How to Set Up Your Project in GanttPRO: Step-by-Step Tutorial
December 11, 2025 / Estimated reading time: 32 minutes

Choosing a project management tool often requires significant time and effort. If you are looking for reliable software to plan tasks, assign resources, track work hours, and handle other essential project needs, it’s time to discover GanttPRO’s full potential.
This powerful online Gantt chart generator is trusted by thousands of users who manage projects of all sizes and complexity.
Here is a step-by-step tutorial to help you seamlessly set up your project in GanttPRO.
Contents:
- Creating a project.
- Creating a project portfolio.
- Project views.
- Project settings.
- Task management.
- Team management.
- Collaboration.
- Resource management.
- Time management.
- Export and sharing.
1. Creating a project
Creating a project in GanttPRO is a simple and fast procedure that doesn’t require specific skills.
It depends on whether you want to create a new project from scratch, apply a ready-made template, or import a ready or partially ready project from an external source. You can also save your project as a template and use it later.
Let’s explore all these options.
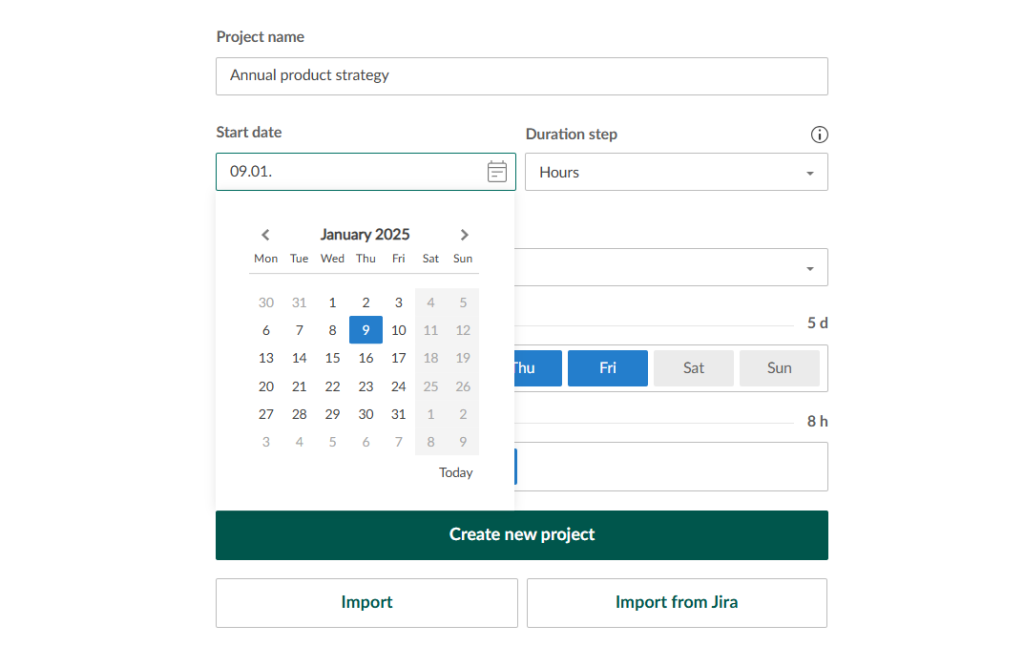
Creating a project in GanttPRO from scratch
The first step to get started is registering with your email address or Microsoft, Google, Facebook, or LinkedIn profile.
If you’re already a GanttPRO user, just log in to your account. Click the Create a new project button located in the top left corner of your page.
You’ll get two options:
- Create a new project.
- Create a project portfolio.
Select the first one and proceed to fill in all necessary details in the appeared settings window.
Creating a project in GanttPRO using pre-made templates
Many users discover the power of easy-to-use templates when they explore tips and tricks to get the most out of GanttPRO.
Whatever your Gantt project type, you’ll find a customizable option to fit your specific goals and requirements.
Available Gantt chart templates cover industries and fields such as:
- IT/software development.
- Construction.
- Manufacturing.
- Education.
- Healthcare.
- Marketing.
- Consulting.
- Professional services.
- Product launch.
- Event planning.
- Retail, and more.
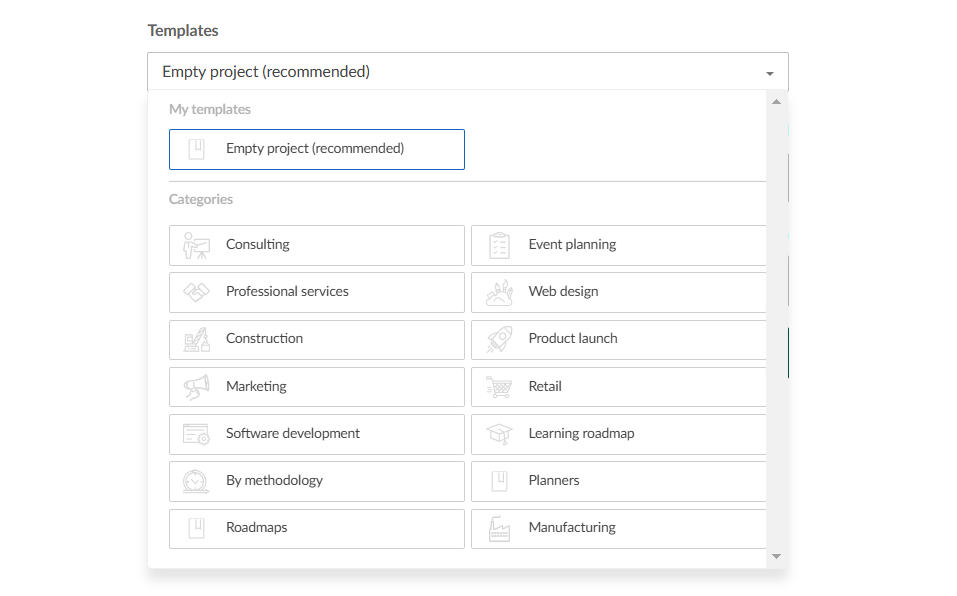
By the way, using templates is one of the things you can do in GanttPRO on a free trial.
Below is how Luis Daniel Matos, a project manager in the small business sector, evaluates the usefulness of such templates:
GanttPRO has allowed me to create Gantt charts for software implementation projects. Additionally, it provided me with very useful templates, so I could have a structure from which to start. I have used GanttPRO frequently and I find it very useful on a daily basis.
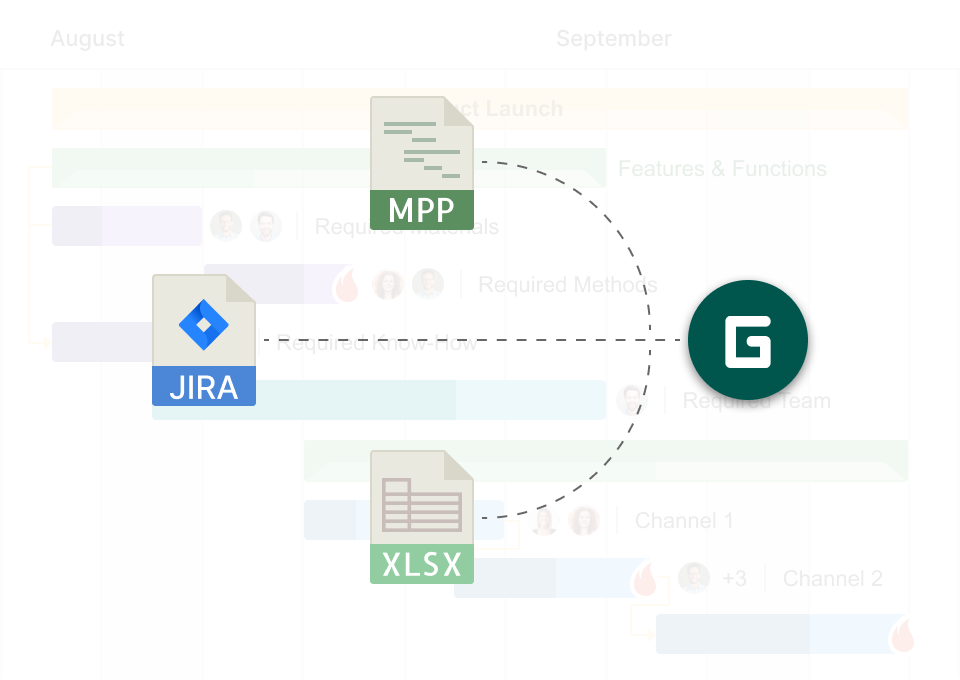
Importing a project in GanttPRO
If you’re already working on a project in Excel or JIRA Cloud Software, you can easily transfer it to the Gantt chart maker. Importing .mpp files from MS Project is also available as GanttPRO is known as the robust free online Microsoft Project MPP viewer. The process is straightforward and hassle-free.
You’ll find the Import button in the bottom-left corner of the Create a new project window. Click on it and upload the desired project.
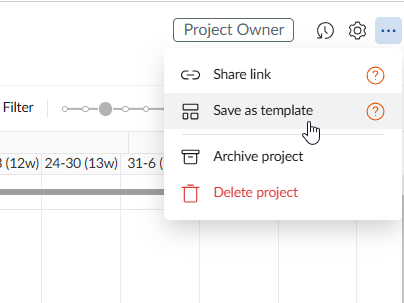
Saving a project as a template
You can effortlessly save your project and reuse it later as a personal template.
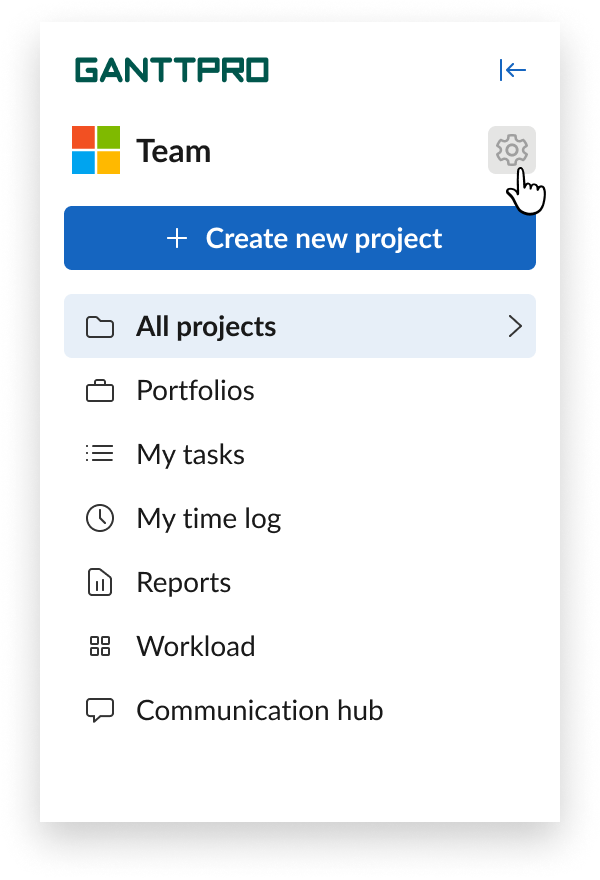
Find the necessary option for this by clicking on the settings icon in the upper right corner of your page.
2. Creating a project portfolio
In GanttPRO, you can also create a project portfolio. This is also one of the features project managers and teams love about GanttPRO. It will allow you to get a comprehensive, high-level overview of multiple projects in one centralized location and work on them without switching between tabs.
This feature will be helpful if you want to quickly check your projects’ health and updates and get access to any details and insights.
Creating a portfolio is accessible if you are an Account Owner, Account Admin, or an Enterprise plan user with a custom role and corresponding permission.
To create it, you need to follow the same path as for creating a project. After clicking the Create a new project button, select the Create a project portfolio option. You’ll be proposed to choose any projects you want to manage in a portfolio.
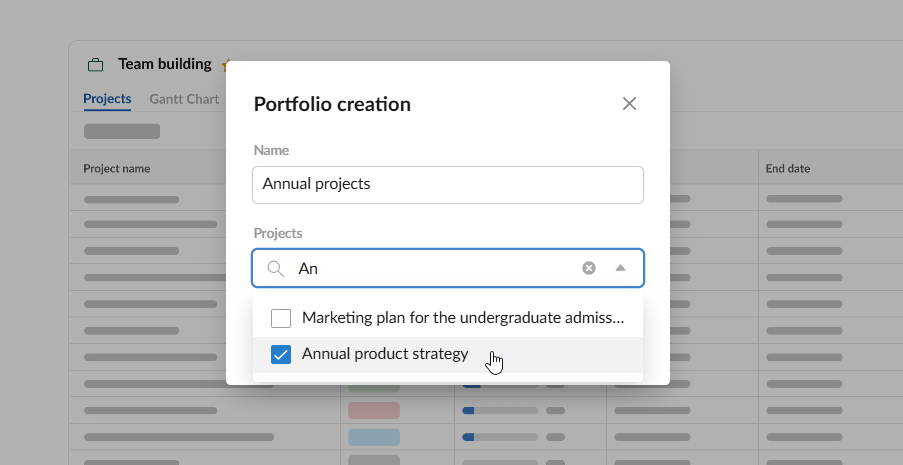
You can work with multiple portfolios in a separate menu in the sidebar. From there, you can create, manage, and delete them.
Inside any portfolio, you’ll find 2 new tabs:
- Projects tab. It provides a comprehensive overview of all projects within the selected portfolio showing real-time details such as name, status, progress, and more. You can easily navigate to any project by clicking the three-dot button to its right.
- Dashboard tab. Resembling the Dashboard section at the project level, this tab displays key information that includes tasks and projects categorized by status, milestones by status, and milestones by date.
3. Project views
A powerful Gantt chart is the core feature of GanttPRO. However, besides this type of project visualization, you can track and manage your tasks with the help of the Board view, List, Calendar, and Dashboard.
All of these views are also among the top use cases GanttPRO users love.

Let’s figure all these views out.
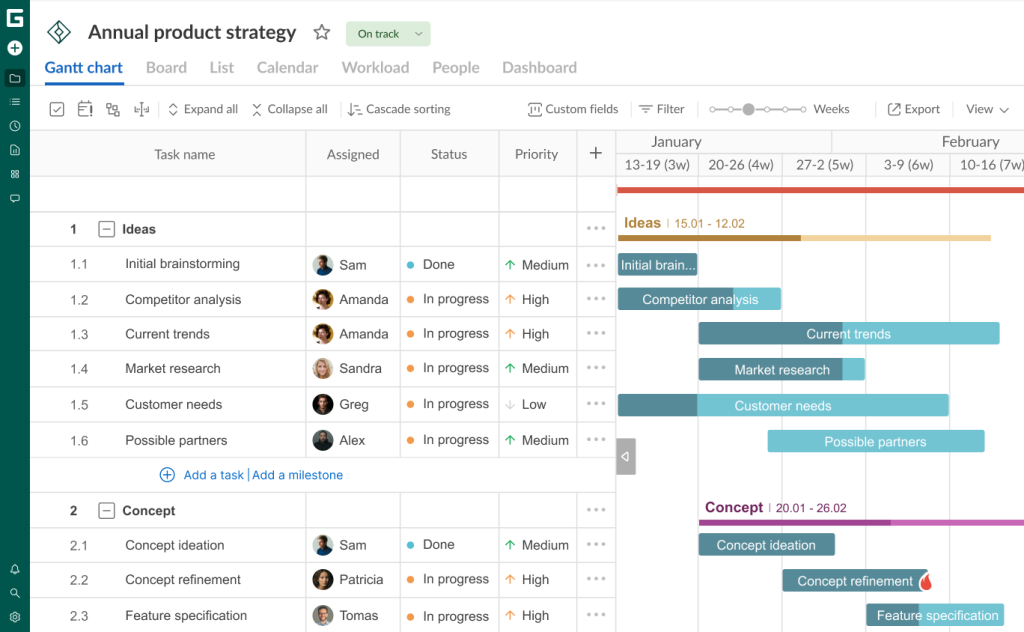
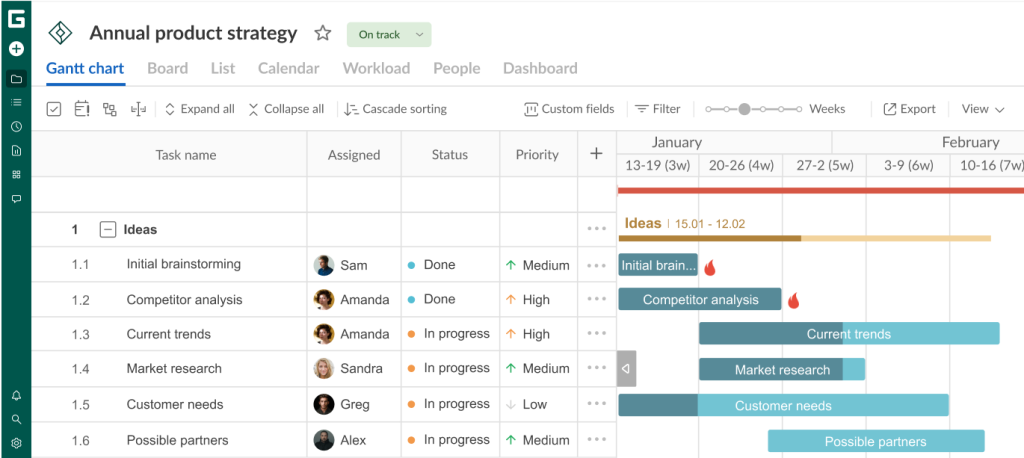
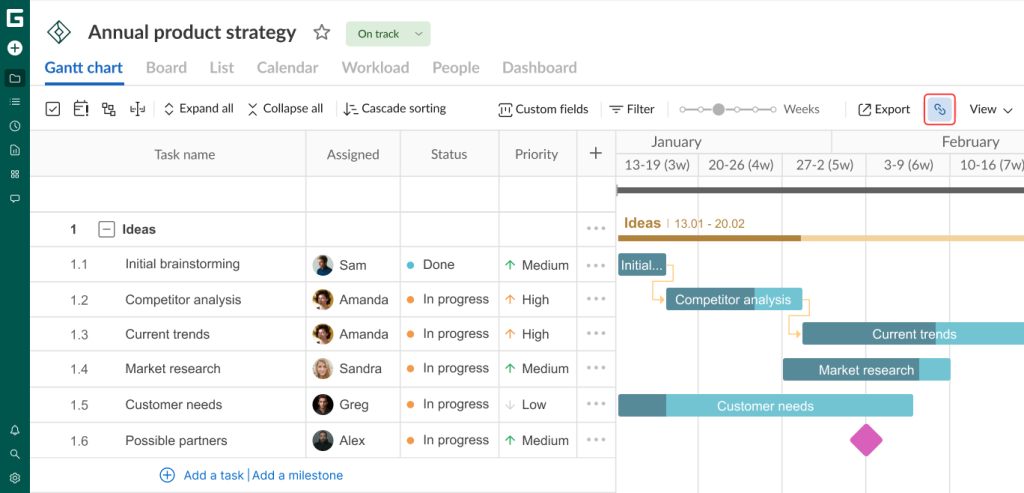
Gantt chart
When you create a project, the Gantt chart view is displayed by default.
This view is the most powerful and visually intuitive way to represent a project in the software. It stands out significantly from similar views offered by competitors. This explains why teams love the Gantt chart in GanttPRO.
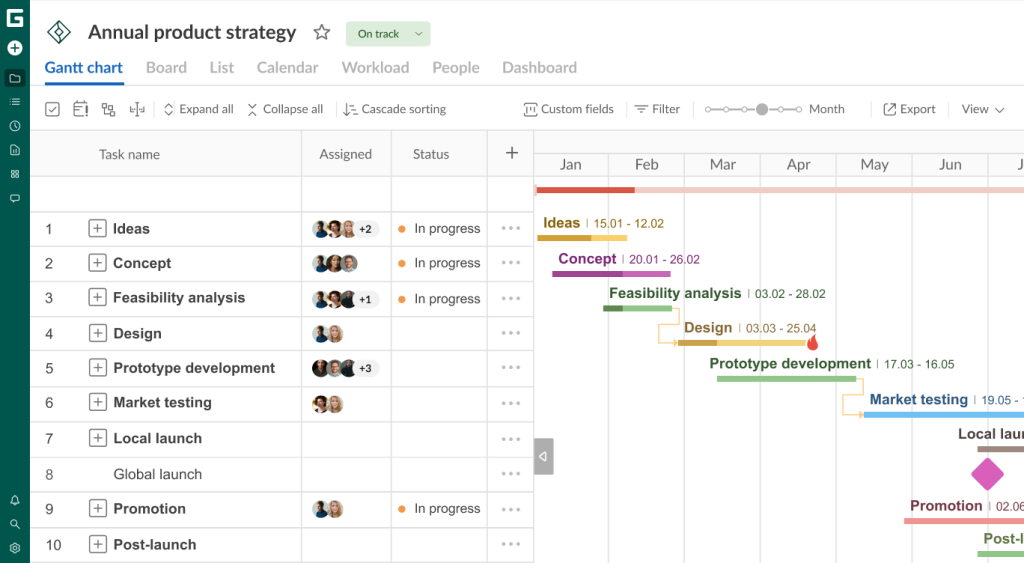
A Gantt chart perfectly suits projects that require detailed scheduling, timeline visualization, and task dependencies. Unlike other types of views that focus just on task statuses or lack a comprehensive overview, the diagram provides a clear representation of task durations, milestones, and interdependencies.
It makes it easier to track progress, identify potential project delays, and adjust schedules proactively. It is particularly valuable for complex and time-sensitive projects where coordination and foresight are critical.
The Gantt chart view in GanttPRO is what Galen Low, a digital project manager and the author of DPM, highlights in his review:
What sets GanttPRO apart is its blend of a sophisticated Gantt Chart view with an accessible user interface, which isn’t always the case with complex project management software. It offers unique value in its blend of task management, resource allocation, and team collaboration features, all centered around a robust Gantt Chart format.
Board
Alternatively, you can get a classical kanban visualization of your project, which is available as the Board view in GanttPRO.
A board contains columns and cards that represent project tasks. Here you can sort tasks by status (open, in progress, done, and closed), priority (highest, high, medium, low, and lowest), assignees, etc.
Using the drag-and-drop functionality, you can move tasks to different columns.
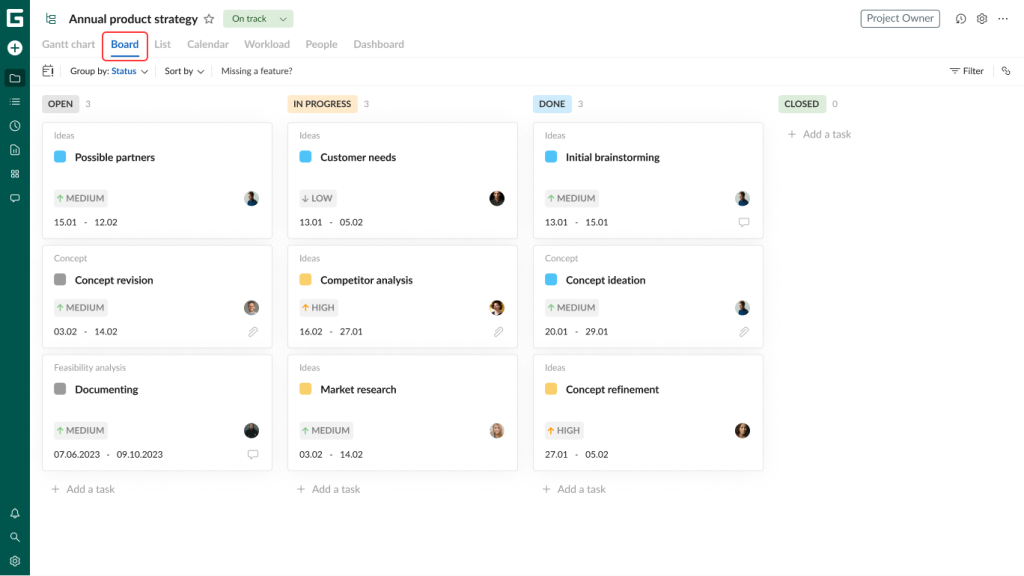
This view provides a workspace for the visualization and organization of project tasks and lets you easily track the progress through your entire project. It’s possible to switch between the Gantt chart and the Board view whenever necessary.
The following video describes this project view in detail.
List
The List view is also a useful option in case you want to display a table to see and work with all your tasks from a project without a Gantt chart.
In this view, you can easily add tasks or milestones by simply clicking on the Add new button.
Selecting multiple tasks to make bulk changes (including deleting several tasks simultaneously) is also available. It’s even possible to identify overdue tasks here.

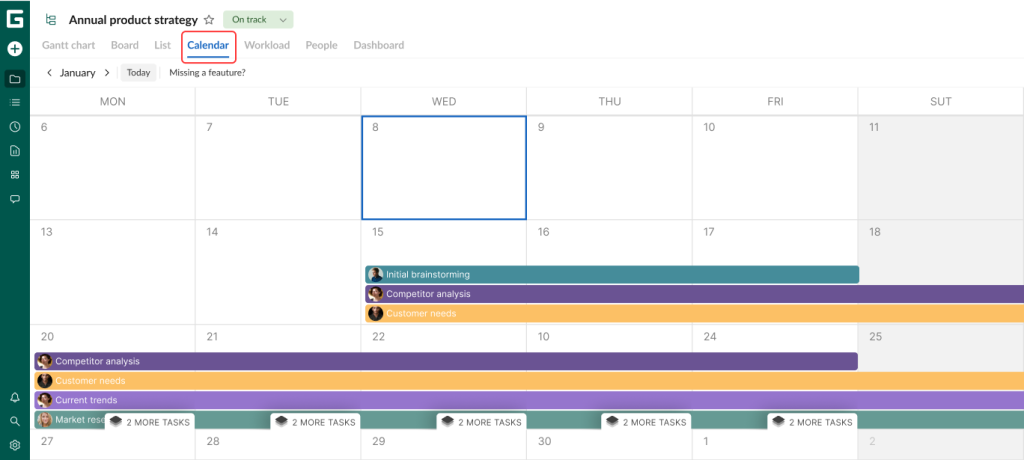
Calendar
GanttPRO makes it easy to switch your project to the Calendar view.
This option seems useful for simplifying detailed day-to-day planning, as a plain alternative to a detailed and more powerful Gantt chart.
Using a convenient calendar, you can track each team member’s tasks and quickly spot any scheduling conflicts or overlaps.
However, remember that this view is limited to tasks within a particular project. It doesn’t show all tasks from your entire account. Moreover, you can’t see milestones here.
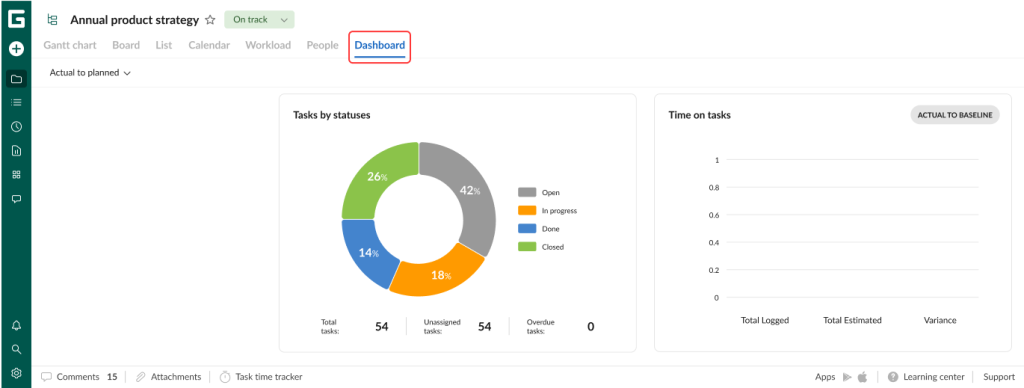
Dashboard
This view allows for overseeing widgets that visualize your key project data updated in real time.
Here you get a quick overview of how a project progresses at any given moment, track its performance against a set baseline, spot potential risks, and ensure that your project remains on budget and on schedule for timely delivery.
Managers often work with several project views when they strive to organize a team’s workflow in GanttPRO even more effectively.
4. Project settings
Before you proceed with the project, let’s figure out what we have in the settings.
In the upper-right corner of your project space, you’ll see the Project settings button. Click on it to customize your project and optimize your workflow for better efficiency.
Here’s what project settings include.
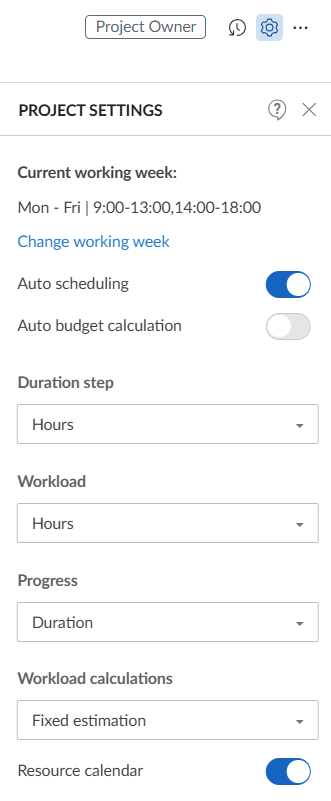
- Current working week. Here you can choose days and hours to customize your working calendar.
- Auto scheduling. This feature helps to recalculate task schedules when you change the start date of your tasks or projects or add dependencies to tasks, which affect the tasks’ start/end dates and durations. The feature is On in the default mode.
- Auto budget calculation. When this option is enabled, costs are estimated automatically based on the resources’ cost values. When it is disabled, you’ll need to enter your budget details manually.
- Duration step. This is a value that is used for calculating time in your project. There are four options: hours, days, weeks, and months. You can change the duration step in your project at any time. Once you change it, each task will have the same step as the whole project.
- Workload. It helps to track the working process of your team members and be sure that nobody overworks or, vice versa, no one is left without tasks. You can choose how to display the workload: in percent or hours.
- Progress. This feature allows you to follow the progress of each task and project on the whole. You can choose between two options: based on duration or average.
- Workload calculations. This setting allows for choosing between 3 ways of duration and estimation calculation: fixed estimation (when assigning a resource to a task, estimation doesn’t change while duration is calculated automatically); fixed duration (when assigning a resource to a task, duration doesn’t change while estimation is calculated automatically); and fixed duration and estimation (when assigning a resource to a task, estimation and duration don’t change while working hours per day are calculated automatically).
- Resource calendar. You can enable it for fixed estimation mode in effort allocation. It takes into account the resource calendar to calculate task duration. When you assign a resource to a task, task duration will be automatically calculated based on its working hours.
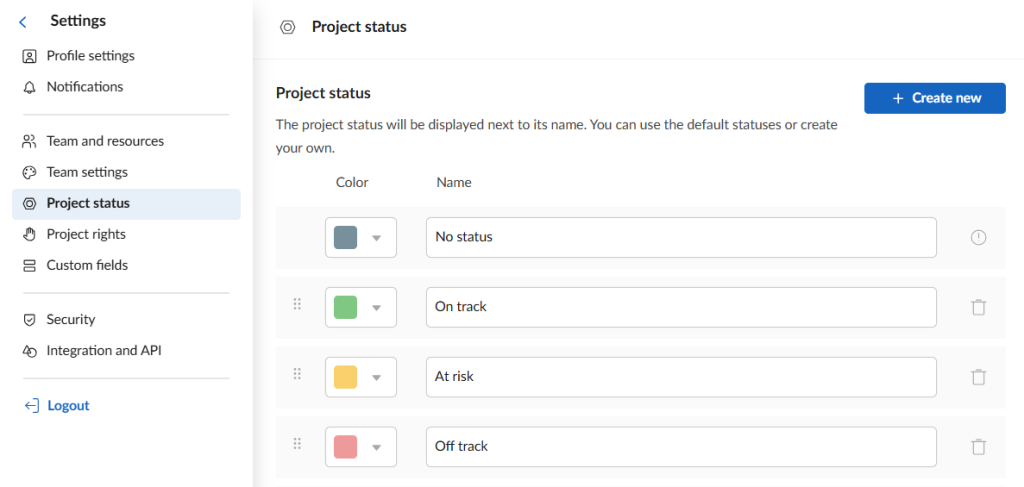
Additionally, you may apply some other useful settings that are located in the top left corner of your page. For example, Project status and Project health.
Set the current status of your project by specifying it right next to its name. Just click on it and select the desired option.
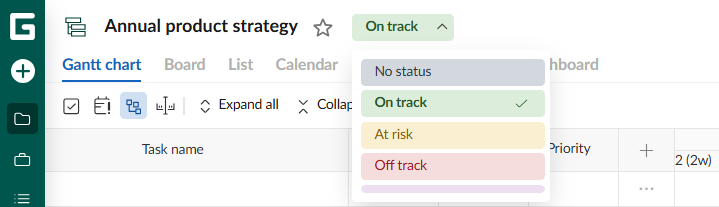
It’s also possible to create your own status in the settings.
To do this, hover above the Create a new project button (above its right side) that is located in the upper left corner. Click the settings icon that appears to get additional options.
There you’ll get a window with different options, including the ability to change/add your project status.
If you want to track your Project health, go to All projects, which is also in the upper left corner. Click on it.
Next to your project name and its status, you will see an information icon. Hover over it and you’ll learn more about the number of your team members, the date of the last change in the project, the number of unassigned tasks, the percentage of project progress, as well as the number of completed, overdue, and slightly overdue tasks.
When all core project settings are tuned, you can move to the next step, related to task management.
5. Task management
Every fulfilled task leads to the entire project’s completion.
In GanttPRO, you can create an unlimited number of tasks for your projects, divide them into smaller chunks, assign them to resources, set dependencies, mark deadlines, and do other actions.
Let’s dive into the details of advanced task management.
Task hierarchy
GanttPRO allows its users to create tasks and subtasks. It’s easy to visualize all activities here along with their start and end dates and duration. You’ll need just a few minutes to structure your timeline logically.
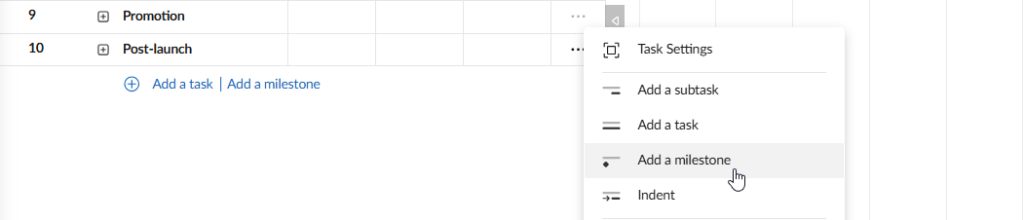
Simply click Add a task at the bottom of your task list.
Alternatively, you can click on the three dots on the right of the task settings line and choose Add a task.

Here you can also add subtasks. Once you do it, the task will turn into a group of tasks. The duration of all subtasks will affect the duration of the whole group.
GanttPRO offers a handy work breakdown structure that helps to achieve the required work hierarchy.
This structure is shown by a convenient numbering system that visualizes all tasks and subtasks in a logical order. You can activate it in the standard fields, which will be described below.
You can change the order of your tasks with a handy drag-and-drop.
The process is so straightforward that you won’t feel lost. Still, watching a quick video can help you master it effortlessly.
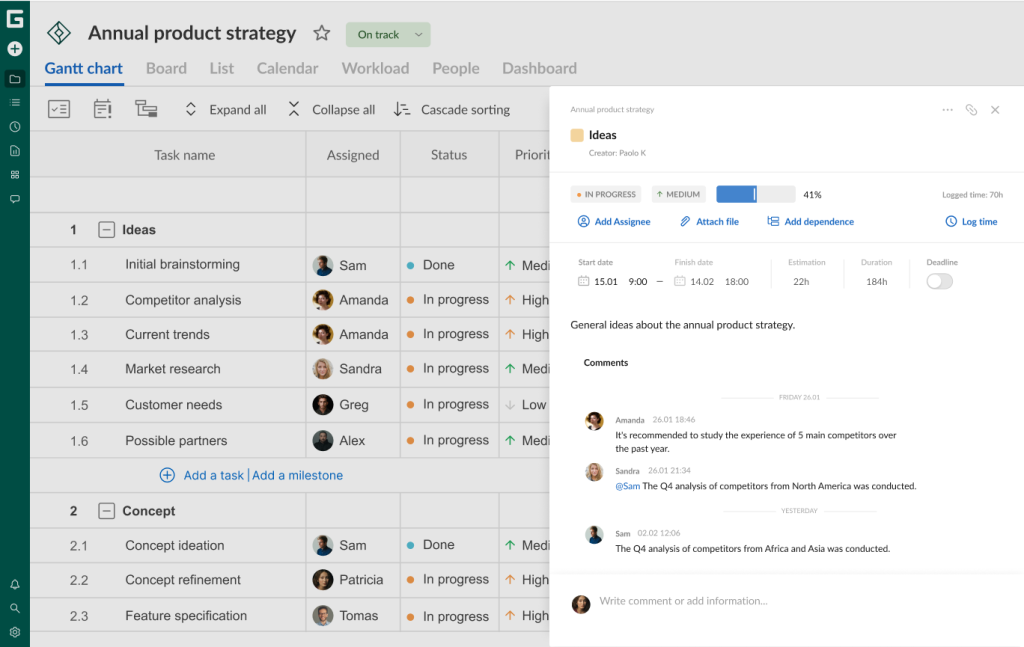
Task settings
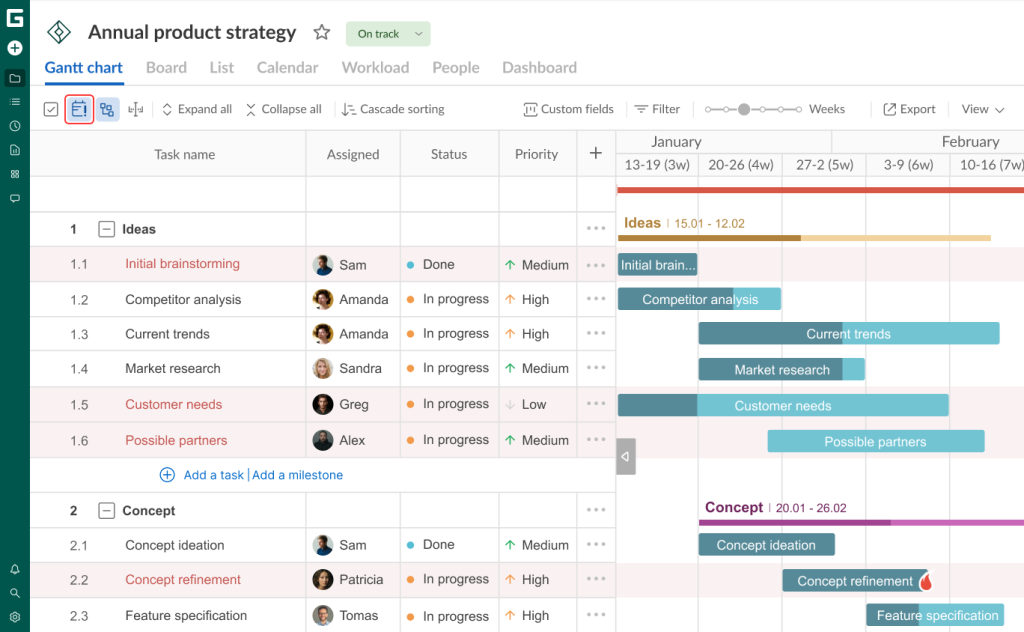
As soon as you create tasks, you can add their start and end dates. It can be done in 2 ways:
- Stretch and move tasks directly on a Gantt chart.
- Change the start and end dates in the corresponding Task settings field.
You can open Task settings:
- By clicking on the three dots on the right side near any task.
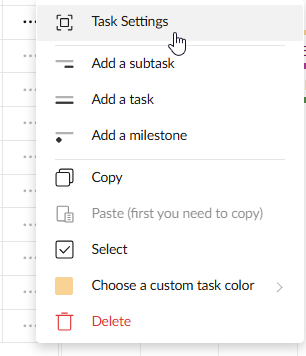
- By double-clicking on a task on your timeline.
Now, it is possible to view and customize every task you need.
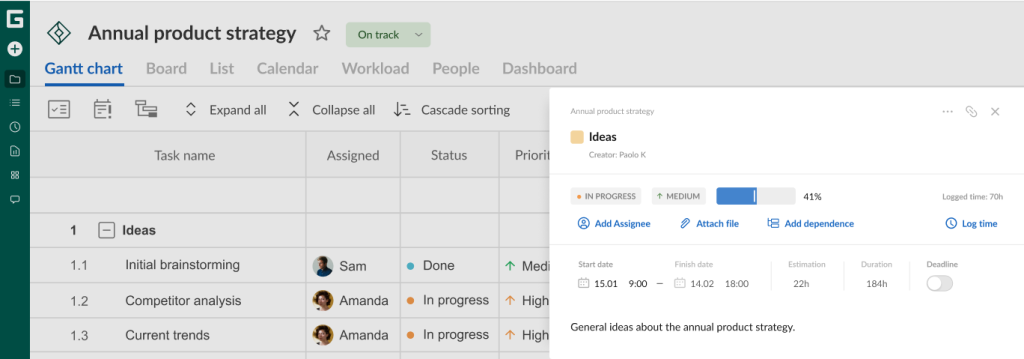
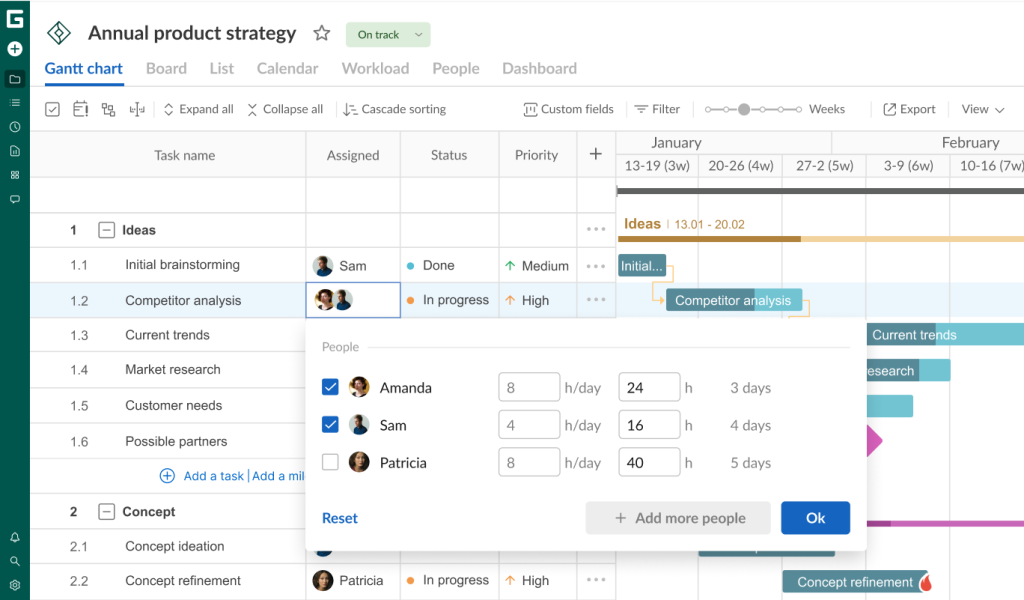
In GanttPRO, you can add the following to tasks:
- Start date.
- End date.
- Assignees.
- Status.
- Priority.
- Description.
- Duration.
- Progress.
- Deadline.
- Estimation.
- Time log.
- Color.
- Files.
- Dependencies.
- Comments.
Task dependencies
Tasks in projects are often interconnected. For instance, the completion date of one task may determine the start date of the next.
GanttPRO allows you to quickly set dependencies using intuitive drag-and-drop. Simply do it with those small circles that appear when you hover over your task bar. Just drag and connect it with a needed task or event.
It’s also possible to configure dependencies directly within the Task settings section.
Here’s how Roberto O., a project manager in the computer software development area, evaluates the capabilities of GanttPRO, including task dependencies:
GanttPRO has been an invaluable tool in my project management journey. I particularly appreciate the ability to create Gantt charts visually, set dependencies, and track progress in real time. The app’s flexibility and customization options allow me to tailor it to my specific needs.
Milestones
Your timeline may contain significant events that are important for the entire project. They are called milestones.
In comparison to tasks, they usually don’t have any duration, as they are just landmarks to measure the progress between project completion.
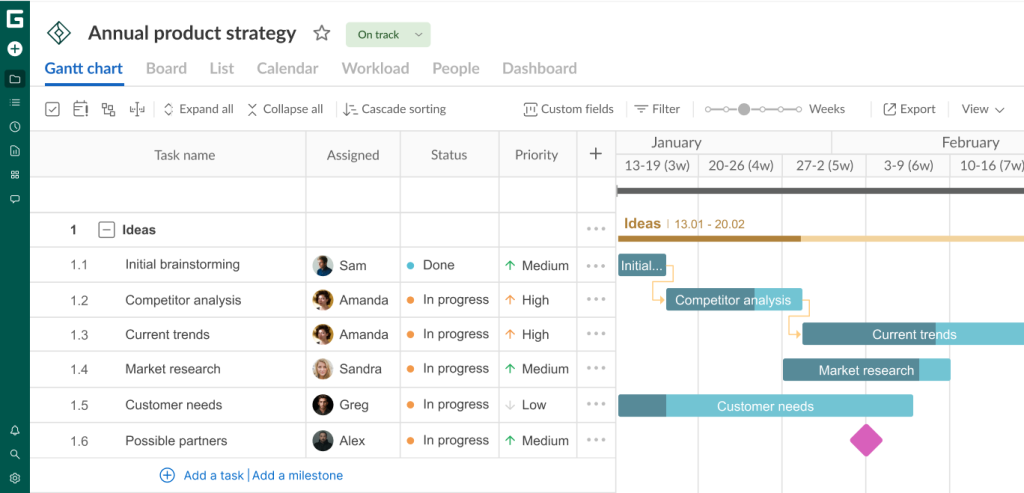
You can see in the previous image how a milestone is visualized on a chart as a diamond-shaped checkpoint.
Add milestones in GanttPRO using the same algorithm as when adding tasks.
In fact, teams that want to learn how to use dependencies and milestones in GanttPRO note the simplicity and ease of these processes.
Overdue tasks
Sometimes, you may have tasks that have been due in the past. However, currently, their progress status is less than 100% or they are defined as Open/In progress.
GanttPRO offers two ways to track overdue tasks.
- You can just click on a corresponding icon in the top left corner of the project grid, and all the overdue tasks will be highlighted in red.
- Alternatively, you can apply Filters to see such activities (the corresponding button is located in the upper right corner).
Critical path
A critical path on a Gantt chart represents the sequence of tasks that must be completed before your project is finished. Such a path defines the shortest possible duration and highlights the activities that impact your work’s completion time.
If there is a delay in one path task, the entire project will be delayed.
In GanttPRO, this feature is turned Off in the default mode.
If you need it, just click on the corresponding icon in the top left corner of your project grid. A critical task (or several) will be colored red.
Experts often note the usefulness of this feature in GanttPRO. One of them is Jill Duffy, the author of PCmag. She claims:
In the Gantt view, a critical path feature highlights in red the sequence of tasks that must be completed for the project to move forward as expected. Project managers often find this feature helpful because it allows them to quickly identify tasks that must not slip, or else others will be in danger of slipping as well.
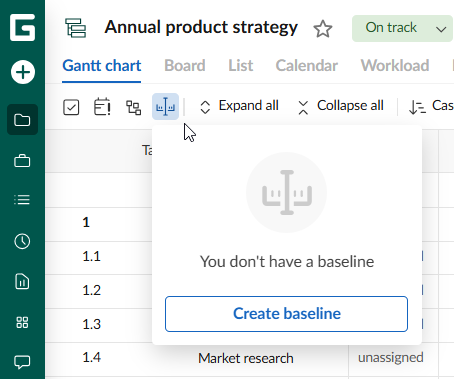
Baseline
The Gantt chart maker allows you to go back to any point in your plan and create a baseline.
You can create an initial version of your project and compare it to the current state to identify whether it is developing as it has been planned.
To create it, also go to the top left corner of your project grid and click on the corresponding icon there.
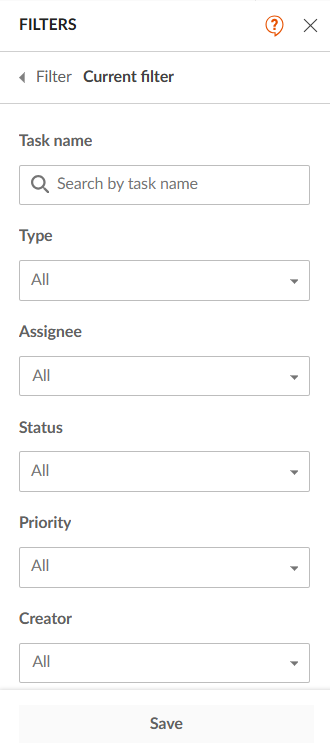
Filters
Click the Filter button located in the upper right corner to sort the tasks in your project by:
- Task name.
- Type.
- Assignee.
- Status.
- Priority.
- Creator.
Moreover, you can save every created filter and use it in the future.
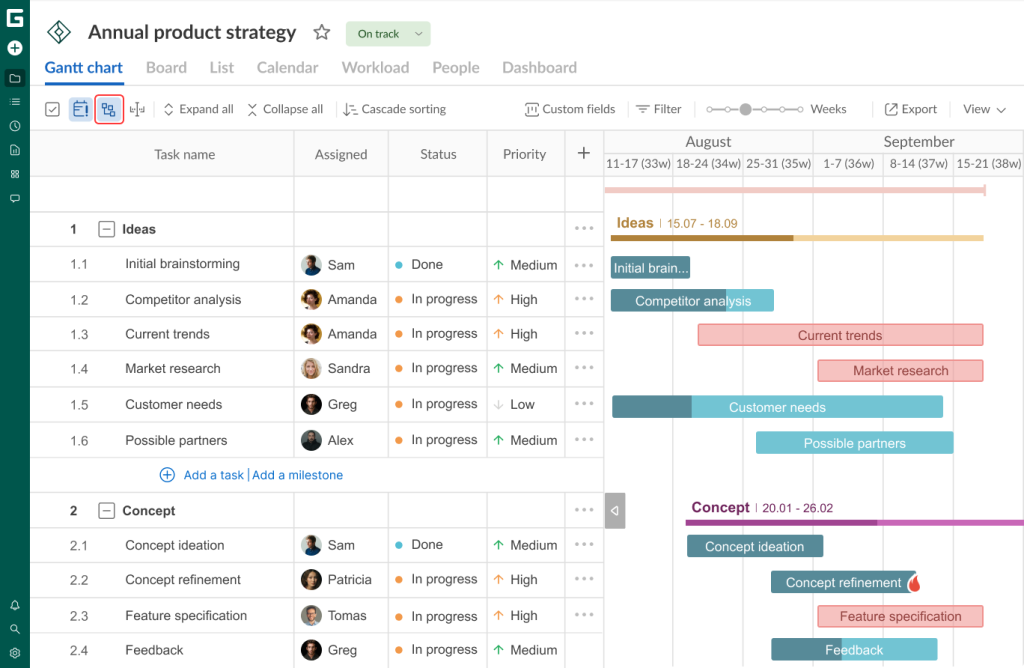
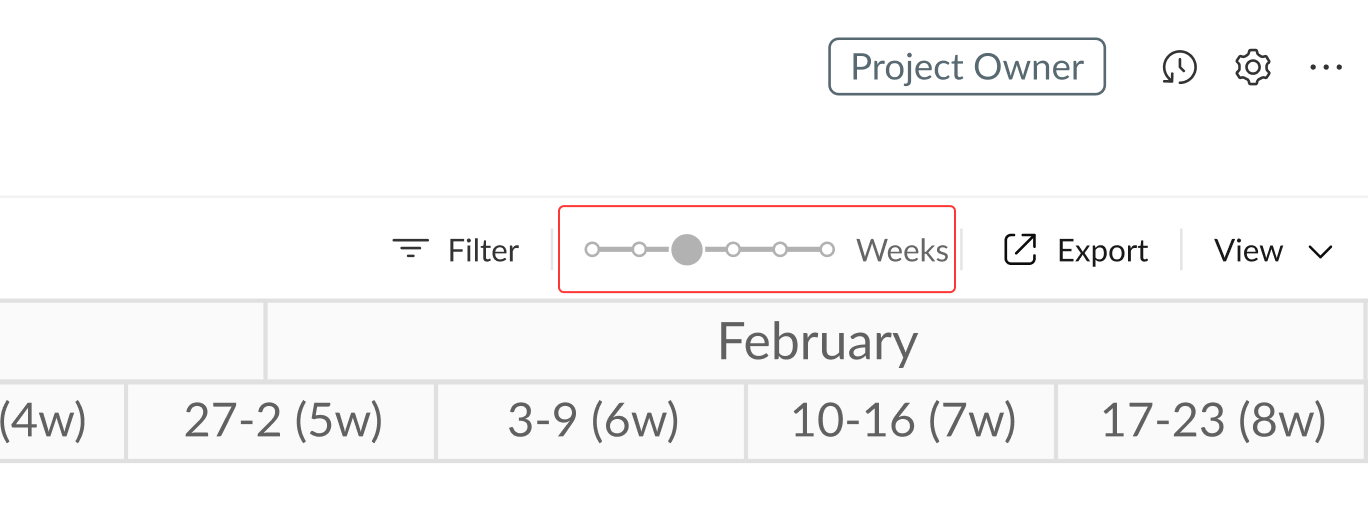
Zoom
At the top right, you can adjust the zoom level of your project timeline, ranging from hours to years.
In this example, this feature allows us to switch between viewing months or weeks on the timeline. It makes it easier to organize tasks and subtasks as needed.
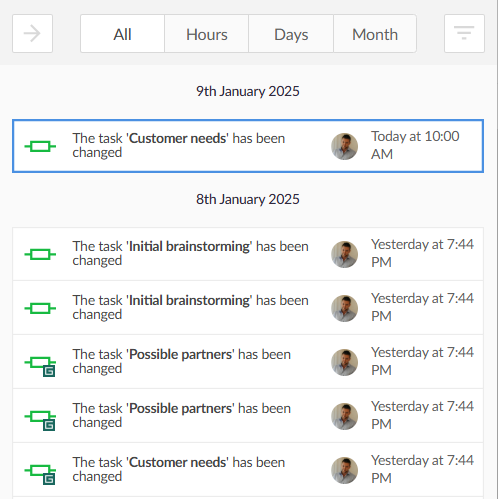
History of changes
In the same area, just above the zoom option, you’ll find an icon that displays the history of changes made to your project.
After clicking on it, you will see a window with all made actions in your project.
In this window, you will also see changes made by anyone from your team. It is all reflected in the activity feed: change itself, an avatar of a person who made it, and the time when it was made.
Furthermore, GanttPRO allows finding the needed point in the project history using the filter. You can sort it out by the event type:
- Task settings.
- Customizable field.
- Priority.
- Status.
- Drag and drop.
- Assignee.
- Project settings.
- Custom days.
- Dependencies.
- Copy and paste.
- Bulk change.
- Cascade sorting.
- Resource conversion.
You can also indicate and apply a time period or choose a user to find a specific point in the project history. Moreover, you can go back to any point in your plan and create a baseline.
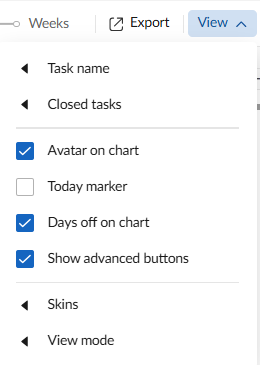
Additional options
These options are personal and not applicable to all users in your team.
You can get them by clicking on the View button which is located in the very top right corner.
Here are the available settings that you can display in your project (or not):
- Task name (its location).
- Closed tasks.
- Avatar on chart
- Today marker.
- Days off on a chart.
- Show advanced buttons.
- Skins.
- View mode.
Standard fields
Now you can manage the standard fields in your project.
By default, you get the Assigned and Status fields. However, you can display additional ones to make project management more efficient.
For example, you can add:
- Resource overload.
- Comments.
- Attachments.
- Work breakdown structure.
- Progress.
- Priority.
- Predecessor.
- Creator.
- Start date.
- End date.
- Duration.
- Creation date.
- Estimation.
- Time log.
- Budget.
- Actual cost.
Сlick on the + sign in the right upper corner of your grid to add or hide fields.
You’ll get the window with two tabs on the right side of your screen. The left tab represents Standard fields.
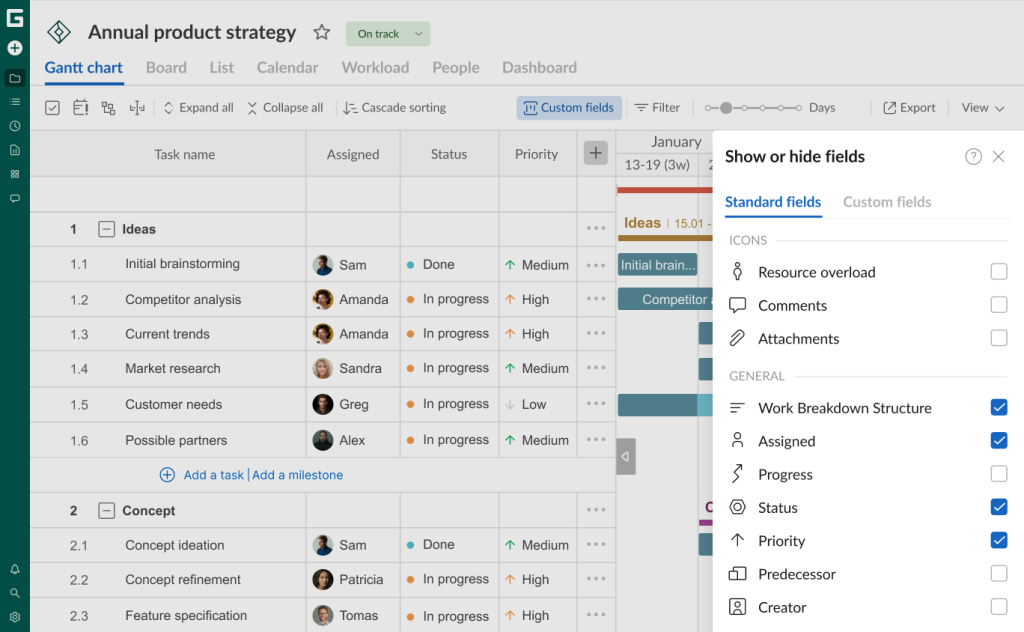
With the drag-and-drop feature, you can change the order of fields.
Custom fields
If you want to create your own fields, also click on the + sign in the right upper corner of your grid. Choose the right tab in the window to work with Custom fields.
Alternatively, you can do it by clicking on the corresponding button in the header left to Filter.

Click on + Create a new field.
Then fill in the field with the task name and choose its type in the drop-down list:
- Text.
- Number.
- Date.
- List.
- Checkbox.
- Color.
- Multiselect.
- People.
- Labels.
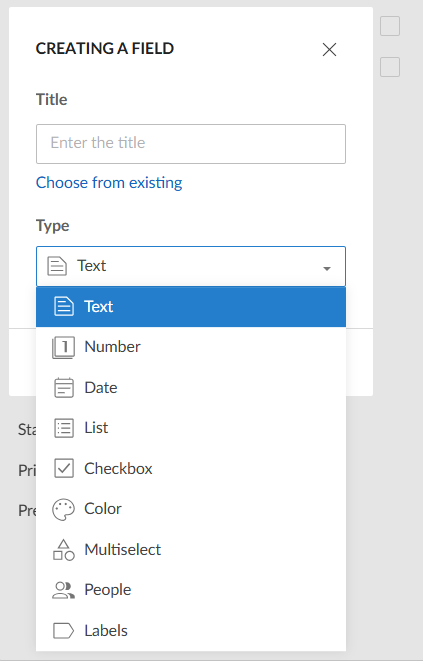
You can create as many custom fields as you need.
Here is what Adam Hirsk, the head of product and R&D at Pacvac, a manufacturer of backpack vacuum cleaners, thinks about custom fields in GanttPRO:

We tried top recommended 5-6 Gantt chart planners and GanttPRO was the one that seemed the most intuitive with good UI, which is the main reason I selected it. I also liked the custom columns feature, this actually makes a big difference when compared to other solutions.
6. Team management
Involving responsible participants in your GanttPRO project is the next essential step.
Below are some quick procedures you should do to realize it.
Inviting team members
You don’t need much time to invite team members and organize their work in GanttPRO. Your project may reflect all people involved in it and all necessary resources required for work management and completion.
This is what Glen Kelly, a program manager, appreciates. He calls GanttPRO the “perfect project management companion”, adding the following:
The software is extremely intuitive and user-friendly. I especially enjoy the collaboration feature where I can invite colleagues to edit tasks and timelines in the live document. I won’t be using any other software in the future. So glad that I found GanttPRO.
There are 2 ways you can invite your team members:
- To your account in general.
- In each project separately.
To attract teammates, go to the Account settings and select the Team and resources tab there. Then press the Invite by email button.
You can type or paste email addresses of new users into the corresponding area.
Explore the details in the following video.
The second way is to invite team members directly from your project.
Select the project you want to invite new users to and go to the People tab. Press the Invite users button. On the Choose from the team tab, you’ll see all users that are in your account.
Add users by selecting related checkboxes. If the required users are not in your account yet, move to the Invite by new email tab. Here, type or paste the email addresses of new users into the corresponding area.
The video below demonstrates how easy it is to do.
Virtual resources
In GanttPRO, you can also invite and manage virtual resources.
Add them to your project and specify their working time units and costs. You can add an unlimited number of virtual resources, regardless of your account plan.
This functionality is also appreciated by many users. One of them is Leif Forsythe, a project scheduler, who admits:
GanttPRO is exactly the product I have been looking for. Being able to create virtual resources has specifically been useful for creating placeholders for subcontractors who haven’t been awarded the work yet. It allows me to account workload for other dependencies.
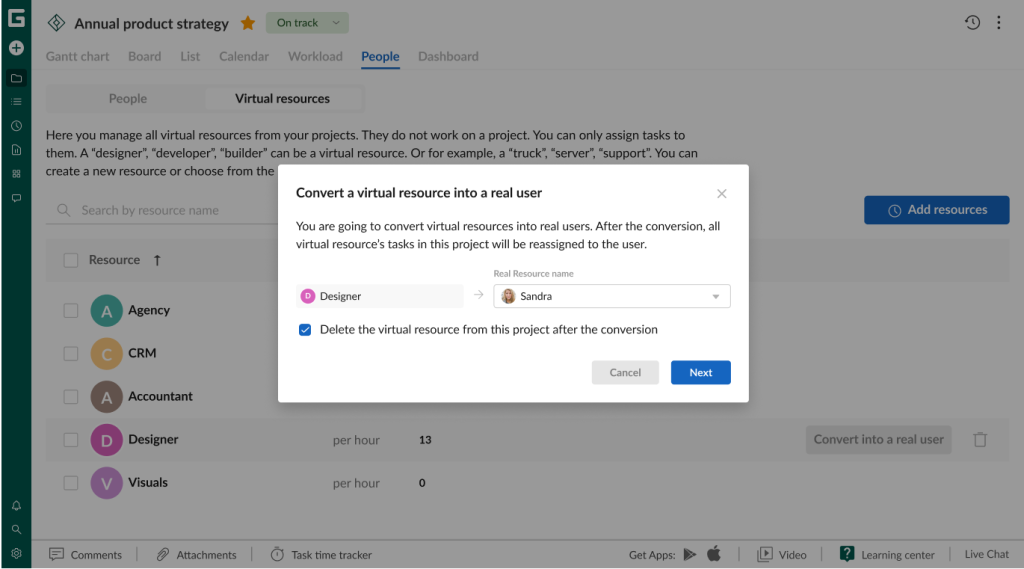
Converting virtual resources into users
The virtual resource conversion feature in GanttPRO allows you to avoid time-consuming manual work and automate the process of adding real users.
You can convert resources in any project. However, it’s only possible to do it within a particular one, and not on the account level.
Go to People and choose Virtual resources. Then select any resource and convert it by clicking Convert into a real user.
After that, you’ll be able to choose real team members to convert.
Task assignment
After you invite new team members or add virtual resources, you can assign tasks to them.
Use the standard field Assigned for this aim.
GanttPRO offers a multi-assign feature that enables you to assign as many team members to a task as needed.
Personal calendars
Another useful feature that the Gantt chart maker offers is the capability to create a personal calendar for each team member and resource.
Click on the Account settings in the bottom left corner and open the Team and resources section.
Then click on a particular user and choose a Personal calendar in the User card.
Here you can customize a work schedule for a certain user, set working hours with 30-minute intervals, and add exceptions such as custom days or days off.
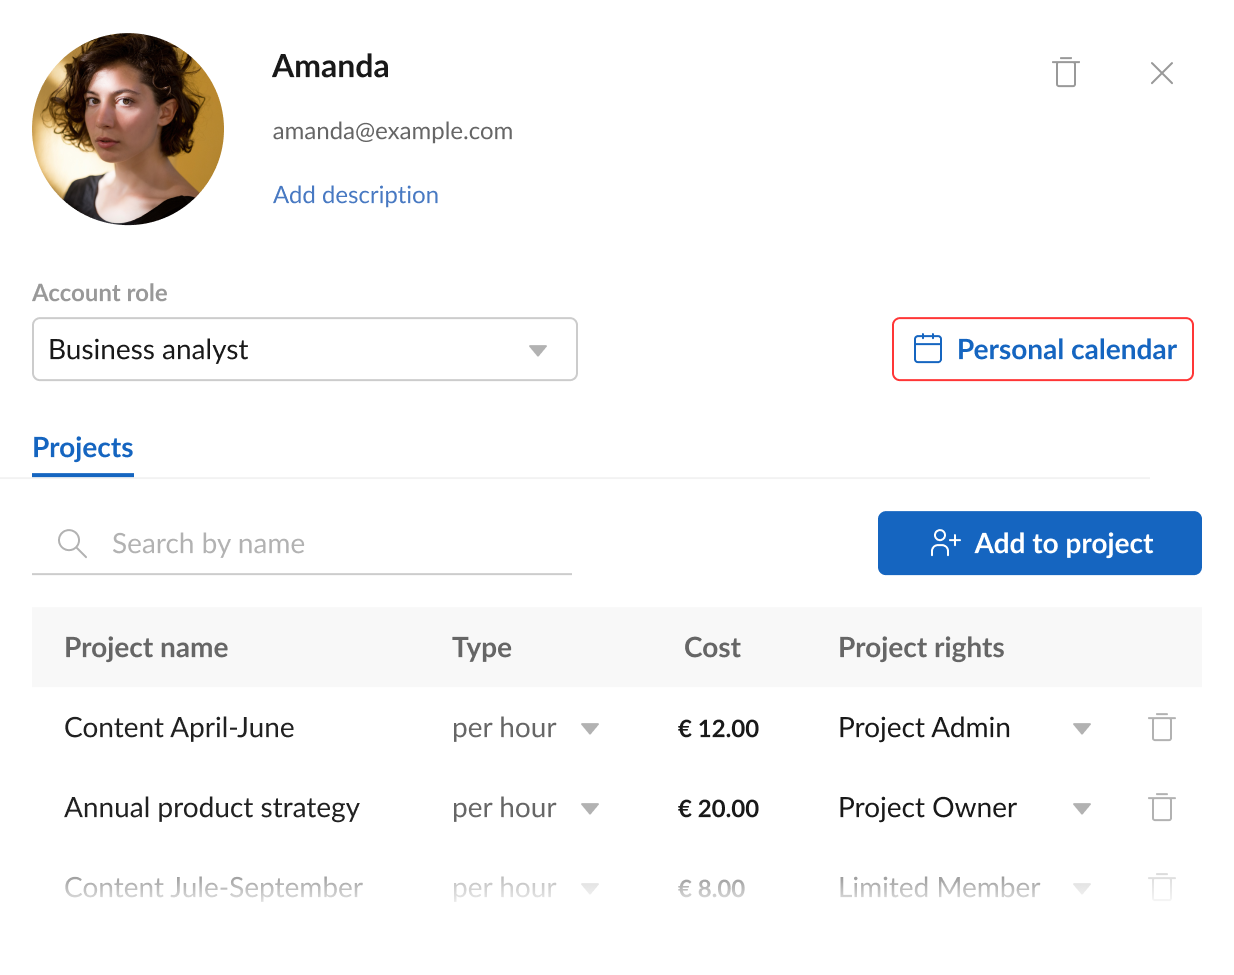
Rights and roles
Project members typically have different capacities and responsibilities. GanttPRO allows you to configure roles and rights for every user.
It will help to ensure that teammates have the appropriate level of access based on their responsibilities. Everyone will be able to focus on their specific tasks without being overwhelmed by unnecessary functionalities and data.
In GanttPRO, there are two levels of permissions:
- Account roles. New users get specific roles when you invite them to your account. These roles are linked to general and high-level capabilities. To configure them, go to Account settings in the lower-left corner. From there, open the Team and resources section and specify the desired roles.
- Project rights. You can also assign rights to specific users. They are configured for actions that they can execute in each project separately. For this, go to the People tab within a specific project and select the appropriate rights for each team member.
7. Collaboration
Effective collaboration is also an important factor in the success of any project.
GanttPRO offers powerful features that streamline team communication and make collaboration effortless.
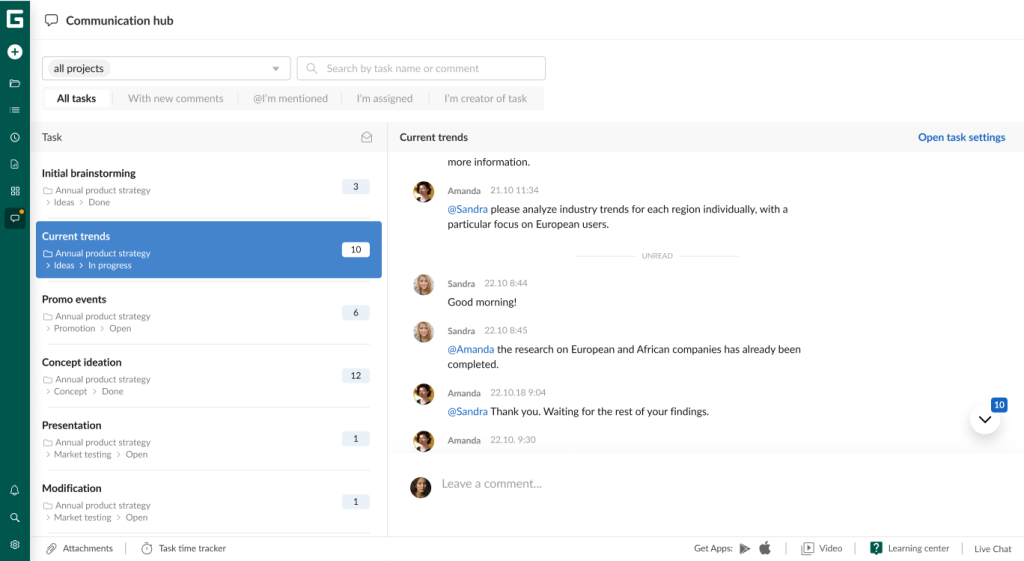
Communication hub
The Communication hub in GanttPRO serves as a centralized space to manage task comments across all projects. Accessible in the left sidebar, it consolidates comments at the account level, eliminating the need to open individual projects to view discussions within specific tasks. All relevant details are readily available in one place.
This hub is designed for project-specific task discussions, not for general conversations. It allows you to track new comments on tasks in real time, ensuring seamless communication.
Within the hub, project participants can view the context and the whole path of any task, filter by a specific project or display all projects, search by task name or comment, and more.
Comments
In GanttPRO, you can also leave comments on every single activity.
The Comments section is located at the bottom of the Task settings window. It’ll help you communicate with your teammates regarding a certain task.
You can view all comments, including who added them and when. It’s also possible to edit or delete your own comments at any time.
Attachments
Attaching files is another simple but useful feature.
You can add files in the Task settings. It is possible to upload them from your PC or drag-and-drop them directly into the Task settings window.
You can also set up integrations with Google Drive or OneDrive cloud storage and attach files from there without uploading them to GanttPRO.
Mentions
As a project user, you can effectively address comments to specific team members by applying mentions.
Simply type the @ sign in the Comments field in the Communication hub or in Task settings. Then, choose a person you want to mention in the drop-down list.
If this person has enabled mentions in notification preferences, they will be notified about the mention in a comment.
Notifications
Real-time notifications help to keep tasks under full control and be aware of everything that is going on in a project.
In GanttPRO, you can apply 3 types of notifications:
- Activity feed notifications.
- Email notifications.
- Push notifications.
You can configure notifications in the account settings and the activity feed. It’s possible to enable or disable sound for your notifications there.
8. Resource management
Project resource management includes strategic planning, allocation, and utilization of all the company’s assets, including people, time, budget, materials, and other essential resources. It ensures optimal asset usage, increased productivity, and reduced waste.
Using professional software like GanttPRO, you have many chances to ensure that your resources will be aligned with your business vision and objectives.
This is confirmed by Diego P., a developer in the information technology field. Among other things, he mentions the effective management of resources in GanttPRO:
My overall experience with GanttPRO has been excellent. It’s a solid platform that has helped me manage my projects more efficiently and stay organized. The planning functionalities, progress tracking, and resource allocation are very useful. I highly recommend it to other project management professionals.
How to use GanttPRO for resource management?
Workload
The workload feature helps you monitor and manage how tasks are distributed among your team members.
You get a visual overview of your team’s workload status:
- Green indicates an optimal workload for a person.
- White signifies that a person has available free time.
- Red highlights an overload situation.
It enables project teams to respond promptly to any situation and allocate workload effectively.
If any team member becomes overloaded with tasks, a red human icon will appear next to their name, signaling the overload.
You can easily see the relevant information by clicking on Workload in the left sidebar menu.
The role of resource workload management in GanttPRO was assessed by Łukasz Wielądek, a project manager at GonnaBe, an advertising agency. Here are his thoughts:

When I have to plan work for a team for the whole week, it’s really easy with GanttPRO. Resource workload is a nice feature because you can see how many hours a person has and adjust the workload to these hours.
Budget tracking
With effective budget tracking, you can be sure that your team stays within the predefined finances. It can also lead to a reduction in the overall project cost.
GanttPRO, as powerful cost estimating software, allows you to choose one of two cost calculation methods that better fits the specific requirements of your project:
- Manual budget calculation. It will suit if you prefer to control and enter budget details yourself and need to adjust costs frequently.
- Automatic budget calculation. This option looks appropriate for quicker setup and management. It automatically estimates costs based on the resources’ cost values.
The budget calculation mode is configured separately for each project and does not apply universally to all projects within your account.
Time log
The Time log feature allows you to record the exact time spent on completing tasks, providing valuable insights for identifying ways to enhance efficiency.
You can easily track time in a real moment by starting a timer and then turning it off when needed. Alternatively, you can enter time after the fact, without a timer.
There are 3 ways to log time in GanttPRO:
- From the Time log field in standard fields.
- From the Time log section in Task settings.
- From the Task time tracker menu located at the bottom of the app window.
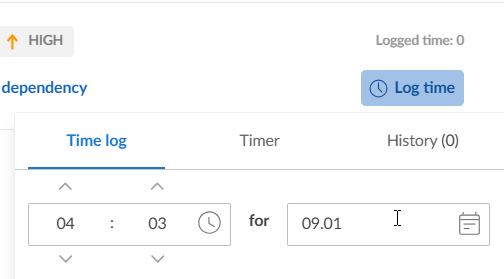
You can log time for any visible task, regardless of task assignment.
This flexibility enables time tracking for virtual resources or on behalf of other team members.
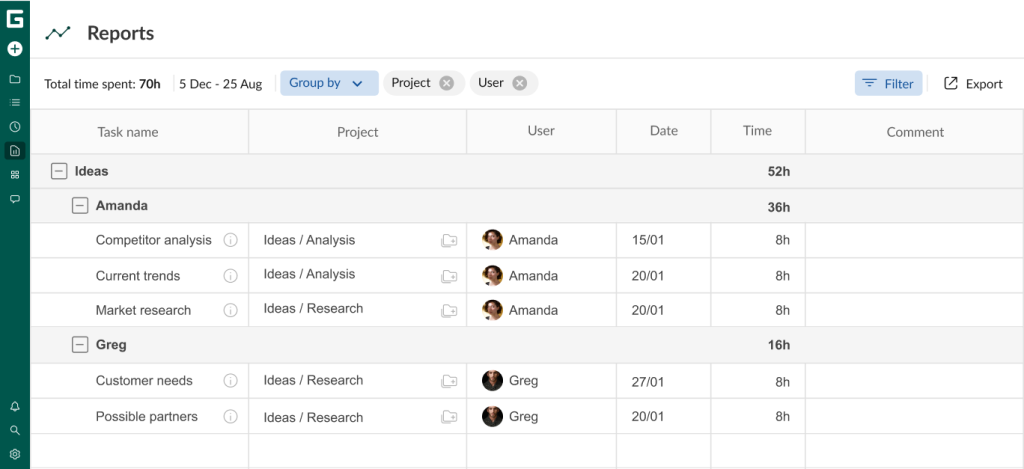
Reports
This feature facilitates the gathering of information related to time, progress, and budget.
Reports enable you to evaluate results, identify optimization opportunities, and make informed decisions for future planning.
Best of all, there’s no need for manual entry — everything is automatically collected in real time.
Simply select the data you want to include in the report, and it’s ready. This streamlined process saves you significant time and effort.
GanttPRO allows you to use reports that are grouped into three main categories:
- Progress.
- Budget.
- Time on tasks.
You can create reports by choosing between the Graphic and Table options. However, not all reports are available in the table view.
Here’s what a Time on tasks report looks like.
9. Time management
Time management is essential for most projects as it helps improve and optimize workflows when necessary.
Below are the capabilities of the software related to effective time management.
Duration and estimation
Estimation is the number of hours required for a task to be completed. Duration means the period in which your certain task should be completed.
For example, a task may take 15 hours (its estimation) in total. However, it’ll be completed within 15 days (its duration).
You can easily enable or disable duration and estimation for a particular task in standard fields.
Deadlines
Meeting deadlines is essential, whether it’s for a small task or the entire project. Every achieved deadline indicates that your project is on track, while even minor delays can threaten its overall success.
To ensure deadlines are met, click on a certain task. In the Task settings window that appears, enable Deadline and set the desired date.
Once a deadline is set, a flame sign will appear on the right side of your task, serving as a visual reminder.
The ability to work with deadlines in GanttPRO is highly valued by many users, including Odette Almaguer, who notes:
I love how intuitive GanttPRO is for project management. Its Gantt chart functionality makes it incredibly easy to set deadlines, allocate tasks, and visualize progress. The drag-and-drop interface is a huge time-saver, especially when project priorities change
Task time tracker
Tracking time spent on tasks by your team members is also important. This is a great way to know (not guess) who worked on what task and for how long, up to minutes.
You can start the timer in real time or log it afterward.
Just open any task. In the settings, choose the way to track the time.
10. Export and sharing
What if you need to collaborate with external stakeholders in GanttPRO?
Exporting and sharing projects are also crucial features required by many managers and teams.
Export
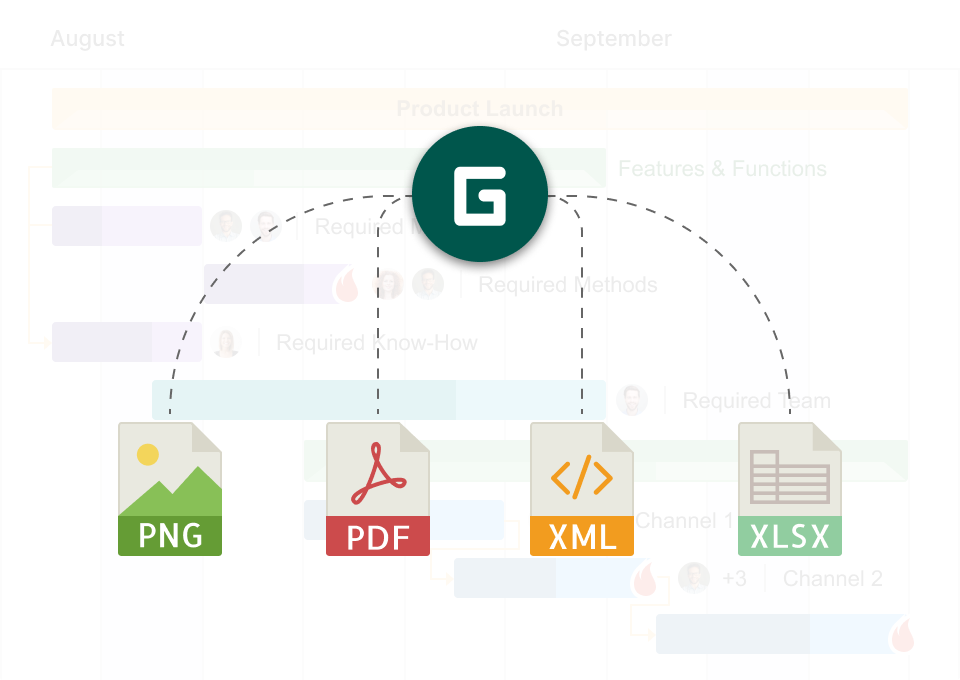
Quick export will help you work with your project data offline or use it for other activities. It will let you include a project in presentations, reports, or analyses.
In GanttPRO, you can export project data in PDF, PNG, XLSX, or XML formats.
Besides choosing the format, you can also:
- Select a paper size.
- Choose an orientation.
- Apply a filter.
- Change the zoom.
- Turn on/off the critical path, Today marker, and workload.
- Tune field settings.
Besides projects, you can export portfolios, workloads, task lists, reports, and time logs here.
Sharing
Sharing your project with team members and other stakeholders will help you keep them informed at any time.
In GanttPRO, you can easily generate one or more links to your project for the Gantt chart view and share them with anyone you want.
To do it, choose the Share link icon, which is located in the upper right corner.
You can click on the Create link button straight away or apply some extra settings there, including a description, filter, password, and snapshot. It’s possible to share links with static or dynamic displays of project states.
Here’s a quick video with details.
You can also manage all your already created links, including link copying, deactivation, and deletion.
Additionally, you can share a private link for the Board view.

This allows you to present your work to your audience in an alternative format. Here, the same options as with a shared Gantt chart are available. You can create a link without any settings or apply some or all of them.
You can learn more about this capability in the video about the Board view shared above (starting at 1:52).
Well, it seems that with these powerful features, GanttPRO is ready to support your journey toward quick and seamless success.
However, the capabilities of this software go far beyond what has been outlined here. Rest assured, GanttPRO continues to evolve and improve, driven by market trends and user feedback.
Set up your project in GanttPRO and achieve project management excellence
If you are looking for a reliable tool for quality task management, project planning, resource allocation, time tracking, budget control, and enhanced team collaboration, GanttPRO is a great choice.
Use this step-by-step guide to work with the Gantt chart creator effortlessly. Refer to it anytime to enjoy seamless project management and unlock the full potential of this powerful tool.
Advanced project management with the robust Gantt chart maker
Plan and manage projects effectively. All in one place.
Sign up for freeFrequently asked questions about setting a project in GanttPRO
-
Yes, GanttPRO is an easy to use project management and collaboration tool. Despite its robust capabilities and variety of application areas, this Gantt chart maker remains intuitive and clear for both beginners and experienced project managers. It offers a structured timeline that makes it simple to visualize project progress and deadlines. Additionally, GanttPRO provides pre-made templates that simplify the planning process for new users.
-
GanttPRO helps project teams plan, schedule, and track their work using an online Gantt chart. It allows for creating tasks, setting dependencies, highlighting milestones, and allocating resources efficiently. With the help of this platform, teams can collaborate in real time by leaving comments, attaching files, and updating task statuses. It is suitable for various industries, from IT to construction. Overall, GanttPRO simplifies project planning and execution, ensuring better organization and productivity.
-
GanttPRO is used for project planning, work management, and tracking progress with an interactive Gantt chart. It helps teams organize tasks, set deadlines, mark milestones, and manage dependencies to ensure smooth project execution. The platform is also applied for resource allocation. It allows managers to assign team members, track workloads, and optimize efficiency. Many businesses use GanttPRO collaboration features like task comments, file attachments, and status updates.
Read also
Join 1M+ project managers!
Create Gantt charts in minutes with GanttPRO and reduce time spent on managing tasks by 40%
Try for freeNo credit cards required. No obligation.
Hi, the tool looks really nice, but it has some bugs that makes it nearly inpossible to work with. 1. The column actions has dissapeared, so i cant create any milestones 2. If i set the name of the task and press enter nothing happens, then if i click a new task the origin tasks name is not saved, so i need to reenter 3. On Firefox latest buildt i cant see any triangle 4. Sometimes i cant shift either a task on the left and no on the right side via drag and drop Hope to see a bug… Read more »
Thank you so much for your feedback! We’ll do our best to fix these issues in the near updates.
Lovely webapp–I’m looking forward to more features.
I think it’s a mistake to require a sign-in for a shared link even for viewing only. I would not send anyone a shared link that required them to set up an account.
Excellent instructions. Well written and easy to skim read. Great job.
Paul,
Thank you so much for such a warm feedback 🙂
Zoom in is not working! It would be great that you fix that. Thanks!
We are extremely sorry if you’ve faced some temporary failures. Please, contact us if this function is still out of service.
Thanks great instructions, was unsure what I was doing before I read them.
Sonia,
You are mostly welcome 🙂
Let us know if you have any questions.
Hey guys, i’m leaving this here since there doesn’t seem to be any real support options. I upgraded so i can use the template feature and unlimited projects features. I’ve got an issue with this setup and your instructions: 1. You say we can have multiple projects on one screen so as to waterfall the projects and better plan multiple projects back to back. I can see how that can be done. 2. You also say you can make projects as templates. I see how that can be done – but not really. Project templates can only be saved at… Read more »
Hi, Craig! Thank you so much for your feedback about the application. Yes, at the moment the template that you personally create can only be added if you add a new project in a separate tab, not in one and the same one. What you wrote to us is a very valid feature and we’ll implement it as soon as possible in one our next releases. Meanwhile, we’ll surely make a refund for you. But we will keep you informed on this and would really like you to come back to us once this functionality is added to the app.… Read more »
Can anyone help with step 7. I would like to know how to remove dependancies.
Hello. Click once on the dependency arrow to “highlight” it. Then press delete.
How do you duplicate an existing project?
How do you duplicate and existing project?
Thanks for the question 🙂
Currently this feature isn’t available but we plan tp add it in our future updates.
Hello. Any way to add forced days off, e.g. holidays or travels ?
Thank you for your question.
Sure, you can set the days off, holidays, vacations, etc. in the Cusrom Calendar in Project Settings.
Hello Thanks for all information, howe do you change the color of the task ?
You are welcome 🙂
Currently the colors customisation feature isn’t available in GanttPRO. However a huge redesign will be launched next month and this feature will be added too.
I see nothing pertaining to how to change the date format. As it is, this would be useless to me. In the instructions above, the date is in a format I could use. As I open Ganttpro, it is defaulting to dd/mm/yy. Help!
Thank you for your question.
You can change the date format in the Profile Settings at the right top of the page.
Great article, thanks. Saved me a day, making Gantt chart