How to Organize Your Team’s Workflow in GanttPRO
November 11, 2025 / Estimated reading time: 16 minutes

A well-organized team workflow with clear processes and defined responsibilities is essential for driving sustainable business growth and operational efficiency.
When employees’ activities are clearly managed, work moves forward without interruptions and confusion. Otherwise, it’s easy to lose track and stop understanding what to do next.
With a properly built workflow, you’ll establish transparency in your team and create a clear structure of tasks.
One of the key elements of success here is using a robust online tool like GanttPRO.
The Gantt chart software ensures that all team processes are properly planned, reviewed, and approved at each stage.
In this article, you will explore 7 steps for organizing a workflow in GanttPRO that will engage your entire team and boost their collaboration efficiency.
Contents:
- Choose an appropriate plan.
- Create a project.
- Invite team members.
- Add virtual resources if needed.
- Create and assign tasks.
- Collaborate with your team in real time.
- Share your project with third parties.
1. Choose an appropriate plan
Before you start planning and organizing team workflow processes in GanttPRO, it’s essential to explore available pricing plans. This is the foundation on which you will build your further strategy.
Each team is unique: some are just starting their project management journey, while others are already working on large-scale projects with dozens of participants. For some, the primary focus is visualizing deadlines. For others — resource control, budgets, or reporting.
GanttPRO offers plans that take into account these differences. Therefore, you can understand in advance what capabilities you need.
This is highly appreciated by Firouz Shahriari, one of GanttPRO users:
GanttPRO is a reliable and user-friendly tool that significantly enhances project planning and execution. Its pricing is reasonable for the value it offers, especially for small to medium-sized teams looking for a robust project management solution.
There are four plans you may consider in GanttPRO:
- Core. It suits smaller teams that look for clear task visualization and basic project management features.
- Advanced. It looks appropriate if a manager wants to streamline teamwork and automate project planning.
- Business. It looks good for teams and companies that need to run comprehensive project portfolios and optimize resource workload.
- Enterprise. This plan is for departments and companies that look for advanced security, control, and support options.
For your convenience, GanttPRO offers a free trial that gives you access to all premium features, including advanced workflow management.
Core: starts at $7 user/month (billed annually).
Advanced: starts at $10 user/month (billed annually).
Business: starts at $17 user/month (billed annually).
Enterprise: custom price.
Free trial: 14 days.
To start working in GanttPRO, register a new account using an email address or a Microsoft, Google, LinkedIn, or Facebook profile.
If you are already familiar with the software, simply log in to your account. After that, you can select a plan and work within it.
Although you can collaborate with a team on all GanttPRO plans, don’t treat this step as a mere formality. The available features, task management flexibility, the degree of interaction in your team, and the ability to scale projects depend on the chosen option.
Exploring the plans will help you avoid unnecessary restrictions in the process of work or, conversely, overpayments for options that you will not need.
The video below will help you choose the best option.
By the way, if you want to dive deeper into the world of GanttPRO, we recommend reading the following blog posts:
- How to collaborate with external stakeholders in GanttPRO.
- How to set up your project in GanttPRO: step-by-step tutorial.
- Tips and tricks for getting the most out of GanttPRO.
- Top 10 features project managers and teams love about GanttPRO.
- 6 top use cases GanttPRO users love.
- What you can do in GanttPRO on a free trial.
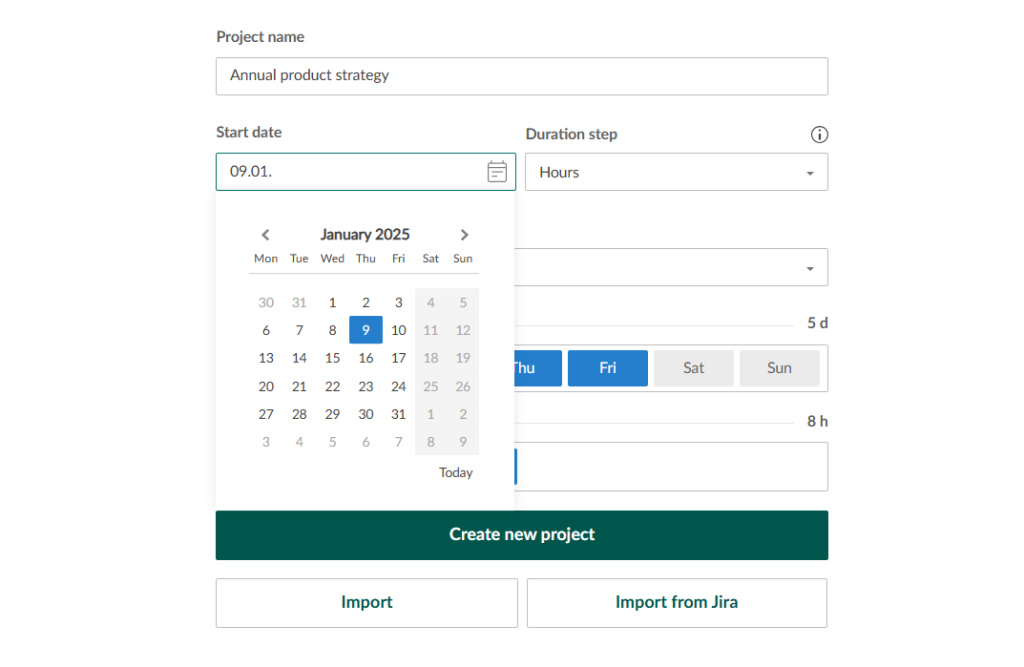
2. Create a project
A new project in GanttPRO begins with a simple but significant creation procedure.
This process is designed to be quick and efficient, regardless of your experience level in project management.
You can create a new project from scratch, use a pre-designed template, or import a project from an external source. In addition to these actions, you can save your project as a template for further use.
- Creating a project from scratch. To start, click the Create a new project button located in the upper left corner of your page. You will see two options in the settings window: Create a new project and Create a project portfolio. Select the first one and fill in all the necessary data.
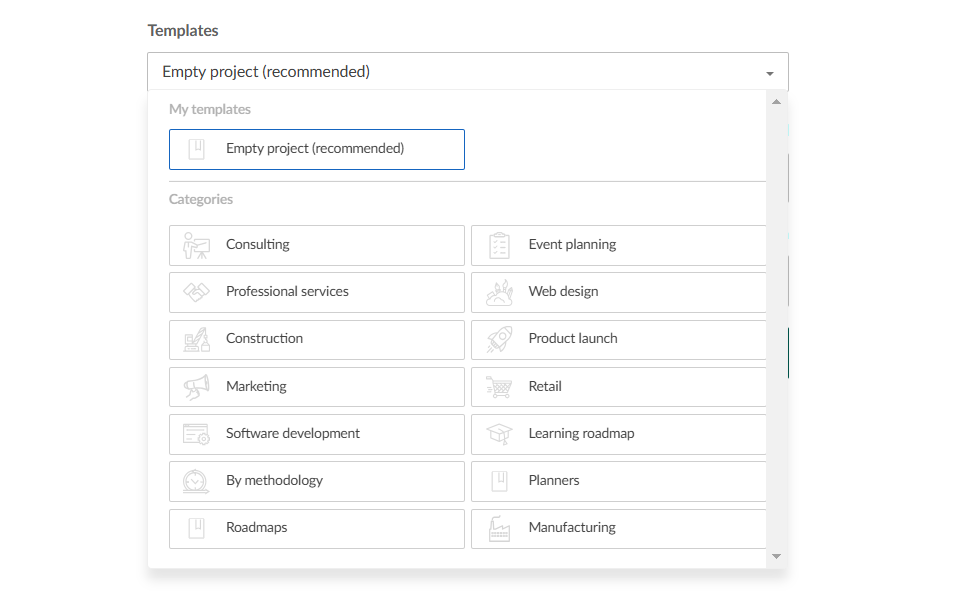
- Creating a project using a template. If you don’t want to start from scratch, choose a ready-made option from the available Gantt chart templates. They cover any needs, from creating a top-notch project plan to visualizing a global production process. These templates can be used in a wide range of modern industries and areas, including IT/software development, marketing, manufacturing, construction, healthcare, education, and more. You will see this option in a drop-down list when you click Create a new project.
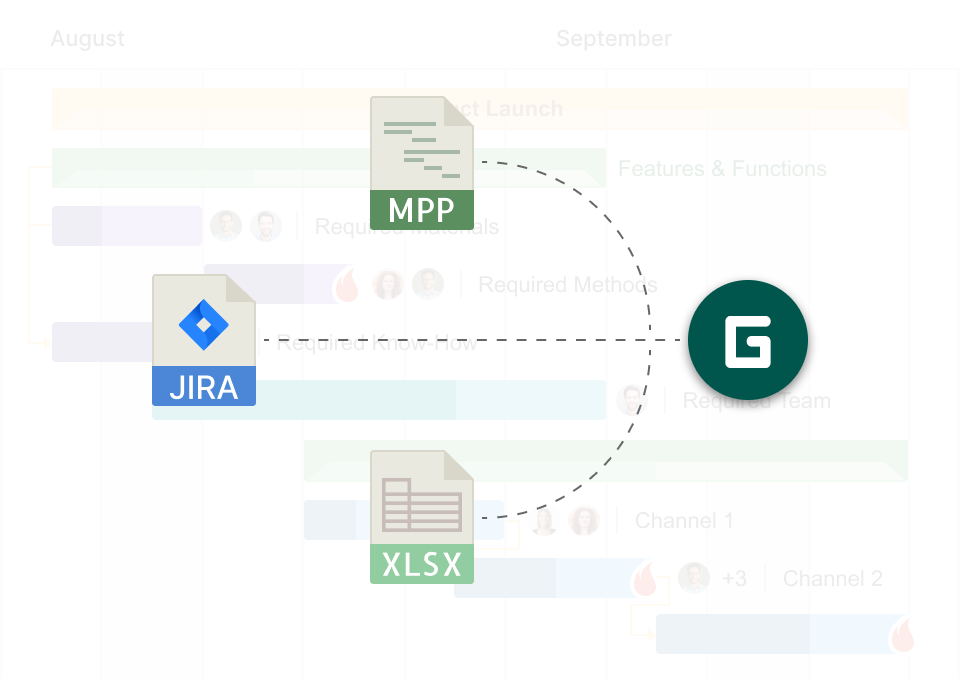
- Importing a project. You may already be working on a project in Excel or JIRA Cloud Software. In this case, it can be easily transferred to GanttPRO. Importing .mpp files from MS Project is also available, especially since the software is known as a reliable mpp viewer. To do it, find the Import button in the lower left corner of the Create a new project window. Then simply click on it and upload the desired project.
If you find it easier to understand this with a visual guide, watch the following video.
Once you have created a project, you can invite participants to it.
3. Invite team members
Despite the rapid development of technology, work on projects requires the participation of real people.
In GanttPRO, you can invite team members and organize their work in minutes.
Your projects will reflect all participants involved in them and all necessary assets that will make work management easier.
The software offers 2 ways to invite team members: in an account as a whole and in each project separately.
Let’s briefly consider both options.
In your account
To invite teammates, you should complete three simple steps:
- Go to Account settings.
- Choose the Team and resources tab.
- Press the Invite by email button. Here, type or paste email addresses of new project participants into the corresponding area.
For further clarification, you can review the process in the video below.
In a project
If you want to add team members directly to a project, you will also need to complete three sequential steps.
Here they are:
- Go to the desired project and open the People tab that is located in the top menu.
- Click the Invite users button. You’ll see two options there: the Choose from the team tab on the left and the Invite new by email tab on the right.
- Explore the left tab with the available account users. Mark the related checkboxes to add your new project participants. Go to the right tab if the teammates you want to add are not yet in your account. Type or paste the email addresses of new users into the provided field.
Below are the details described in a video format.
4. Add virtual resources if needed
Another key feature that sets GanttPRO apart from competitors and makes it popular among high performing teams is its unique capability to add virtual resources to a project. You may need this feature as the next step in organizing your team’s workflow.
Many managers value this capability because the software allows for the addition of an unlimited number of virtual resources, regardless of the account plan. The process itself doesn’t require much time and effort.
Adam Hirsk, the head of product and R&D at Pacvac, a manufacturer of backpack vacuum cleaners, knows how to use GanttPRO for resource management.
Here’s how he evaluates work with virtual resources:

I like using virtual resources in GanttPRO. I set them up as departments to give a broader view without specific assignees. This capability allows another good level of customisation and is really useful for filtering your views of a Gantt chart.
In GanttPRO, you can determine the working time units and associated costs of virtual resources. It allows you to seamlessly integrate them into project planning.
It’s possible to create virtual resources at both the account and project levels.
- Account level. First, go to Account settings located in the bottom-left corner. Select the Team and resources section. Choose the Virtual resources tab there. Finally, click the + Create new button to add a required resource.
- Project level. Open a project and select the People tab that is located in the top menu. Move on to the Virtual resources tab. After that, click the + Add resources button.

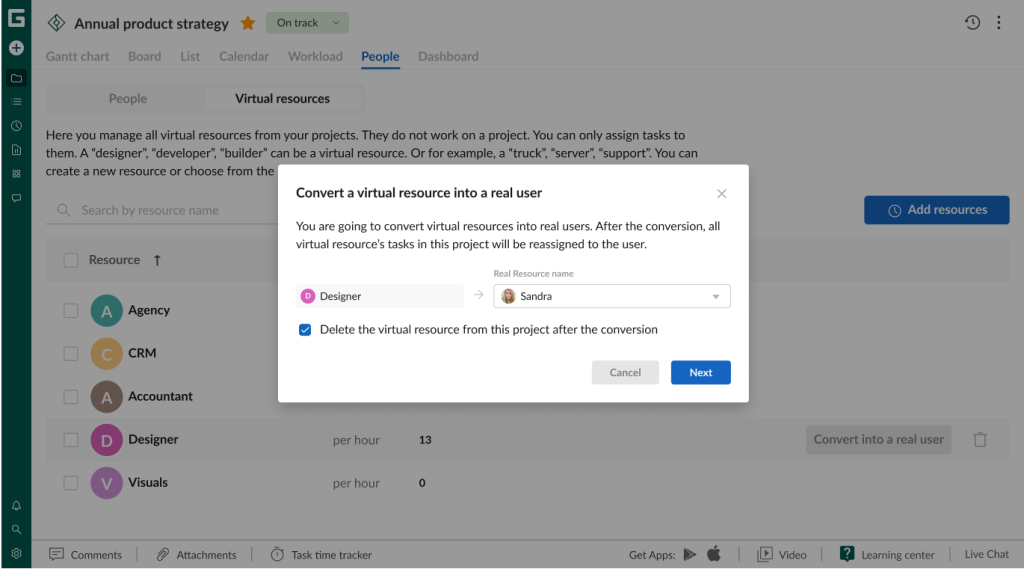
However, sometimes, you may need to replace a virtual resource with a real team member.
In this case, GanttPRO offers a seamless and fast process of virtual resource conversion.
Luckily, this procedure doesn’t require any time-consuming manual work.
You can apply this capability in any project. However, remember that the conversion may happen at the project level, not at the level of a whole account.
So, if you want to convert a virtual resource into a real user in GanttPRO, follow these easy tips:
- Go to the People tab that you’ll find in the top menu. Open it.
- Select Virtual resources.
- Choose any resource and convert it by clicking on Convert into a real user.
Now, it’s time to focus on how team members can work on their tasks.
5. Create and assign tasks
Effective teamwork in GanttPRO is enhanced through its task planning and management features.
Without the right task allocation, your project can quickly become stuck. But if you organize your activities efficiently, you will always know what to do and when.
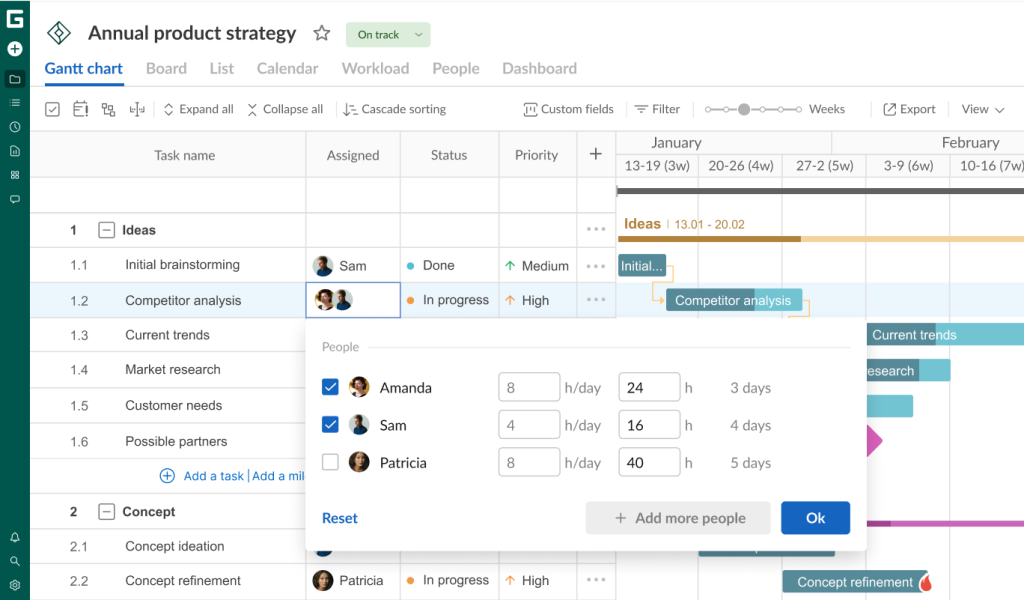
In GanttPRO, your team can easily plan tasks, prioritize work, track progress, establish dependencies, break large projects into trackable work units by applying a WBS work breakdown structure, and more.
Nilmara Krause, a GanttPRO user, shares her experience to illustrate the effectiveness of these capabilities:
GanttPRO is one of the best Gantt tools I have ever used. I can divide tasks into phases, track deadlines, and collaborate with others involved smoothly. The ability to drag and drop tasks and visualize dependencies is essential to keep the schedule on track.
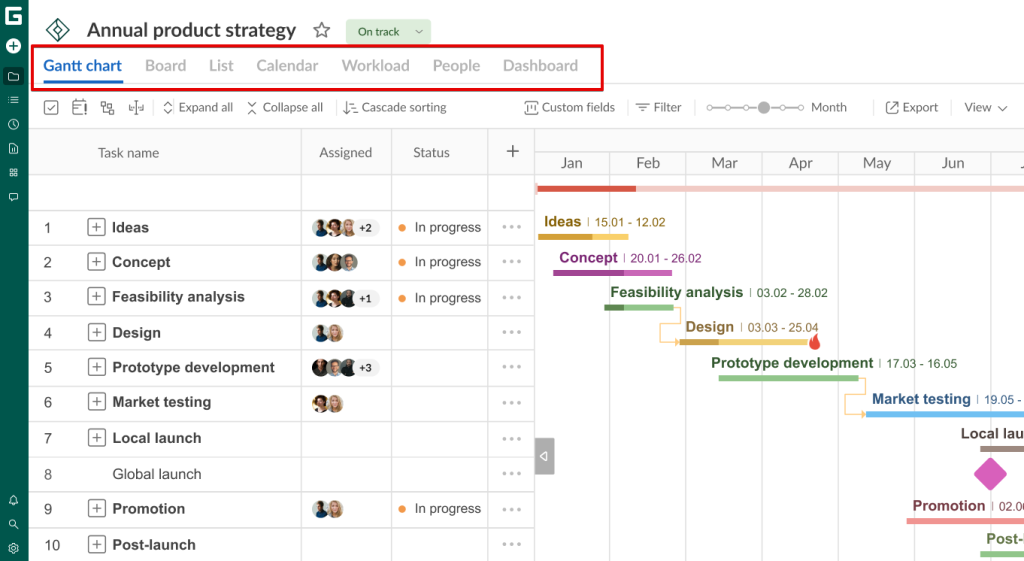
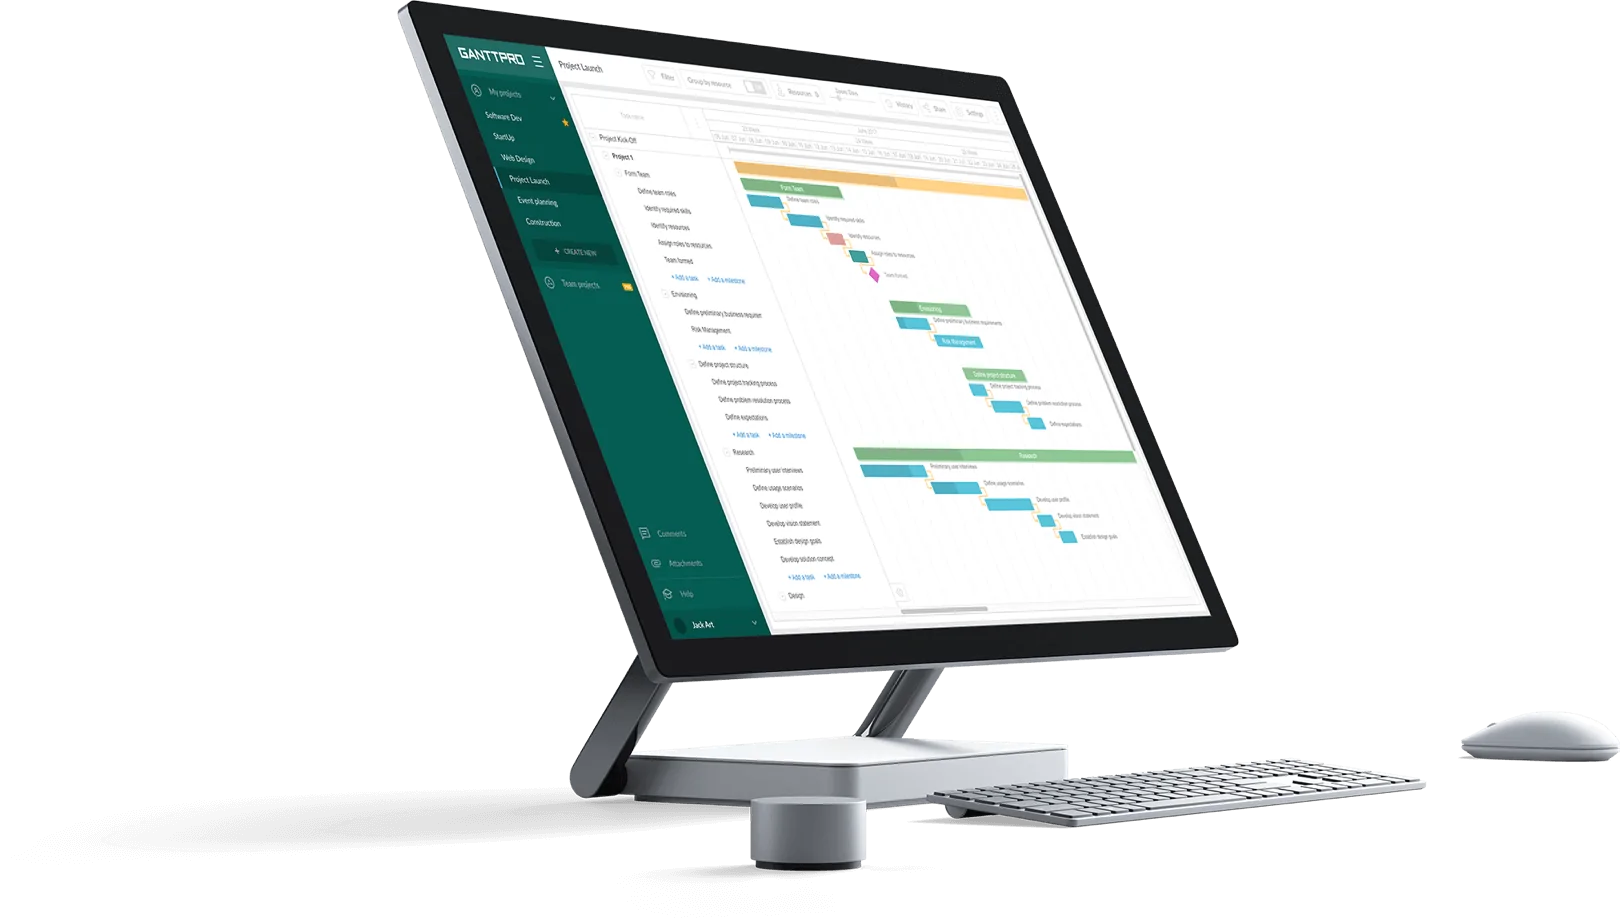
The key project view that you get by default every time you start a new project in GanttPRO is a Gantt chart. It serves as a reliable visual helper, not just another planning tool.
It represents a timeline system that, in combination with a grid, allows teams to quickly establish workflows and save time on working with other tools.
With this diagram, you can easily transform complex project data into a clear horizontal bar chart format.
In this system, each task is displayed as a separate bar. The duration of this task is the length of the bar. The start and end dates are its position on a timeline.
You clearly understand how your activities can be linked and what progress they show in real time.
All this clearly explains why teams love the Gantt chart in GanttPRO.
You will need just a couple of minutes to create tasks here.
Click Add a task at the bottom of your task list. It’s also possible to click on the three dots on the right of the settings line and select the same option there.
Then add subtasks in the same way.
The following video reveals details on how to structure your tasks in GanttPRO.
The Gantt chart view in GanttPRO is especially helpful when projects require precise deadlines, detailed planning, and seamless collaboration. It displays durations, task relationships, and major project milestones.

However, if you want to try other views to manage tasks in GanttPRO, you can visualize your project:
- On a Kanban-like board.
- In a calendar.
- In a list.
- Using a dashboard.
Switch between them in the top menu under your project name.
Now your tasks look organized. You can assign them to your team members or virtual resources.
It’s easy to do it by using the Assigned field for this purpose. This is one of the standard fields in GanttPRO.
The multi-assign feature in GanttPRO enables you to assign as many team members to a task as you want.
This capability is highly appreciated by many users, especially since not many PM tools allow for it.
6. Collaborate with your team in real time
It’s important for any team involved in project management to share information and get updates in real time.
For example, when one employee makes a change during a project, others can instantly see these updates, regardless of their location.
Users appreciate when they don’t need to refresh pages manually to display changes. It eliminates communication delays and reduces the risk of misunderstandings.
With real-time synchronization in GanttPRO, everyone stays on the same page, makes decisions faster, and reacts to changes more effectively.
Overall, real-time updates not only offer convenience but also enhance productivity and flexibility in project management.
Here’s what Odette Almaguer, one of GanttPRO users, thinks about the collaboration capabilities in GanttPRO:
GanttPRO is also great for collaboration. I can share updates with teammates quickly, keeping everyone on the same page. Overall, it keeps me more productive and reduces the stress of managing complex projects.
The obvious advantage of using the software is that it facilitates collaboration both within the entire account and at a task level.
At an account level
Сollaborating across the entire account in GanttPRO is possible in the Communication hub.
This spot, located in the left sidebar, allows you to comprehensively discuss tasks across multiple projects. It combines discussions at the account level. It means that team members don’t need to go to certain projects to comment on specific tasks.
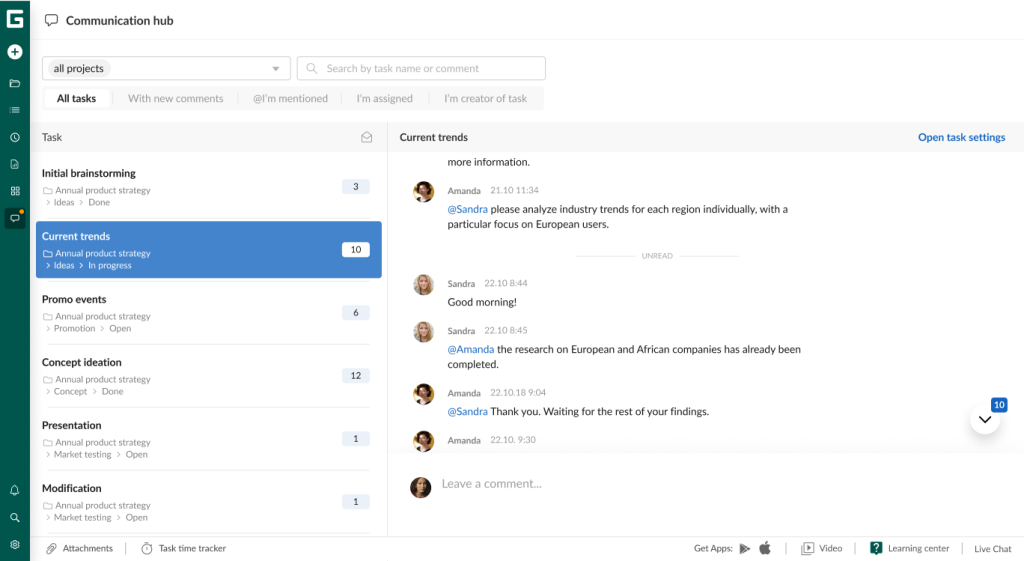
The feature allows GanttPRO users to explore the context and the entire path of any task. They can see everything at once or apply special filters for certain projects. It involves a search for task names or comments and other options.
The hub is designed for discussions focused on specific project tasks rather than general conversations.
At a task level
If you want to collaborate at a task level in GanttPRO, you can use the advanced features, including:
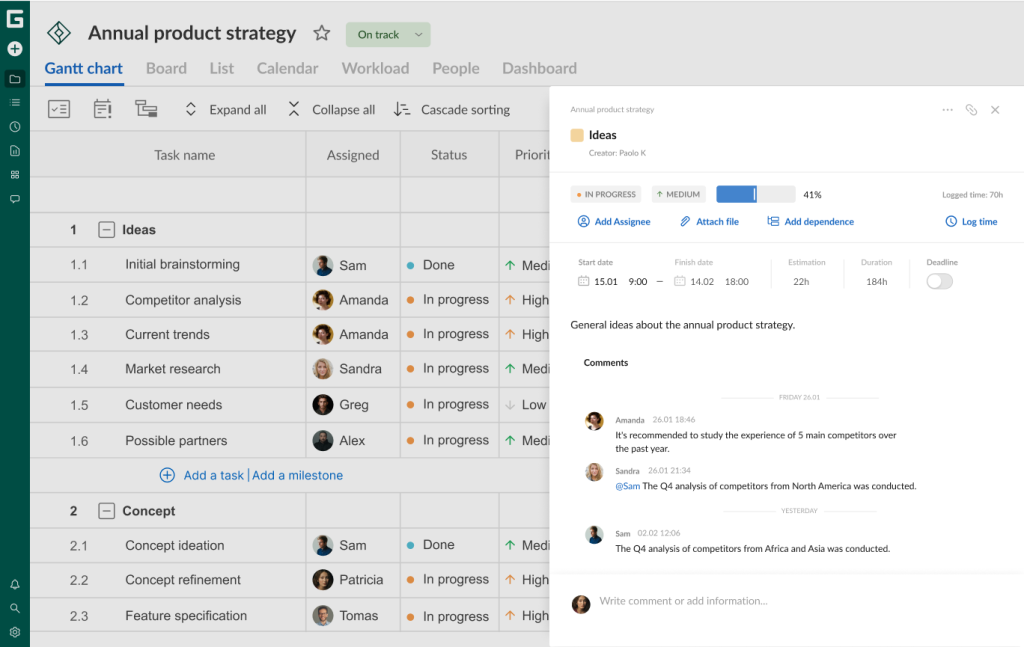
- Comments. This feature allows your team members and stakeholders to easily discuss project tasks. Everyone can view comments along with the information about their authors and the time of publication. Any assignee can control, edit, or delete their own messages. It’s easy to leave comments at the bottom of the Task settings window.
- Mentions. This feature becomes an important assistant when you need to streamline communication with colleagues and make it more accessible. To mention someone, use “@” in the Communication hub or the comments area of Task settings. This way, you can select a specific user from a drop-down list.
- Notifications. Keeping your colleagues informed will be clear and timely if you use this feature. GanttPRO offers three options: email notifications, activity feed notifications, and push notifications. Determine the desired method in the Account settings and the activity feed interface.
- Attachments. Many tasks require adding documents or other data sources. Insert attachments from your device by uploading them or using simple drag and drop.
7. Share your project with third parties
Sharing is a critical aspect of project management that enables collaboration and oversight. Managers use it to ensure transparency, coordinate actions, maintain consistency, gather feedback, and obtain approvals.
Who can act as a third party?
These can be both external participants (contractors, clients, sponsors, etc.) and internal, but not directly involved in a project (other departments, top management, analysts, and so on).
Let’s explore some examples.
You may need to share a work plan with top management, customers, or remote team members. In this case, you may need to get their approval or relevant feedback.
In some cases, it can be a consultant or an expert who is expected to evaluate work results.
Often, you may need to provide work plans for review to representatives of related departments or financial analysts.
Finally, you can share a project for further maintenance. In this case, you transfer it to the support department.
In GanttPRO, it’s possible to share projects using a public link and the export feature.
Shared private link
Third parties can get access to your projects even without registration. You can keep them informed at any time using the shared private link feature.
The software allows for generating one or more links with filtered data to different project views and sharing them in seconds.
You can create links with static or dynamic displays of project states. It’s possible to deactivate, copy, or delete them at any time if needed.
Additional settings like a description, filter, and password are also available.
Here’s what Christopher O’Hearn, a project director at 3M3A, a global media consultancy company, says about this feature:

My clients and I like the ability to share a link in GanttPRO: to get it exported, to see the updates, as well as to change some of the views. I often work with several different people involved in a project. So, usually I coordinate the project, and whenever I make updates, I send out the link, and we know what we are working on.
If you want to apply this capability in GanttPRO, select the Share a link option that is displayed when you click on the icon with three dots located in the upper right corner. Then click on the Create a link button.
Watch this video to make it even clearer.
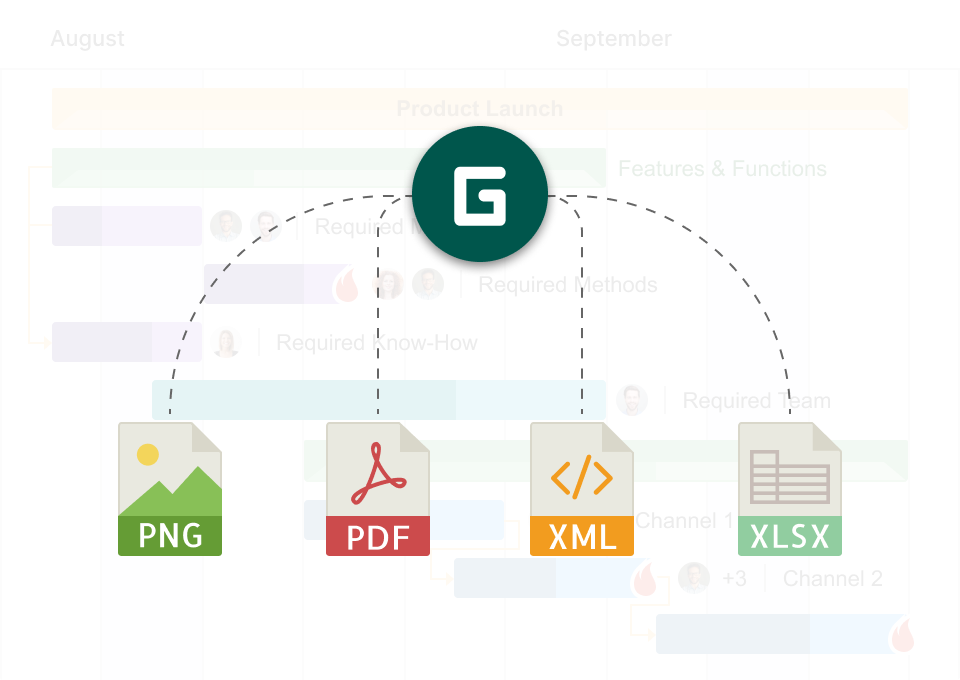
Export
Additionally, GanttPRO offers a seamless export capability. It allows you to save your project data in formats like PDF, PNG, XLSX, and XML. Therefore, you can easily share all you need with partners, clients, or other stakeholders.
With this flexibility, you’ll ensure seamless project reporting, facilitate data integration into analyses and presentations, and cover many other purposes.
Besides choosing a format, you can customize export settings by adjusting paper size, orientation, zoom level, field parameters, etc.
Beyond projects, it’s possible to export portfolios, workloads, task lists, reports, and time logs.
Go to the upper right corner to find the Export button.
This concludes our overview of the key team workflow organization features in GanttPRO.
As you can see, the platform offers comprehensive functionality while maintaining intuitive usability for effective project management.
Advanced project management with the robust Gantt chart maker
Plan and organize team workflow effectively. All in one place.
Sign up for freeOrganize your team workflow professionally in the rhythm of GanttPRO
When all work processes in a team are organized clearly and transparently, chaos disappears.
A powerful workflow management tool like GanttPRO can tie together strategic planning, daily tasks, deadlines, resources, and communication. It creates a space where a team moves in the same direction and achieves complete synchrony.
Everything from assigning roles to tracking progress fits into a streamlined system that’s easy and efficient to manage.
The software is especially valuable when you need to complete a project with minimal loss of time and nerves.
Try GanttPRO and turn your team’s work organization into a well-established mechanism, where each element works at the right time and for the overall result.
Read also
Join 1M+ project managers!
Create Gantt charts in minutes with GanttPRO and reduce time spent on managing tasks by 40%
Try for freeNo credit cards required. No obligation.