About GanttPRO
What is GanttPRO?
GanttPRO is online Gantt chart software that allows you to create and schedule projects with the help of Gantt diagrams.
Our project planning app allows making Gantt charts for simple and complex projects, track their progress, set durations of the tasks, if necessary, organize tasks and subtasks in a way you need it, etc. In other words, GanttPRO has all the most essential features for successful project management.
You can learn more about GanttPRO Gantt Chart software from our short tutorial videos.
Here is an overview of GanttPRO online Gantt chart maker.
If you still have any questions about the Gantt chart software, please, consult our FAQ or contact us at support@ganttpro.com.
Do you offer a free trial?
We offer a 14-day FREE GanttPRO trial to everyone to test our tool with all the features open. You can work on personal as well as team projects inviting as many members as you wish.
If you like the tool and want to purchase a subscription, you can do it as soon as the trial ends or anytime sooner.
You can create an account or log in to already created free one and get a free trial from here.
If you have any questions about the free trial, please, email us at support@ganttpro.com.
Which pricing plan can I choose?
Basic
Basic plan offers all the essential features you will need when you are just starting to use project management software. Also, when you need it just for a limited range of activities, or when your project is simple and does not require advanced features.
It is available for 1+ users for a yearly subscription, and for 5+ users in case you subscribe on a monthly basis.
Within this plan, you can work with most types of views, create an unlimited number of projects and tasks, configure most of their settings, set dependencies and milestones, and collaborate freely with your teammates.
What are the limitations of the Basic plan?
- Portfolio view is not available.
- Custom fields are not available.
- Within the project planning features you will not be able to use cascade sorting for the Gantt chart; see overdue tasks; save filters and templates; perform bulk changes; and create reports.
- Resource management features in the Basic plan are limited to the possibility to add an indefinite number of virtual resources and set a project calendar without exceptions.
Certain integrations like Jira Cloud and SSO are not supported.
PRO
PRO plan includes the whole set of features for efficient project planning and execution, as well as for team collaboration.
It is available for 1+ users for a yearly subscription, and for 5+ users in case you subscribe on a monthly basis.
What are the limitations of the PRO plan?
- Portfolio view is not available.
- It is not possible to create reports.
- Resource management features in the PRO plan are limited to the possibility to add an indefinite number of virtual resources and set a project calendar with exceptions.
- Certain integrations like Jira Cloud and SSO are not supported.
Business
Business plan offers extended functionality for advanced project planning and management and includes all the features available in GanttPRO.
It is available for 1+ users for a yearly subscription, and for 5+ users in case you subscribe on a monthly basis.
What are the limitations of the Business plan?
SSO authentication can be configured only for Google Workspace.
Enterprise
With the Enterprise plan, you will get a fully-featured version of the software similar to the Business plan. The difference is that with the Enterprise plan you will additionally get:
- More SSO options. Possibility to configure all available SSO options (Azure AD, OneLogin, Google Workspace, Okta).
- Enterprise onboarding assistance. Our account managers will provide support throughout the onboarding process and help your team with any issues related to the implementation of GanttPRO.
- Priority support. You will have priority in getting assistance from our customer support managers any time after onboarding as well.
- Increased API limits.
It is available for 10+ team members.
How to purchase a subscription?
When you register in GanttPRO as an account owner, you are automatically given 14 days of trial.
If you want to purchase a subscription, you can do it at the end of your trial or anytime sooner.
To purchase a subscription:
- Choose one of the four paid plans.
You have four plans to choose from:
- Basic
- PRO
- Business
- Enterprise
Find out what are the possibilities and limitations of each plan here.
- Define the duration of your subscription.
You can subscribe on a monthly or yearly basis.
GanttPRO’s monthly subscription provides month-to-month access, with monthly charges being made each renewal day (the same day of the month that you originally signed up for the plan). Monthly plans automatically renew every month.
If you cancel before an upcoming renewal day, you will not be charged on the following renewal day and henceforth. Your license will automatically renew at the end of the license term unless you cancel it.
GanttPRO’s annual subscription provides year-to-year access. It is more profitable in comparison with a monthly subscription, as in this case, the price per member is lower. Annual charges will be made on each renewal date (the same date of the year that you originally signed up for the plan). Annual plans automatically renew every year.
If you cancel before the upcoming renewal date, you will not be charged on the following renewal date and henceforth. Your license will automatically renew at the end of the license term unless you cancel it as provided in the policy.
You can always switch between a yearly and a monthly subscription by configuring it in the billing settings.
- Choose the number of seats.
Here, you have to define how many users you want to add to your account.
It is possible to choose 1 seat for Basic, PRO, and Business plans if you subscribe on a yearly basis.
For monthly subscriptions, you can purchase seats in groups of 5. Thus, you can choose 5, 10,15 seats, and so on.
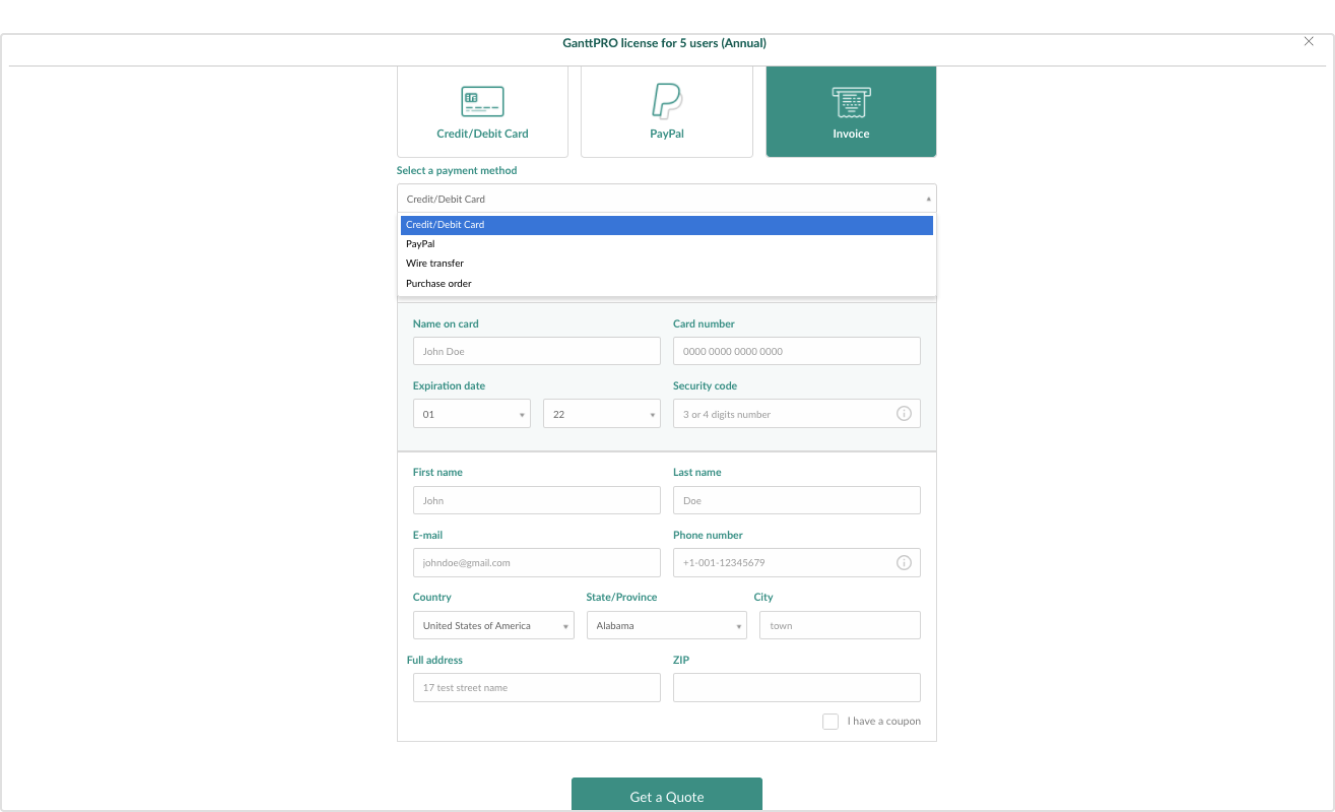
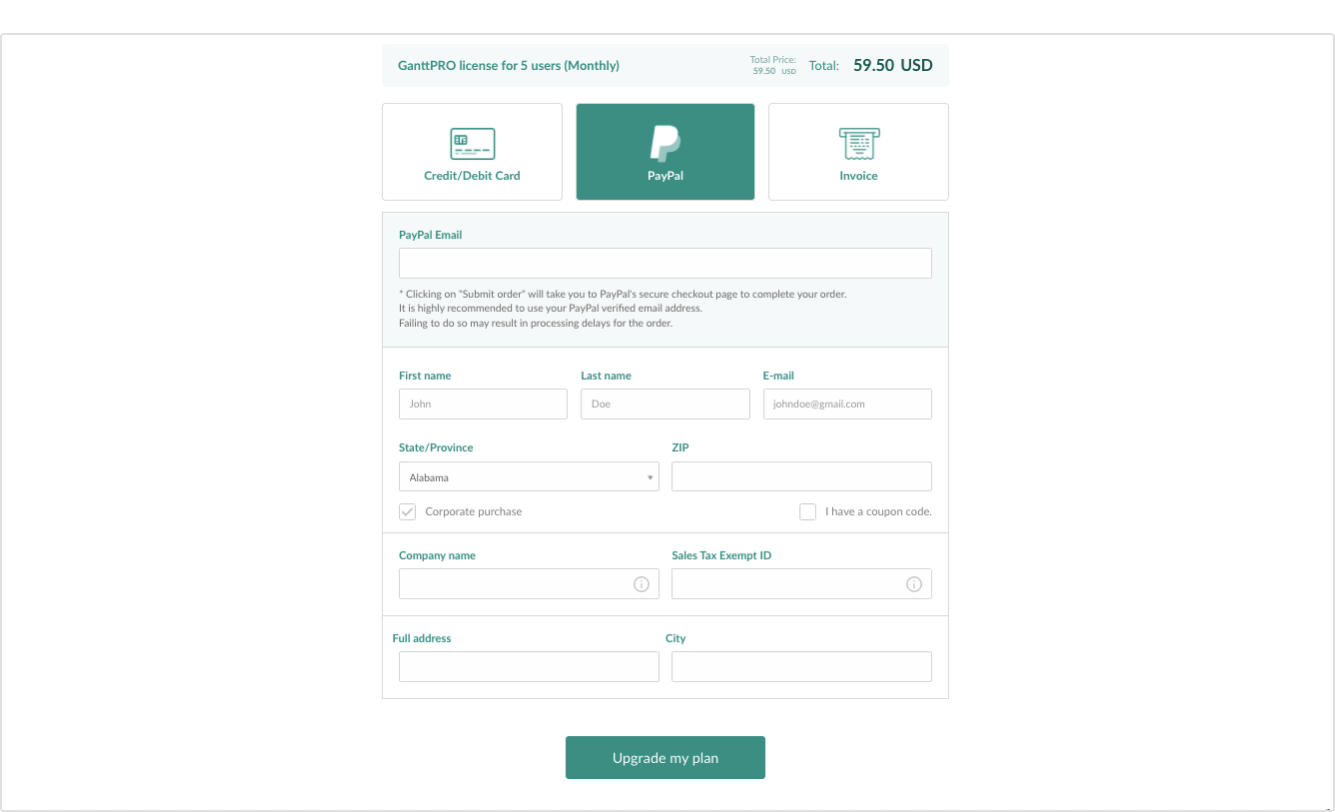
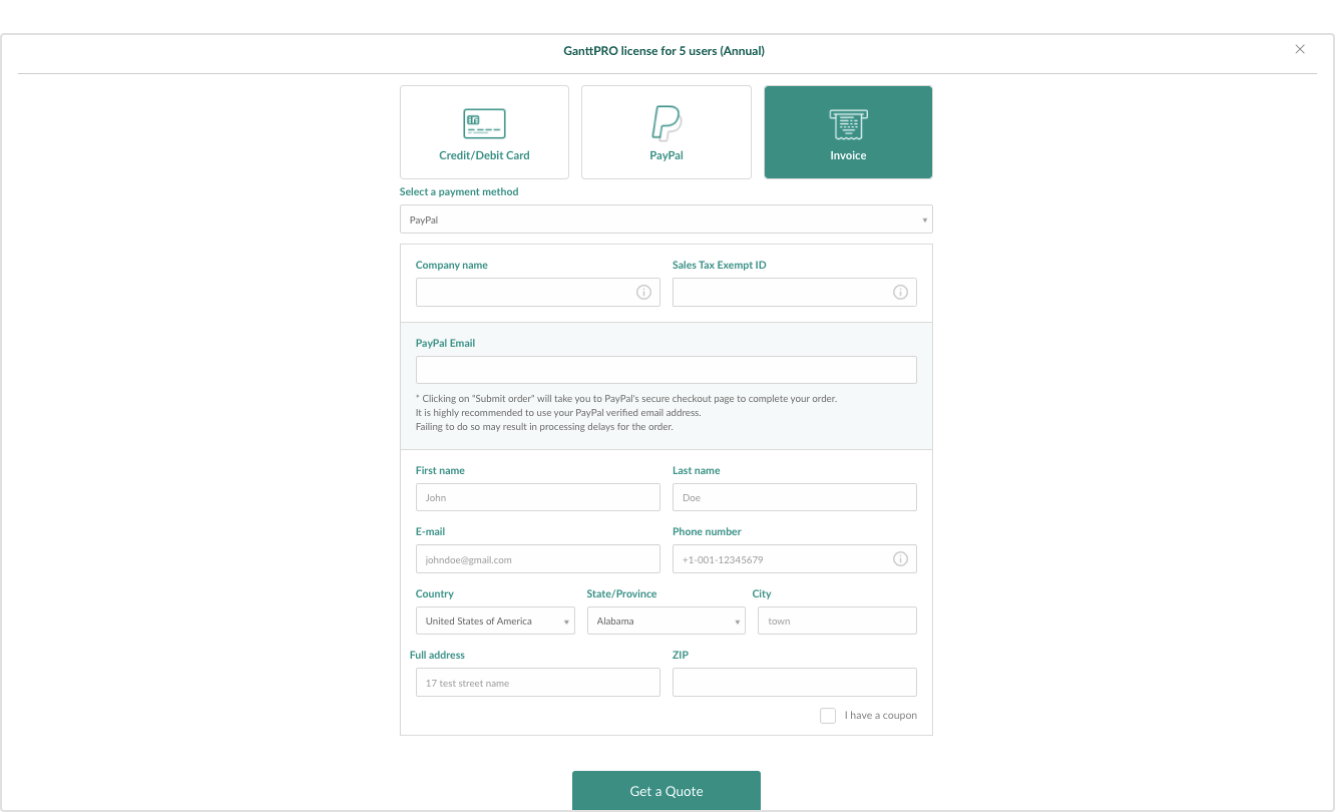
Which payment methods can I choose?
Once you complete all the steps necessary to purchase a subscription, you will proceed to payment.
You can choose one of the 4 payment methods:
- Credit/Debit card
- PayPal
- Wire transfer
- Purchase order
Note that all the online payment processes related to GanttPRO subscriptions are managed via PayPro Global. Therefore, upon your first payment there, your PayPro Global account will be created. You will be able to change billing details, check history payments, and download invoices in it.
You will also see PayPro Global on your bank/card statements for all the payments you have made.
Credit/Debit card
There are two ways to pay by credit or debit card.
If you choose Credit/Debit Card, you will have to fill in all the required fields and then click on Upgrade my plan. After that, the payment will be debited from the indicated card. And you will get an email with the invoice to the specified address.
Here you can also check the box for Corporate purchase to introduce your company details.
In case you need an invoice before paying, select Invoice and pick Credit/Debit card in Payment methods. After that, click on Get a quote. You will be redirected to the page where you can download the invoice and pay it afterward.
PayPal
There are two ways to pay by PayPal as well.
If you choose PayPal, you will have to fill in all the required fields and then click on Upgrade my plan. After that, the payment will be debited from the indicated PayPal account. And you will get an email with the invoice to the specified address.
Here you can also check the box for Corporate purchase to introduce your company details.
In case you need an invoice before paying, select Invoice and pick PayPal in Payment methods. After that, click on Get a quote. You will be redirected to the page where you can download the invoice and pay it afterward.
Wire Transfer and Purchase Orders
You can use these payment methods only for yearly subscriptions.
To pay by bank transfer, select Invoice and choose Wire transfer or Purchase Orders as a payment method. Having filled in all the payment details, click on Get a quote.
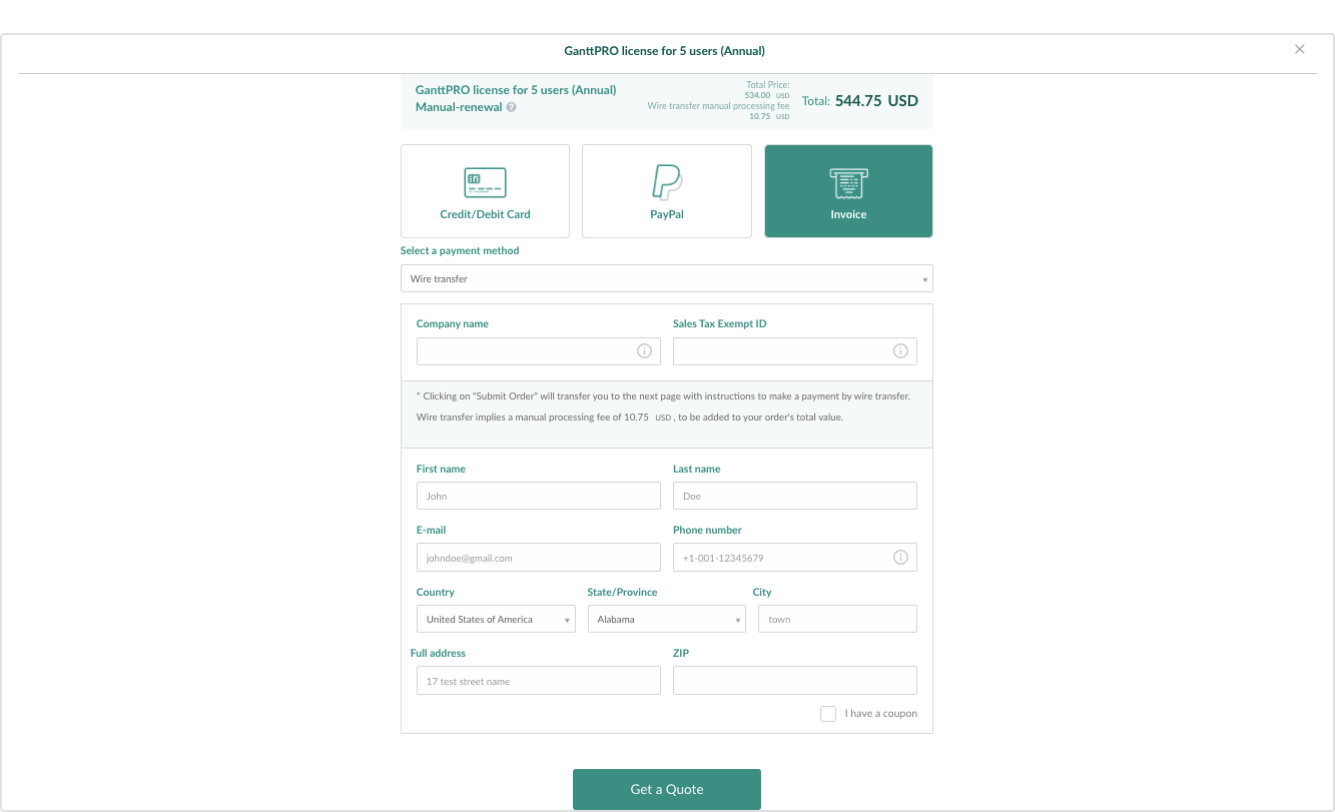
In the next emerging window of PayPro Global go for Click here to pay and in another window check the entered data and click on Purchase.
You will receive at the specified email the bank details of our payment partner PayPro. Transfer the details to the accounting department and make the payment.
Upon completion, you will receive a payment confirmation by email.
Note that the transfer may take up to 2 weeks. Your subscription will be activated as soon as we get the payment. A notification about that will be sent to the email address specified in the billing details.
Why am I sure my personal data is secured?
GanttPRO project planning tool is developed with the help of XB Software, the outsourcing software development company with more than 10 years of experience and 100+ employees. The company works in full compliance with ISO 27001 standards.
All ganttpro.com employees are required to take your personal information very seriously. The ID and password information is protected and our Web security is reviewed regularly. Only GanttPRO developers and monitoring teams have access to the platform and data as they need to monitor and maintain performance. All employees signed Non-disclosure agreements (NDA). Upon your request, we can sign an NDA with your company. Also, access to the cloud platform is possible upon customer’s support requests.
We implement a variety of security measures to maintain the safety of your personal information when you register, create Gantt charts, and collaborate on projects with other GanttPRO users.
We offer the use of a secure server. All supplied sensitive/credit information is transmitted via Secure Socket Layer (SSL) technology and then encrypted into our payment gateway providers database only to be accessible by those authorized with special access rights to such systems, and are required to keep the information confidential. To prevent your information from being read or changed while in transit and provide the strongest privacy and integrity protection, we use Hypertext Transfer Protocol Secure (HTTPS).
Thus, we use SSL, private VPN on MS Azure cloud infrastructure, real-time data replication, and make backups every day at 2 p.m. PST.
We work in full compliance with GDPR.
What about Privacy Policy and Terms of Use?
You can check out our privacy policy and terms of use here:
If you still have any questions, you can always contact us at support@ganttpro.com
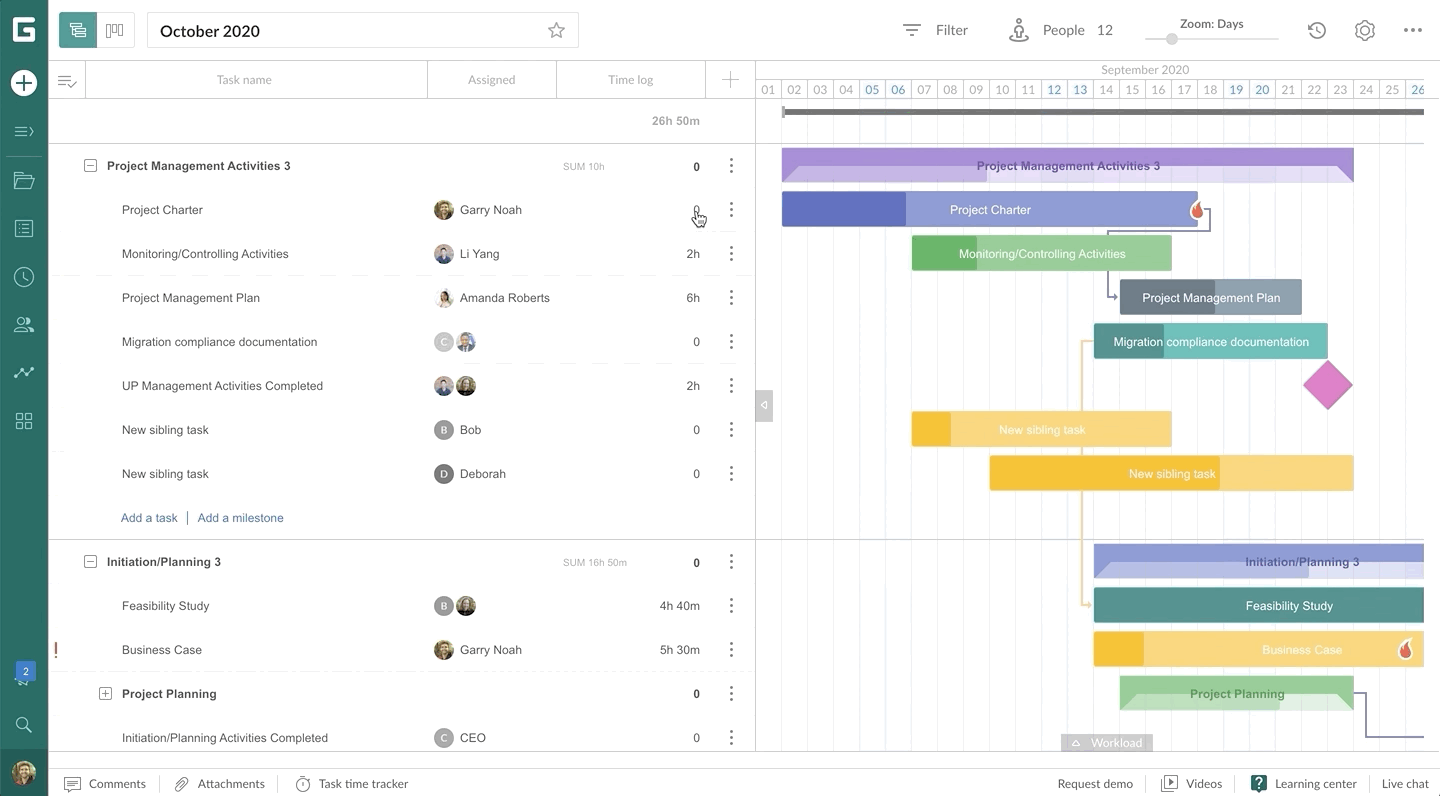
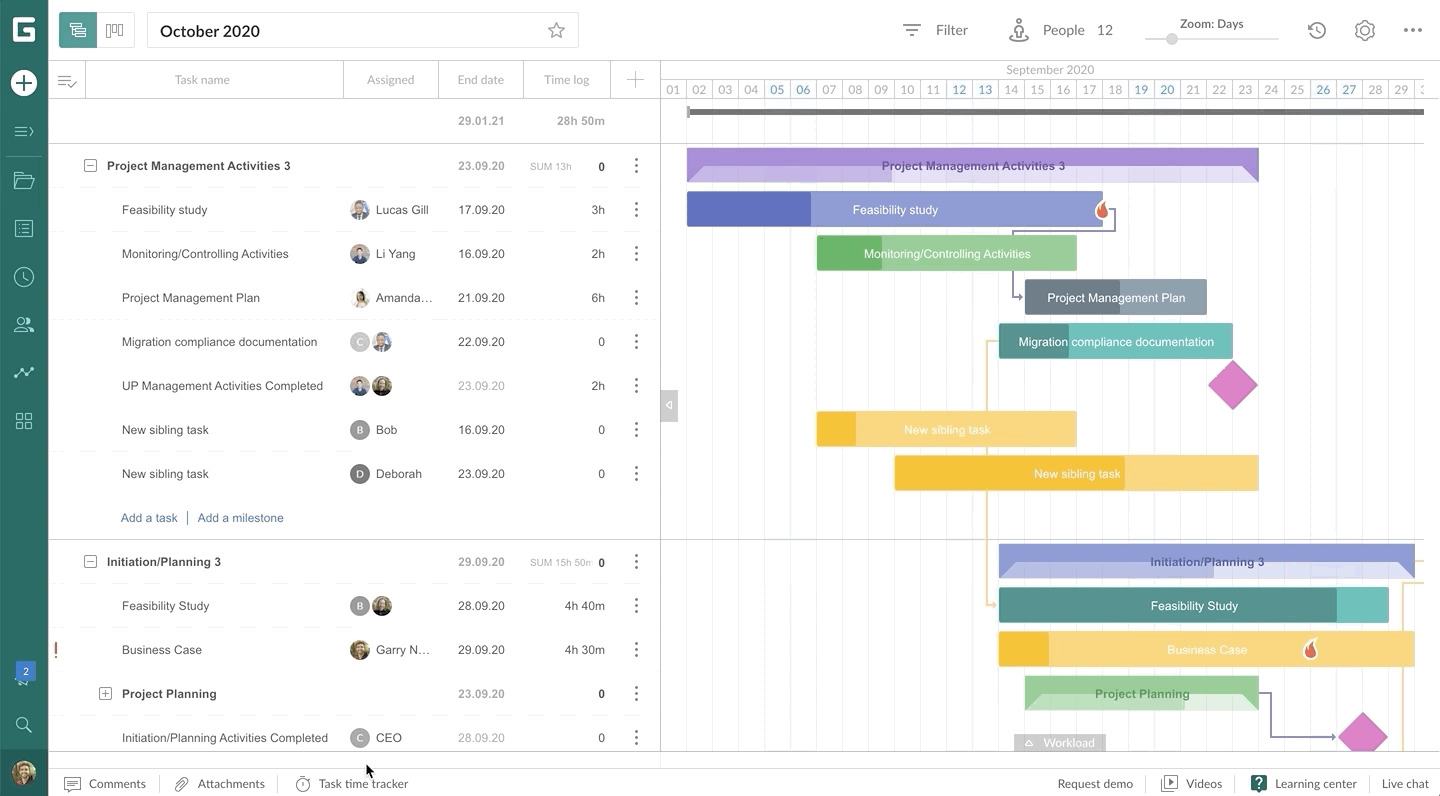
What is a Gantt chart?
What is a Gantt chart?
The Gantt chart is an easy way to organize and manage a great number of tasks when making and scheduling projects with the help of a Gantt diagram.
When you are about to start any project, you will need to think over all the details of it, including the smallest steps and tasks that it consists of. Gantt charts allow you to see how many steps it requires, what subtasks they include, and in what sequence to successfully deliver the project – all of this is reflected against time. You can assign each task to the right people to make sure that the steps will be fulfilled successfully and the whole project will be delivered on time.
There is a possibility to monitor the progress of each stage and find workarounds in case of any unexpected problems occur.
You can use Gantt charts to share the information on the progress of the projects and any changes that need to be made to it with the members of the team.
Learn how to start working in GanttPRO from this video tutorial.
What is Auto Scheduling and manual planning?
Auto scheduling in Gantt chart software is an ability to recalculate task schedules when you change the start date of your tasks or projects or add dependencies to tasks, which affect the tasks’ start/end dates and durations.
Auto scheduling is switched on by default for new projects, but you can always turn it off and start planning projects manually.
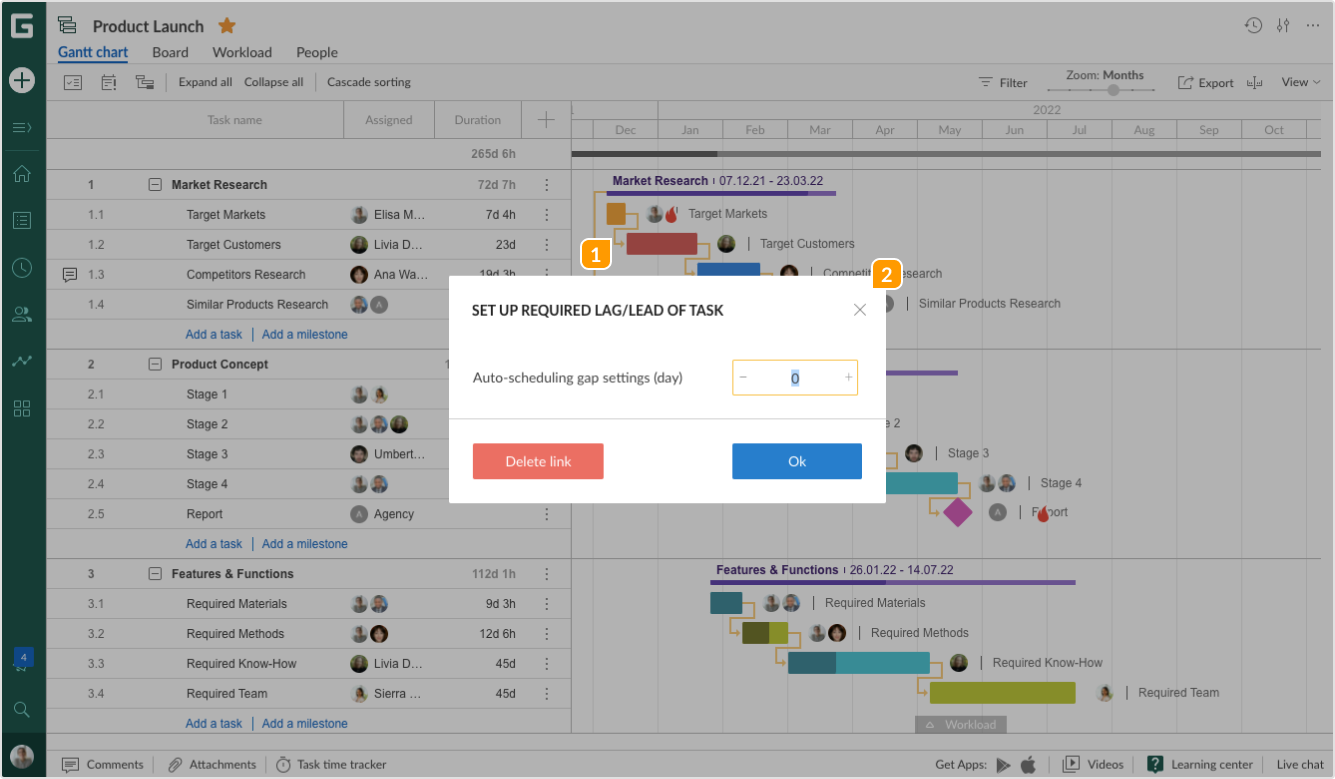
Sometimes you may have situations when one of the tasks or subtasks in a chain is to start with a delay (lag time) after the preceding task is finished. Or vice versa, the following task needs to start when the preceding one is still in process (lead time). In GanttPRO, you can easily keep gaps between tasks or create overlaps between them even when the Auto Scheduling is enabled. So if you need to move the group of tasks on the timeline, the dependencies will be kept just the same as you have set them up.
If you need to set up lead or lag time, click on the dependency between the tasks and you will see the setting “Setup required lag/lead of task”. All you have to do now is to add or decrease the required values:
- You can set up the lead time with the help of a negative value (-).
- You can set up the lag time with the help of adding values (+) to create a gap between the tasks.
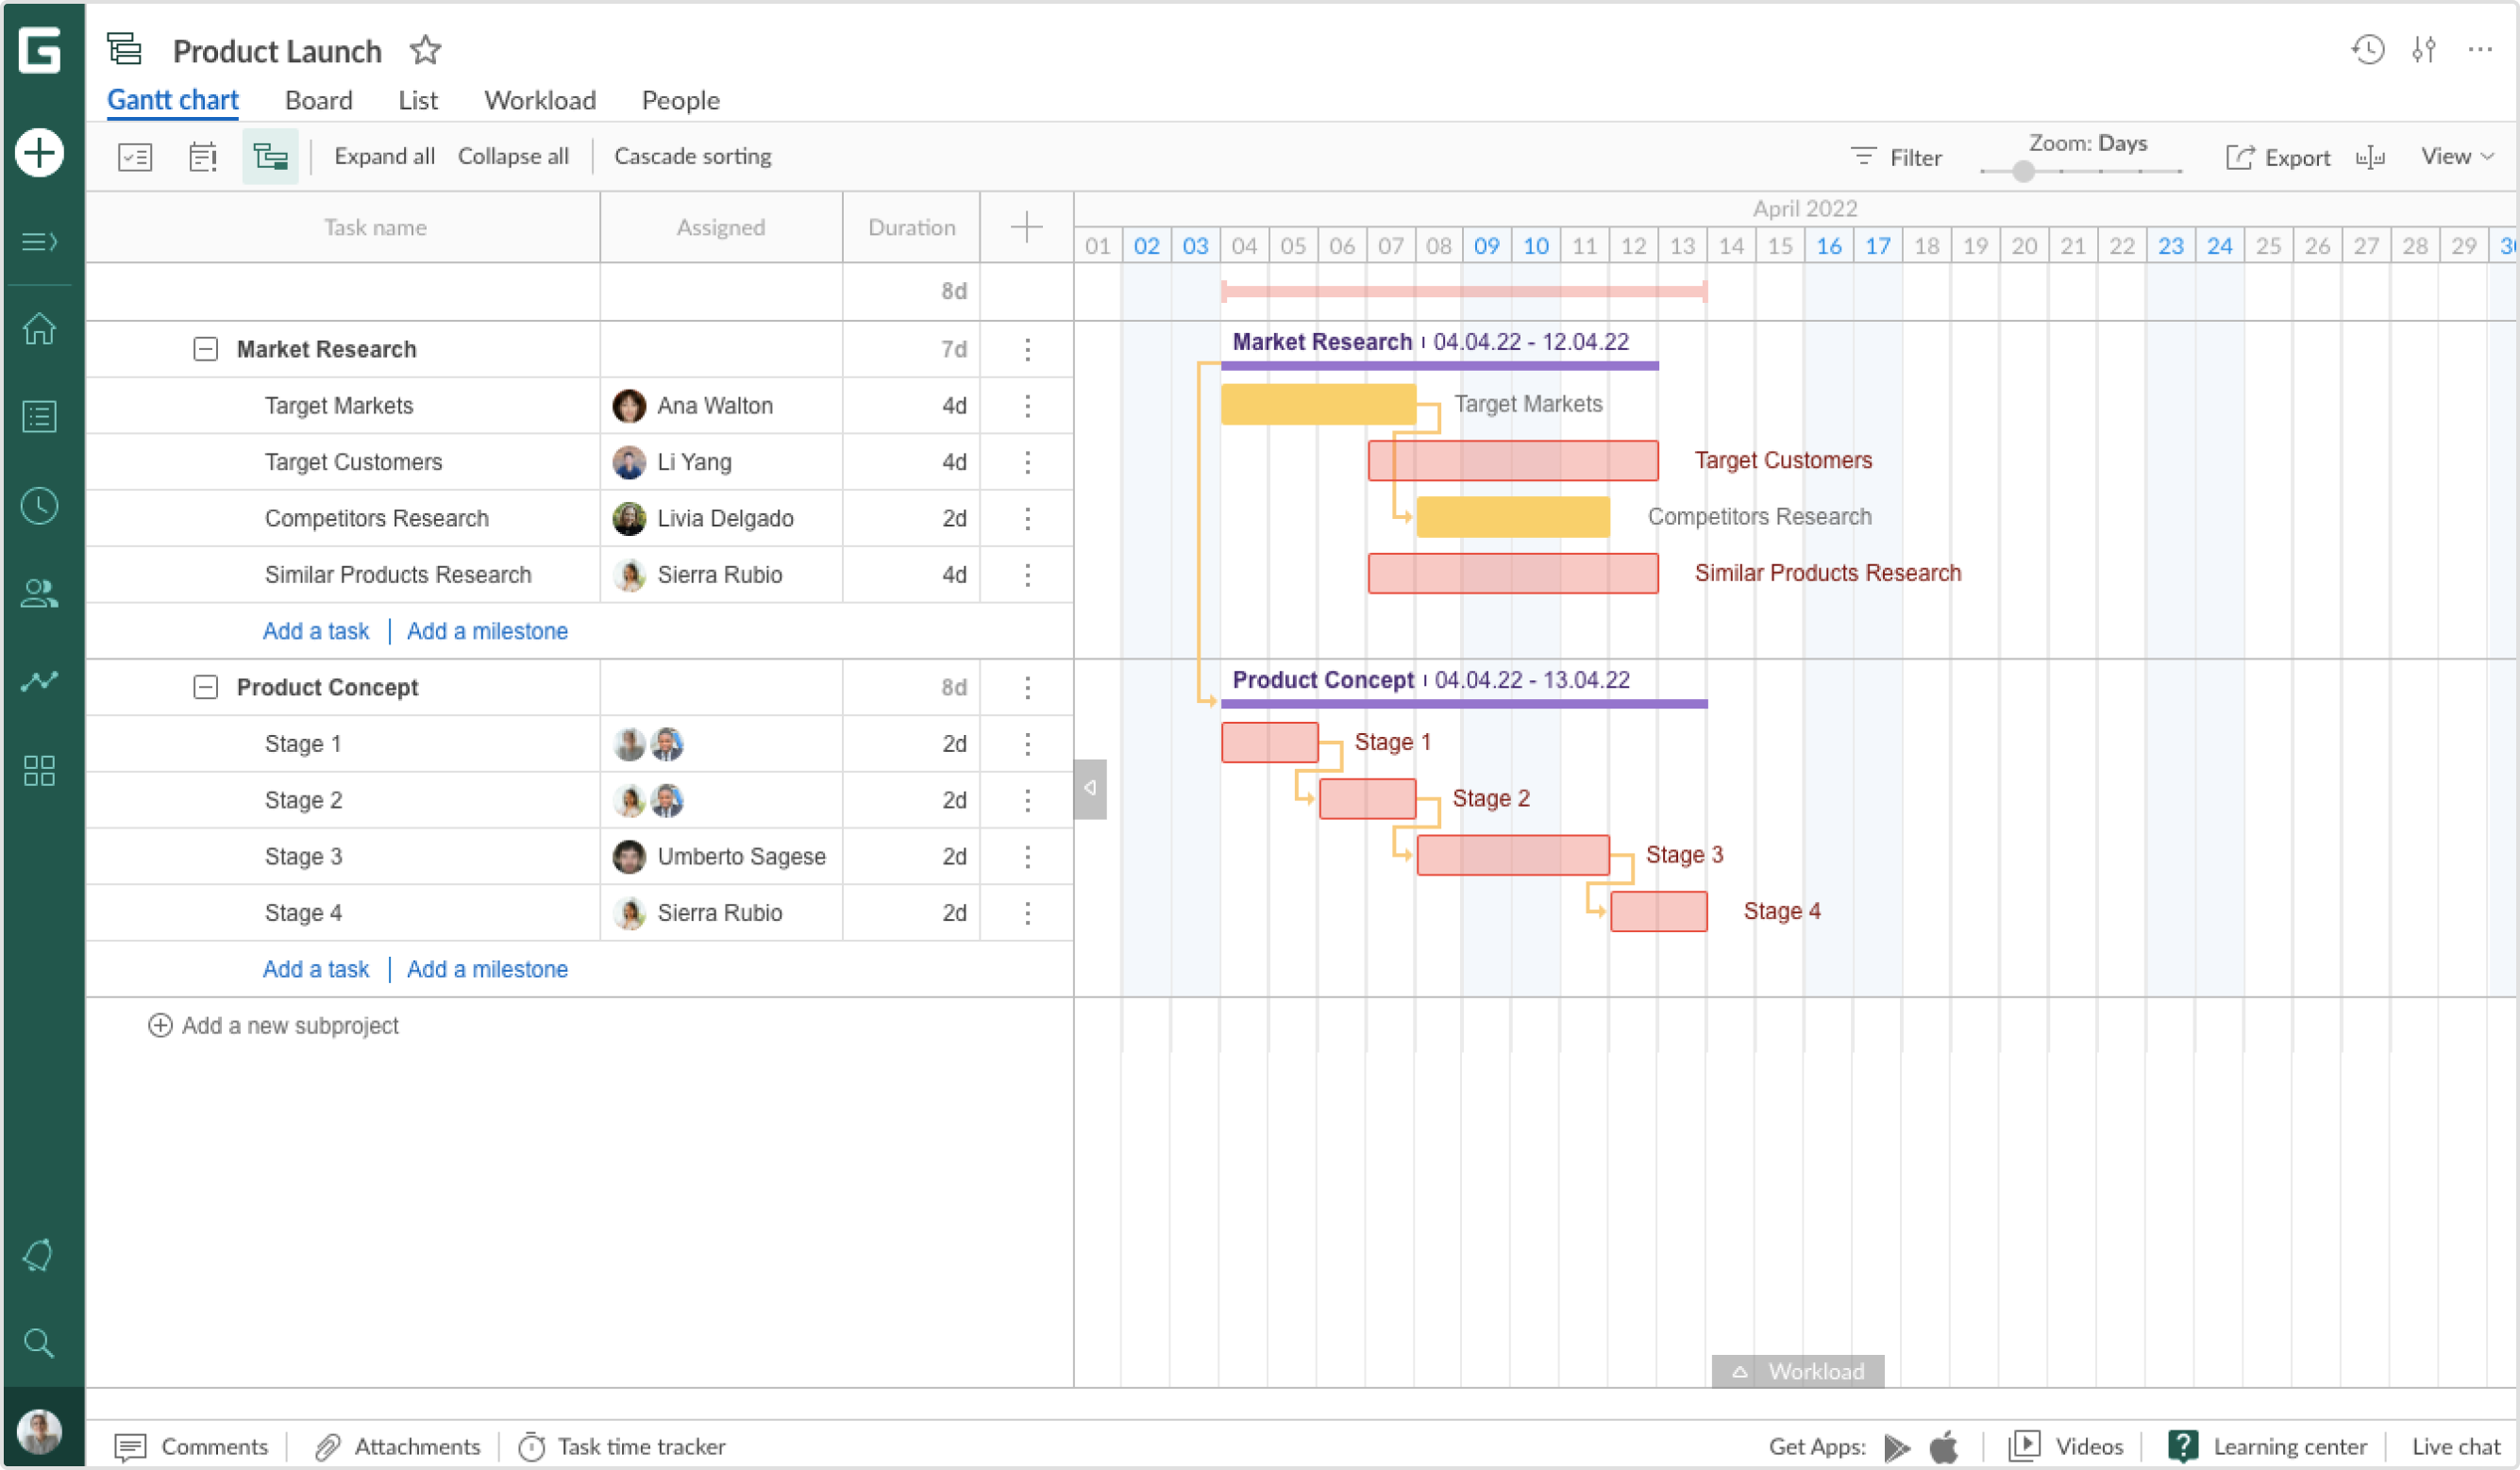
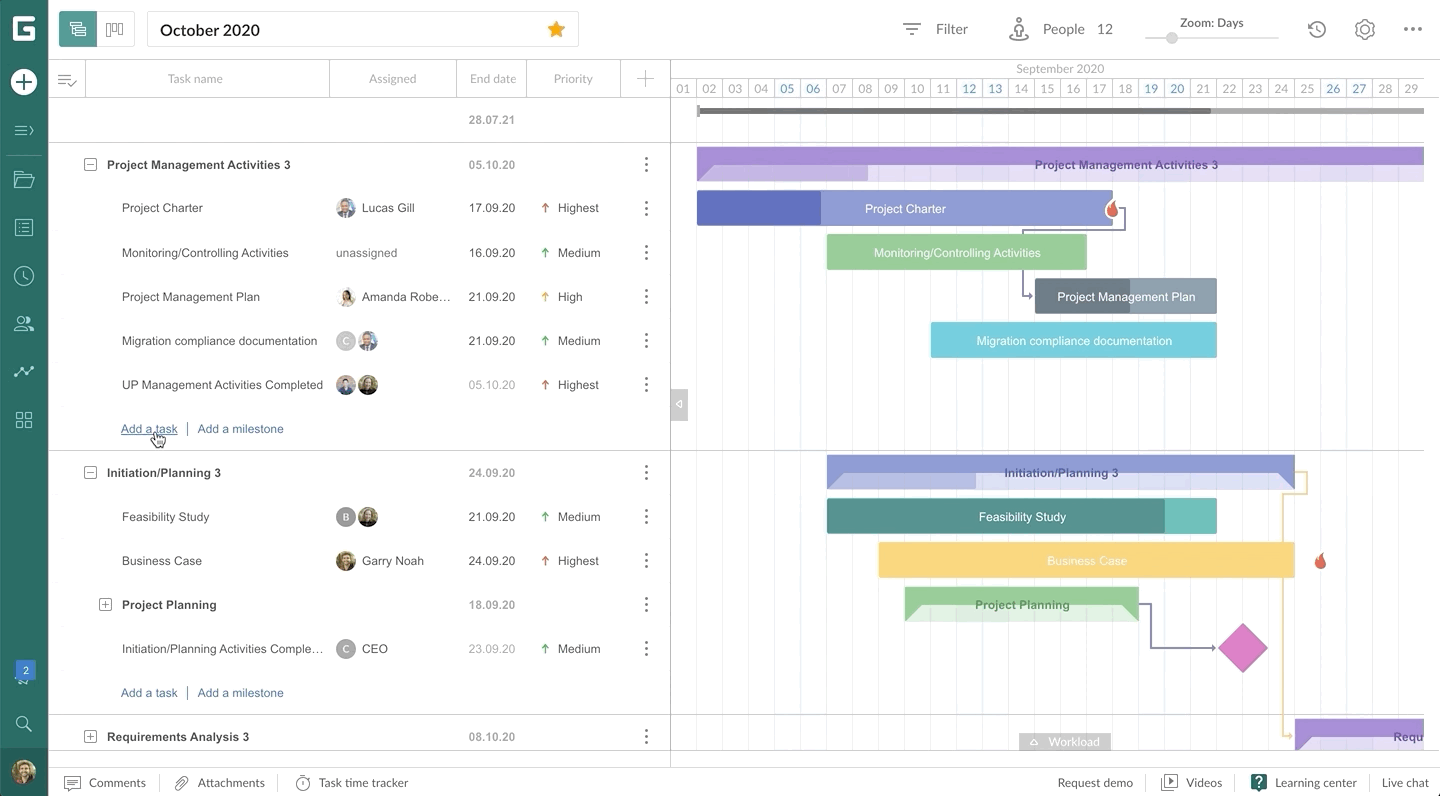
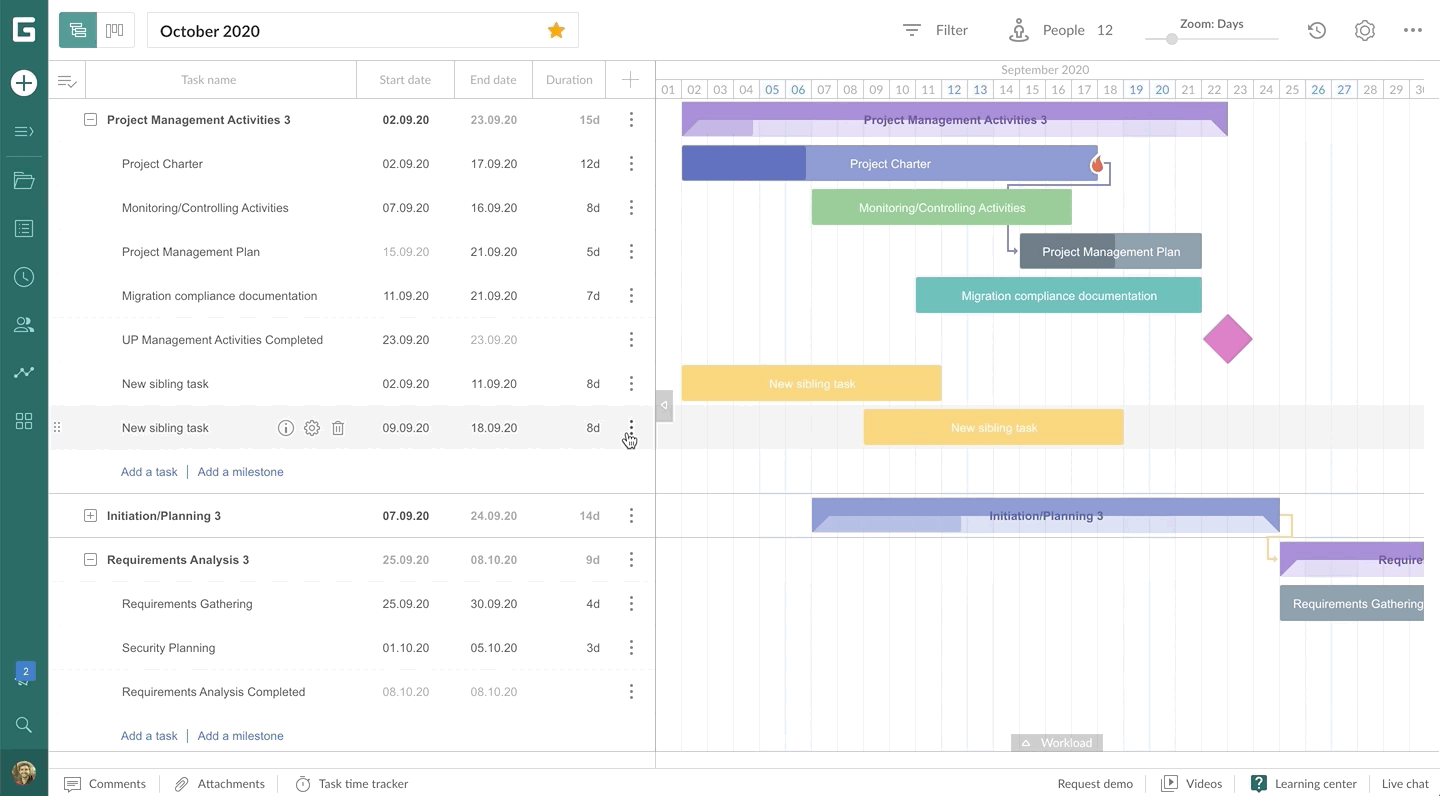
What is Critical Path?
A critical path is the sequence of tasks that have to be executed for the timely completion of the project. With the GanttPRO’s Critical Path feature, you will be able to see all the tasks that directly impact your project completion date.
Following critical tasks can be helpful to redistribute resources from other not so important tasks when there is a probability that the project may be going behind the schedule. Or, to focus on tasks with higher priority should the circumstances require.
To enable this option on your Gantt chart, go to the top left corner of the project grid and click on the corresponding sign. All the critical tasks will be highlighted in red.
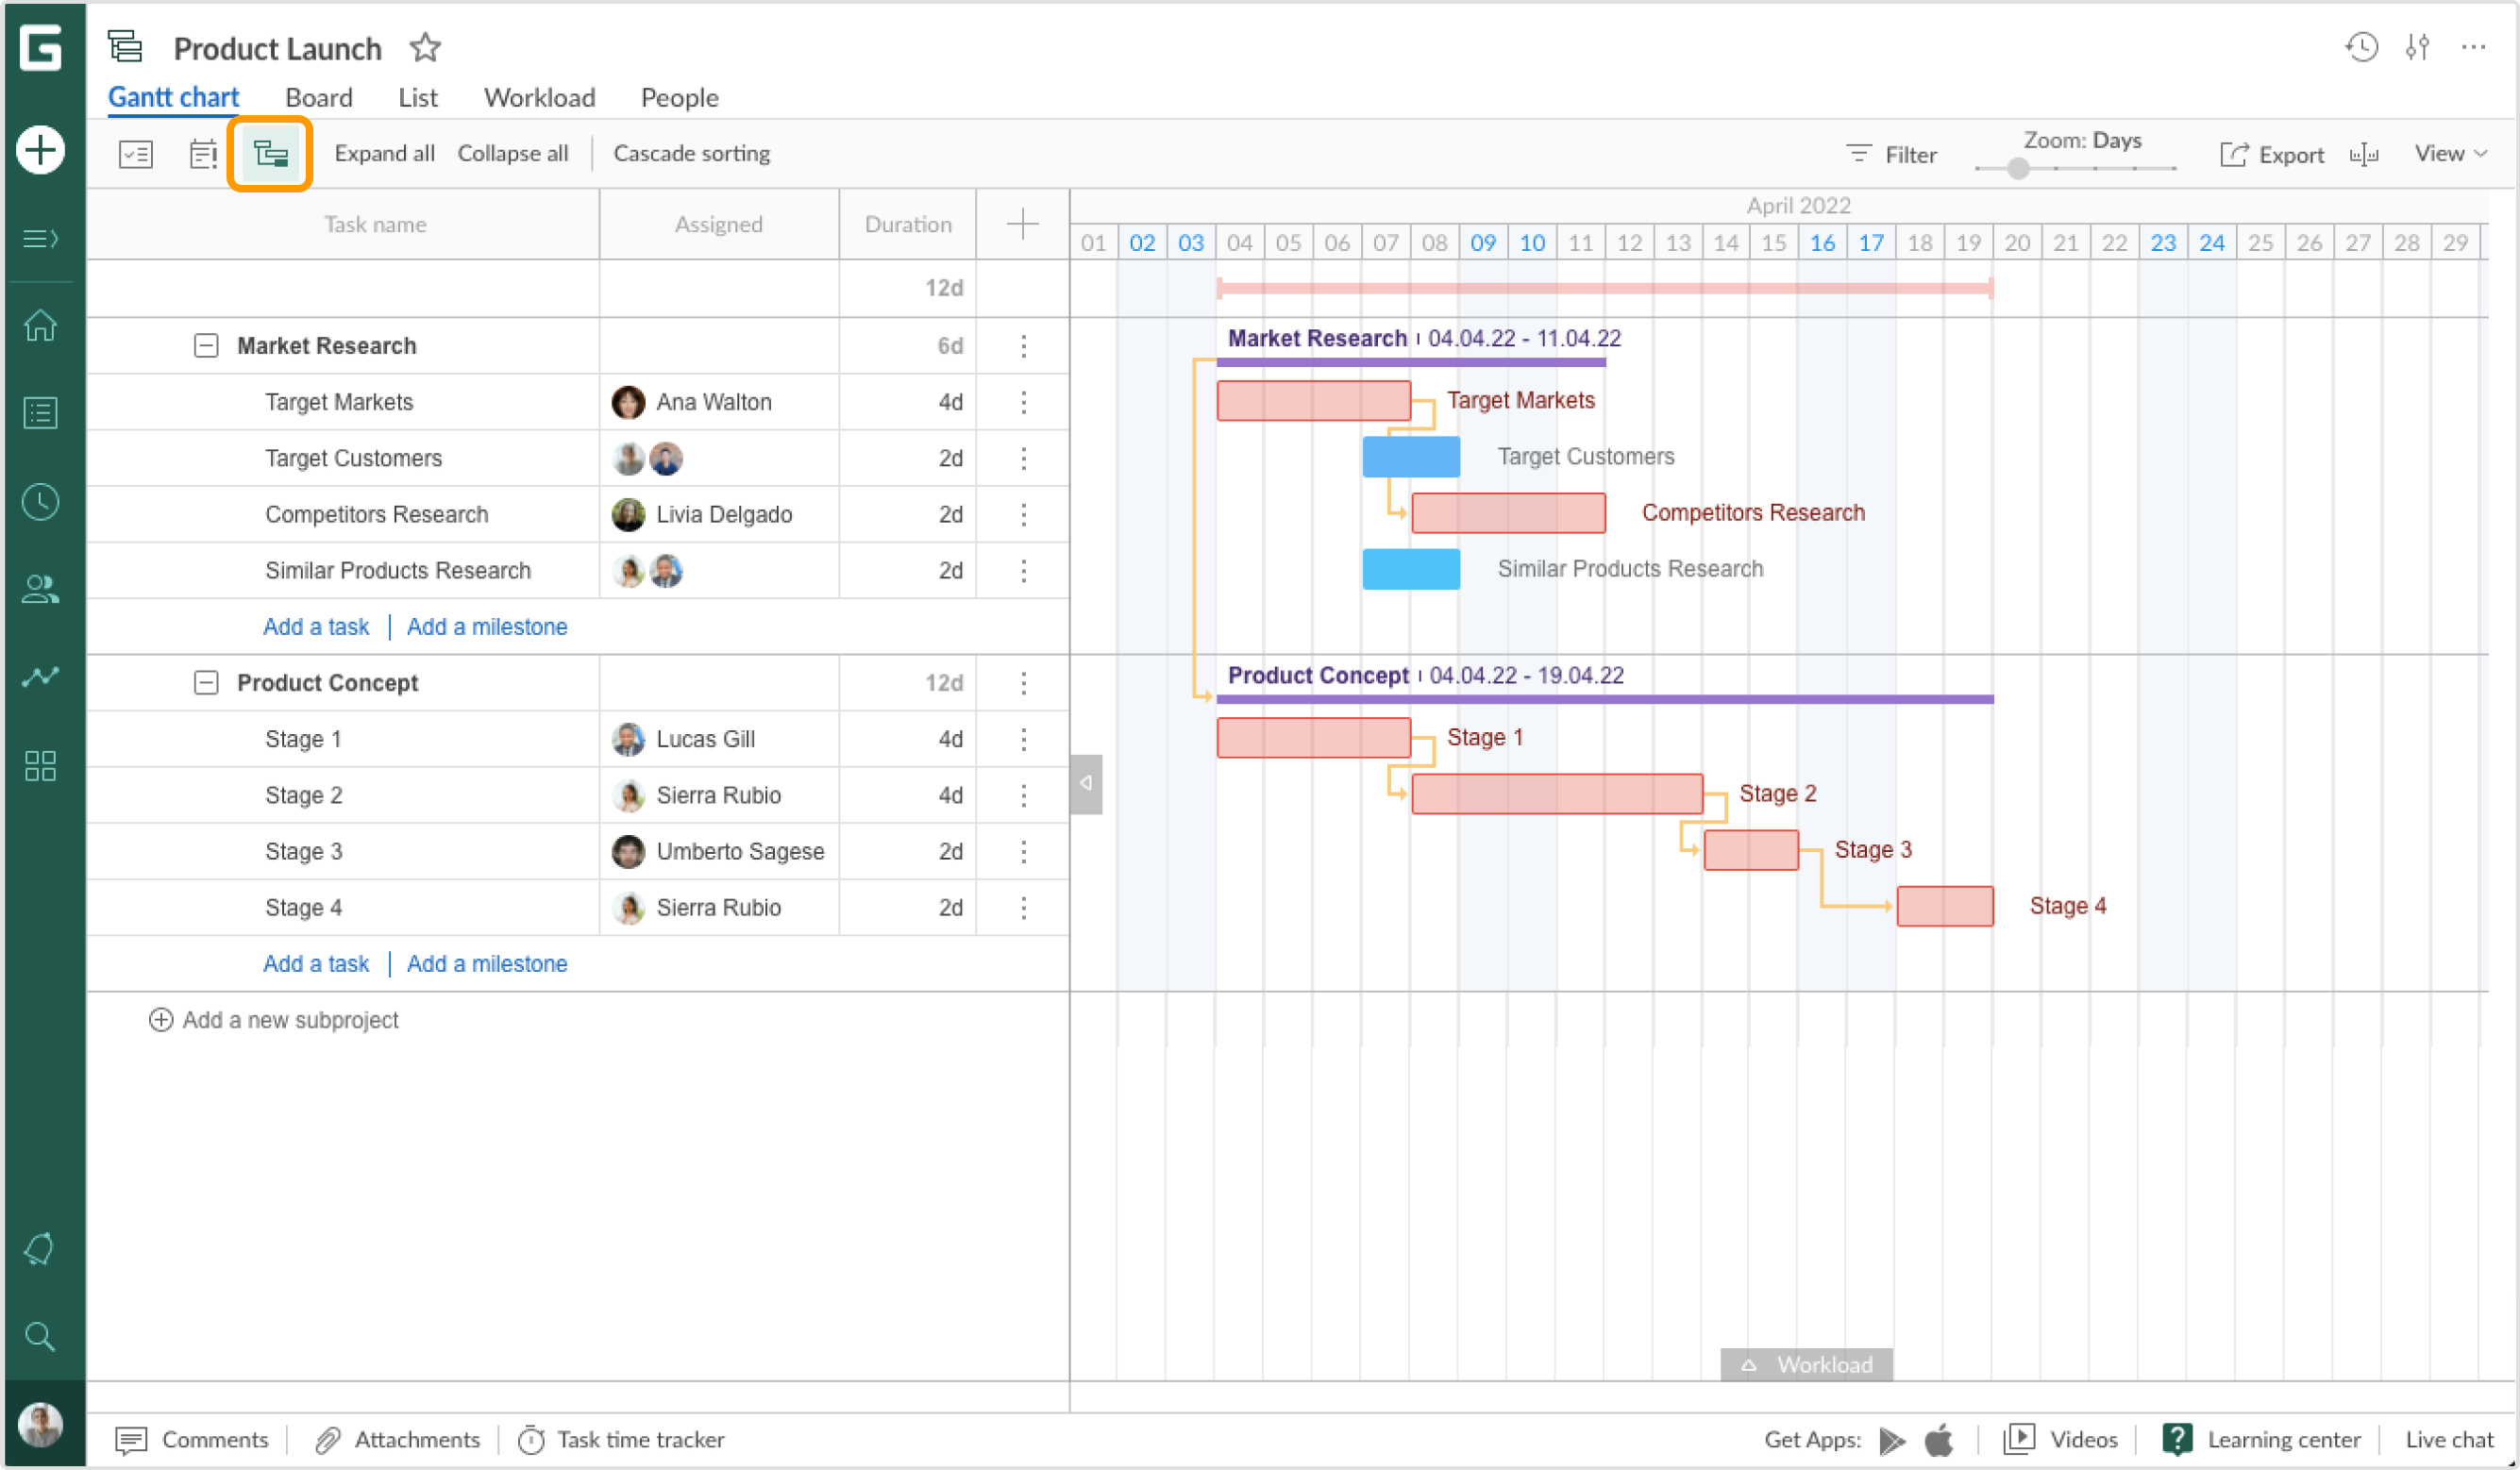
Let’s use this example to see how to reduce the overall project duration by managing critical tasks. As we can see, tasks “Stage 1”, and “Stage 2” in Product Concept are the longest ones and impact directly project completion date. Thus, we can redistribute resources from the other tasks to these ones, so that they can be finished earlier.
In particular, in our case, we can reassign project members from the tasks “Target Customers” and “Similar Products Research” to the tasks “Stage 1”, and “Stage 2”. Project duration will be reduced by 5 days.
Another option could be to invite other team members to the project or hire external consultants.
What is project zoom?
Project zoom in Gantt chart software is used to adjust the look of a project on the grid to the needed timescale. Zoom doesn’t affect the duration in which you are planning a project and its tasks. It simply provides you with the view of a project and makes it convenient for you. You can find project zoom in Settings. Depending on the length/type of a project, you can set Zoom to Hours/Days/Weeks/Months/Quarters/Years.

What are project templates?
When adding a new project, you have pre-defined Gantt chart templates (Construction template, Software development template, Learning roadmap template, etc.). We have added them for two reasons:
1. They can help you to understand better how Gantt charts work if you are just starting using them for project making.
2. You may have a project somehow similar in a structure to some that we already have in our pre-defined templates. So you can just use it for convenience and to save time setting up your own chart.
If you want to create a project from scratch, you can choose the Blank project.
There is an option for users who are on any pricing plan to create their own templates. If you have already created a project and want to use its pattern in the future, you can save it as a template – it will be automatically added to “My Templates” section. So when starting a new project, you can just choose it from the list in “My Templates”.
Find more information on how to work with templates in GanttPRO in this video.
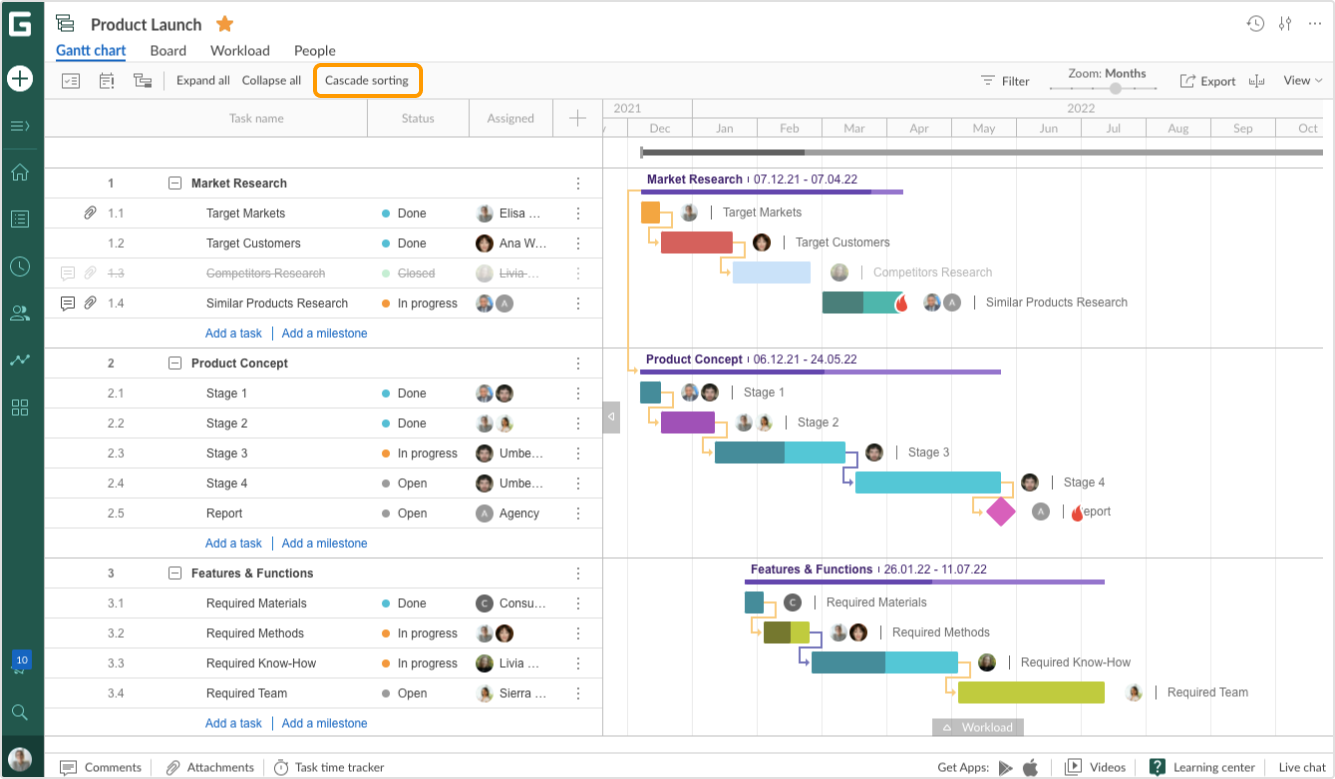
What is Cascade sorting?
As a Gantt chart is a visual tool for planning and monitoring project progress, there is also an option to sort all the tasks in a cascade-like way for an easier following and understanding of the process.
You may enable this option by clicking on Cascade sorting in the top left corner of the project grid. Tasks will be sorted by date: the earlier the start date is, the higher the task is located.
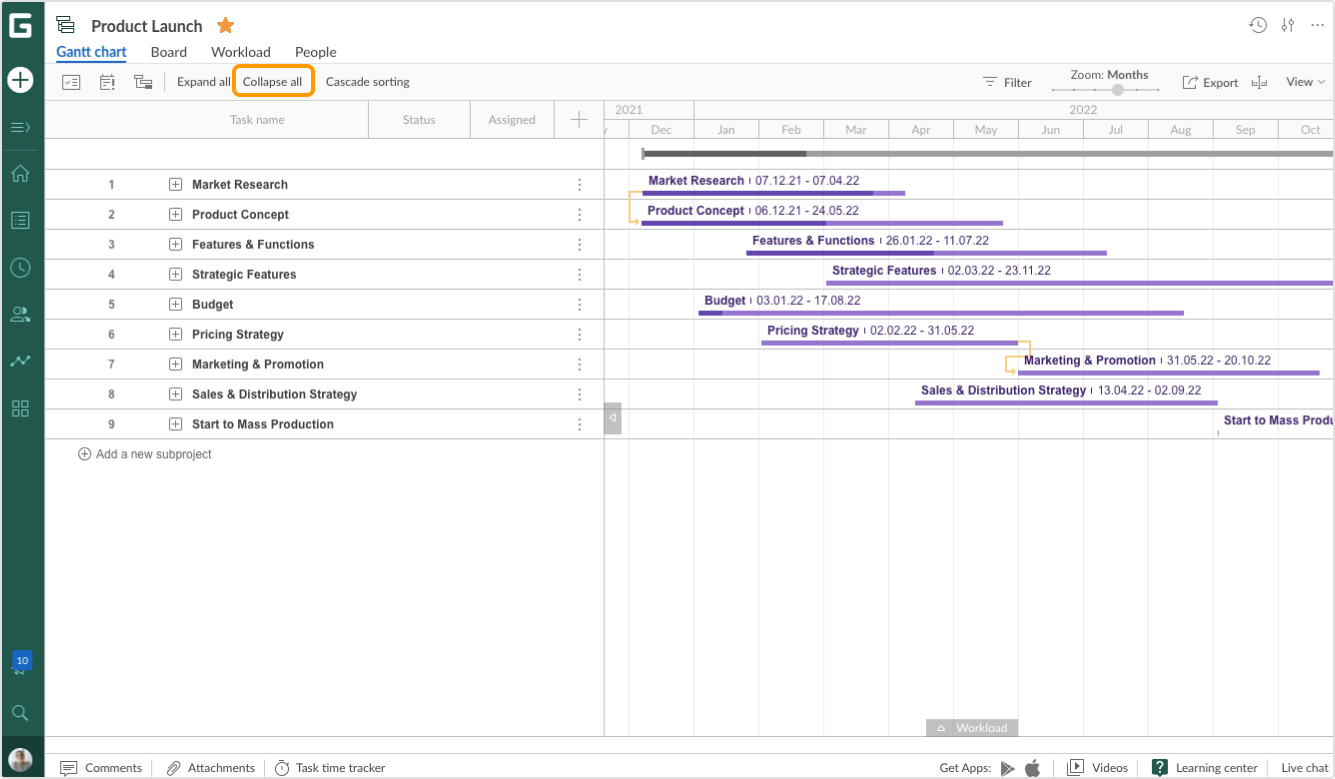
What is Collapse all/Expand all?
The options Collapse all and Expand all can come in handy if you have a complex project with a detailed work breakdown structure and plenty of activities.
If you click on Expand all at the top of the project grid, you will see the whole list with all types of tasks.
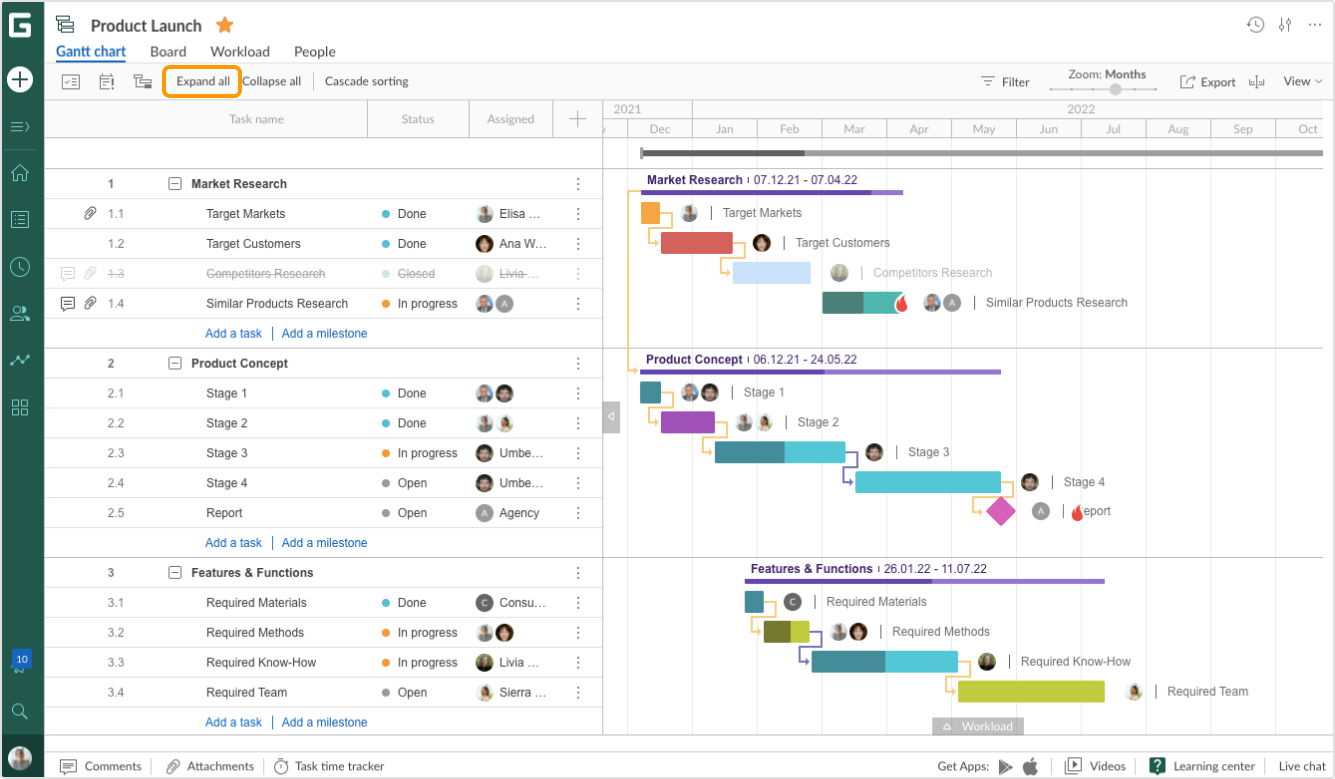
Conversely, if you click on Collapse all, you will see only parent tasks.
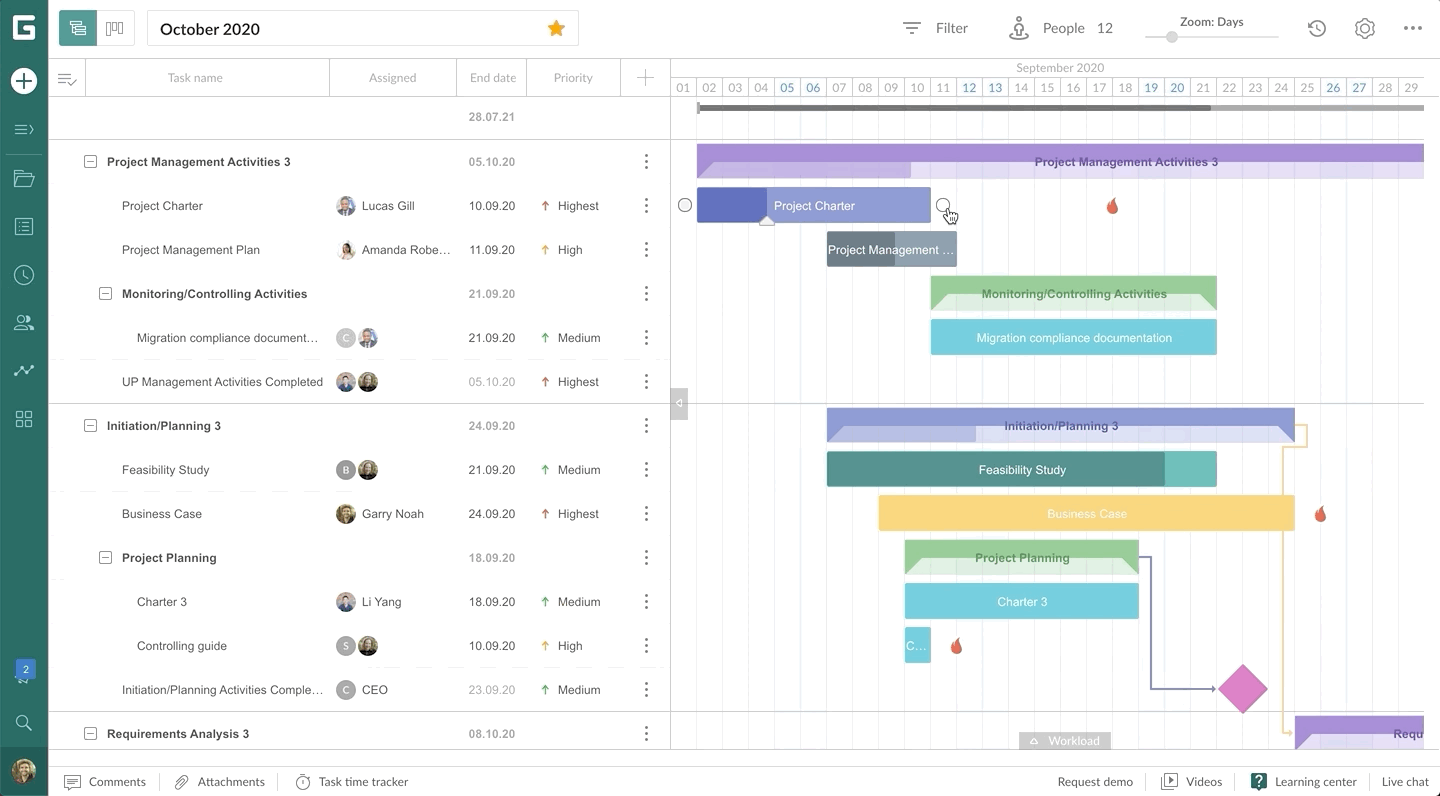
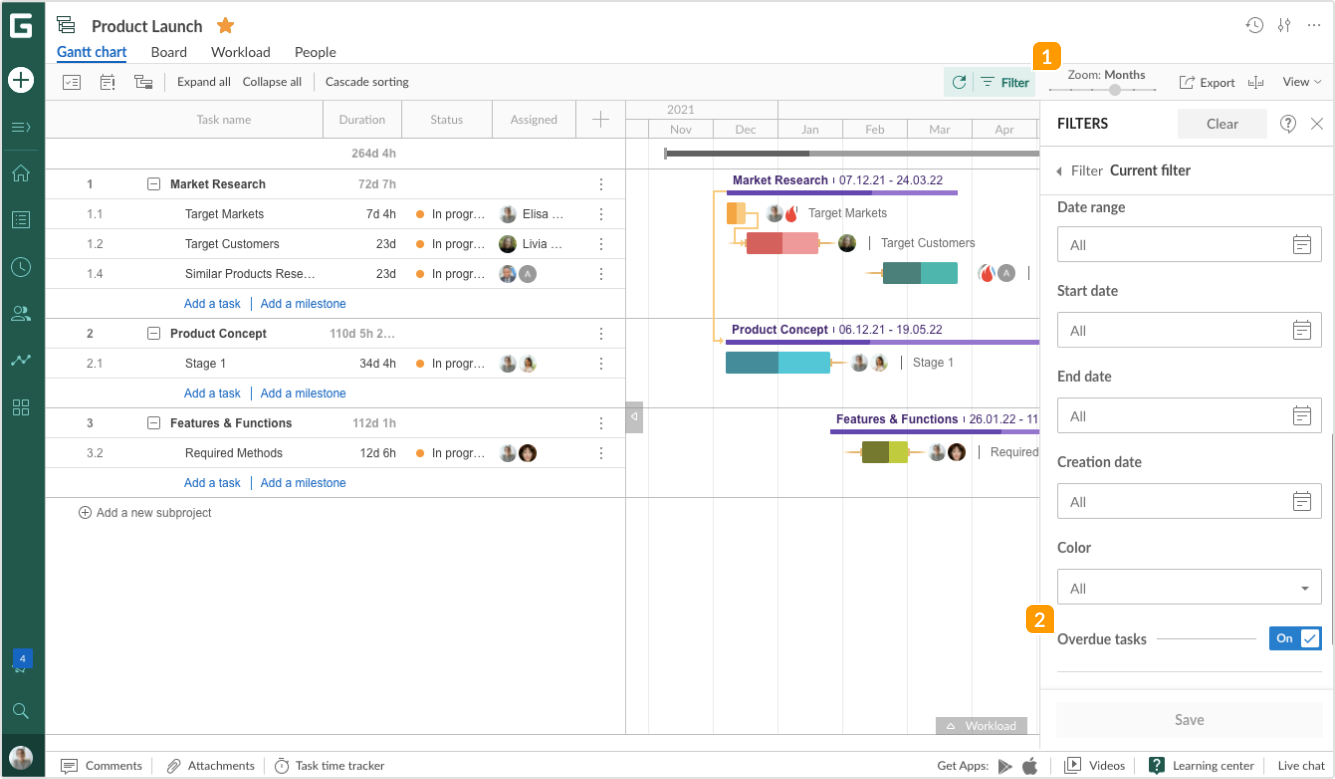
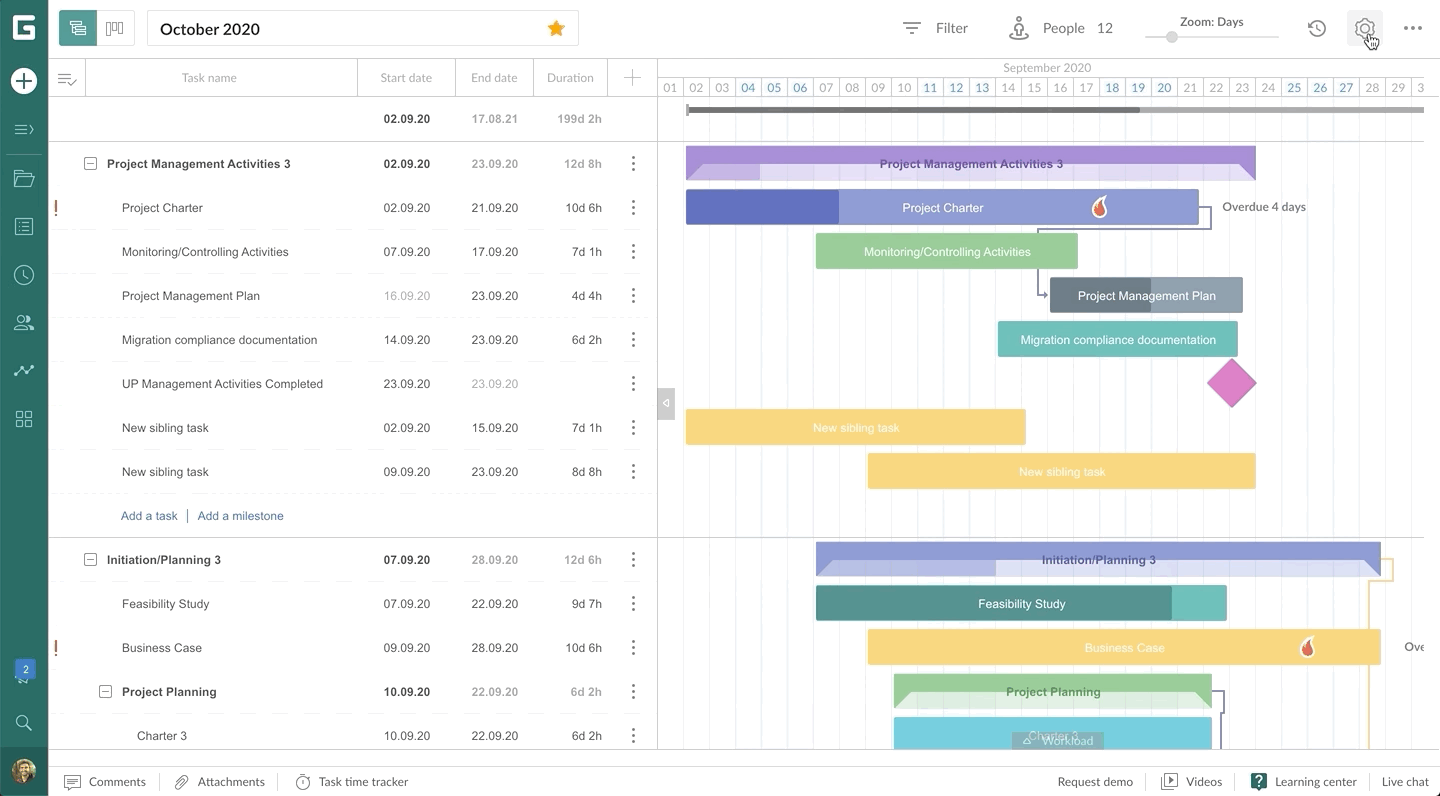
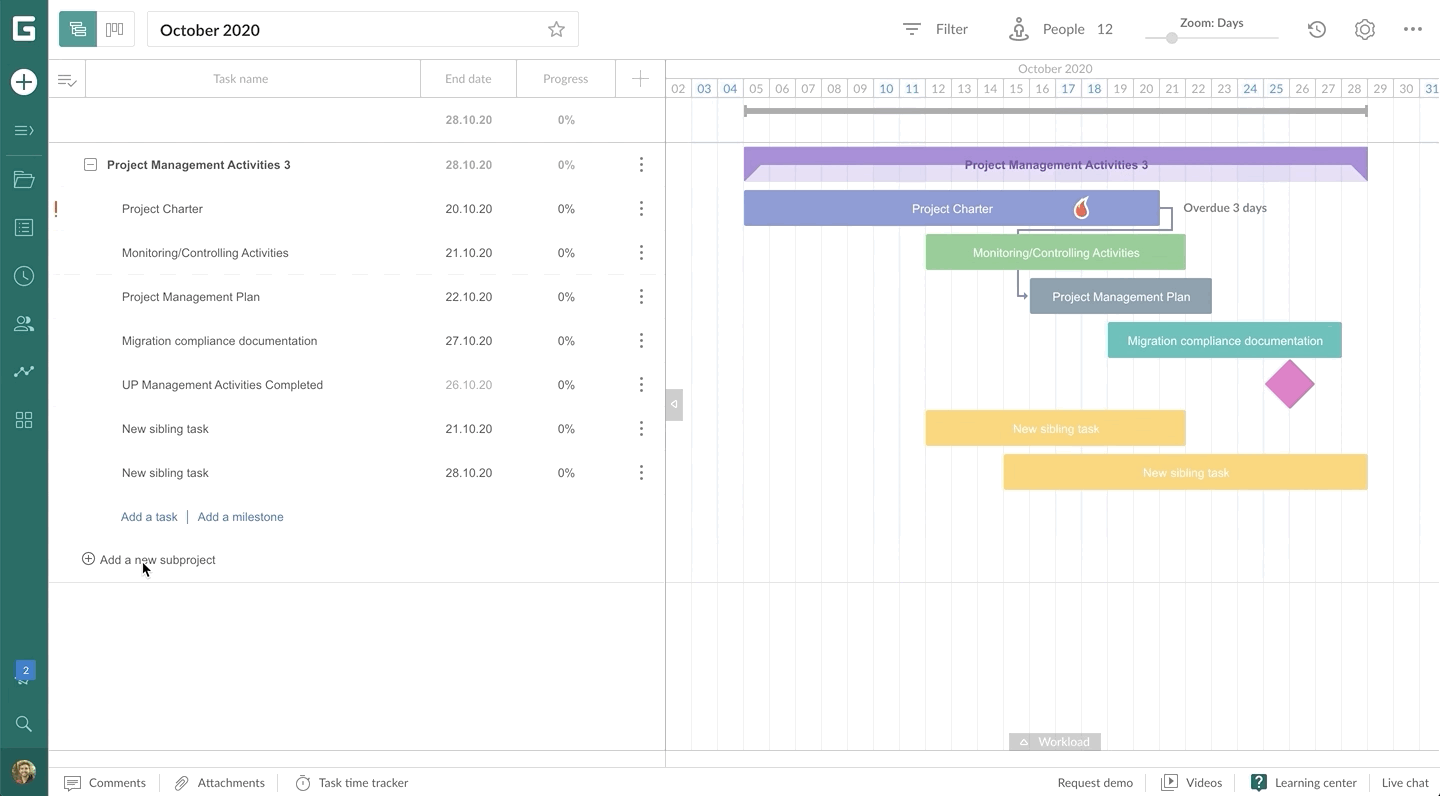
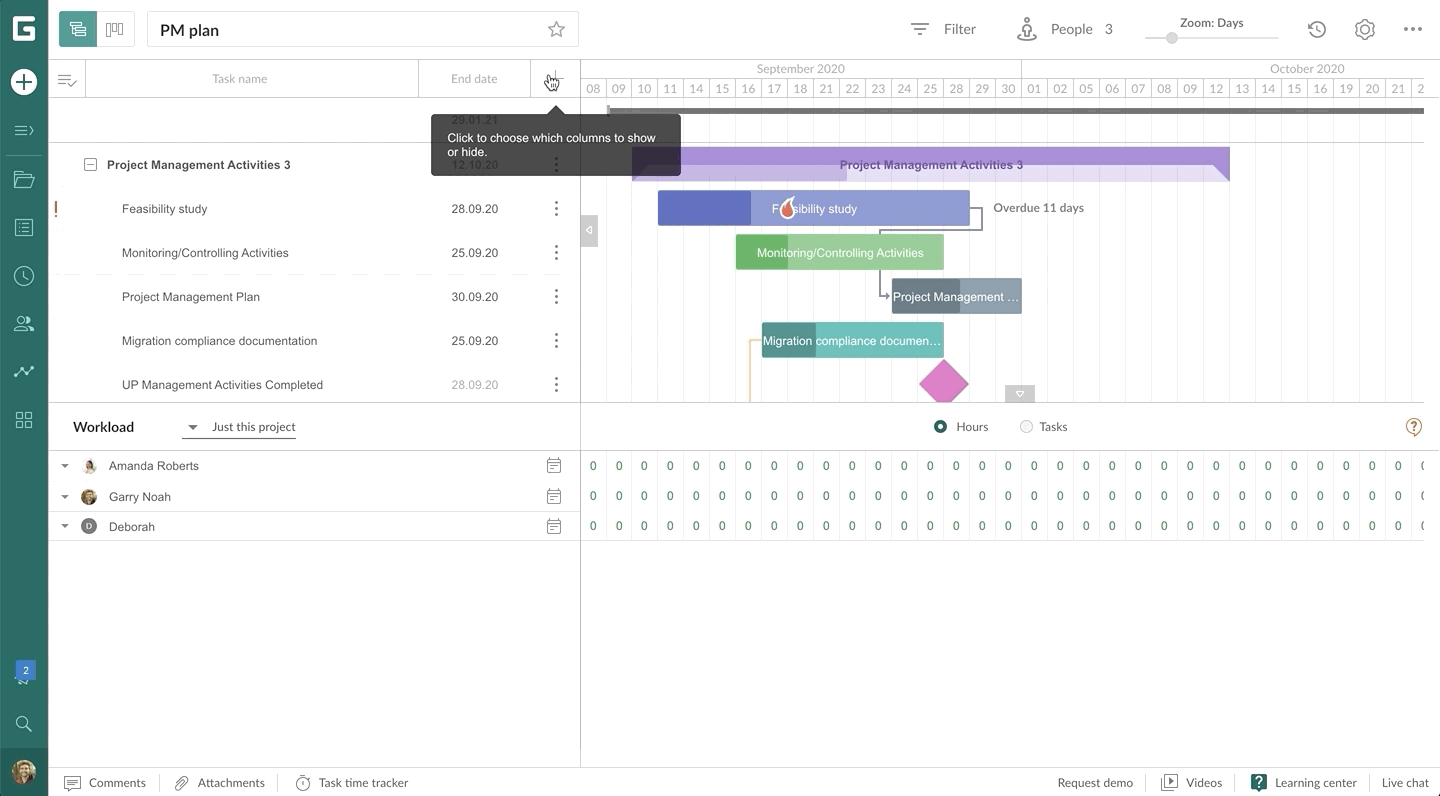
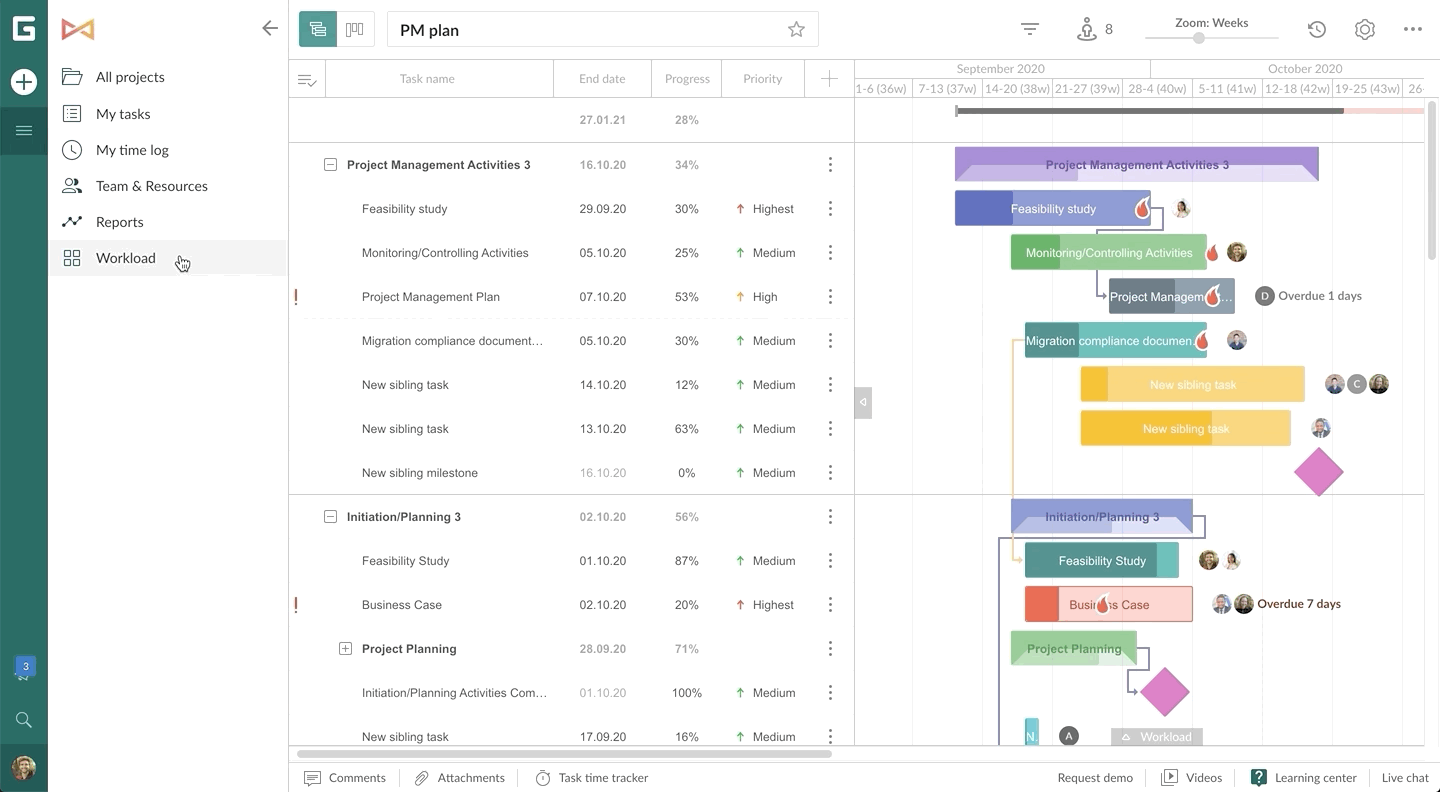
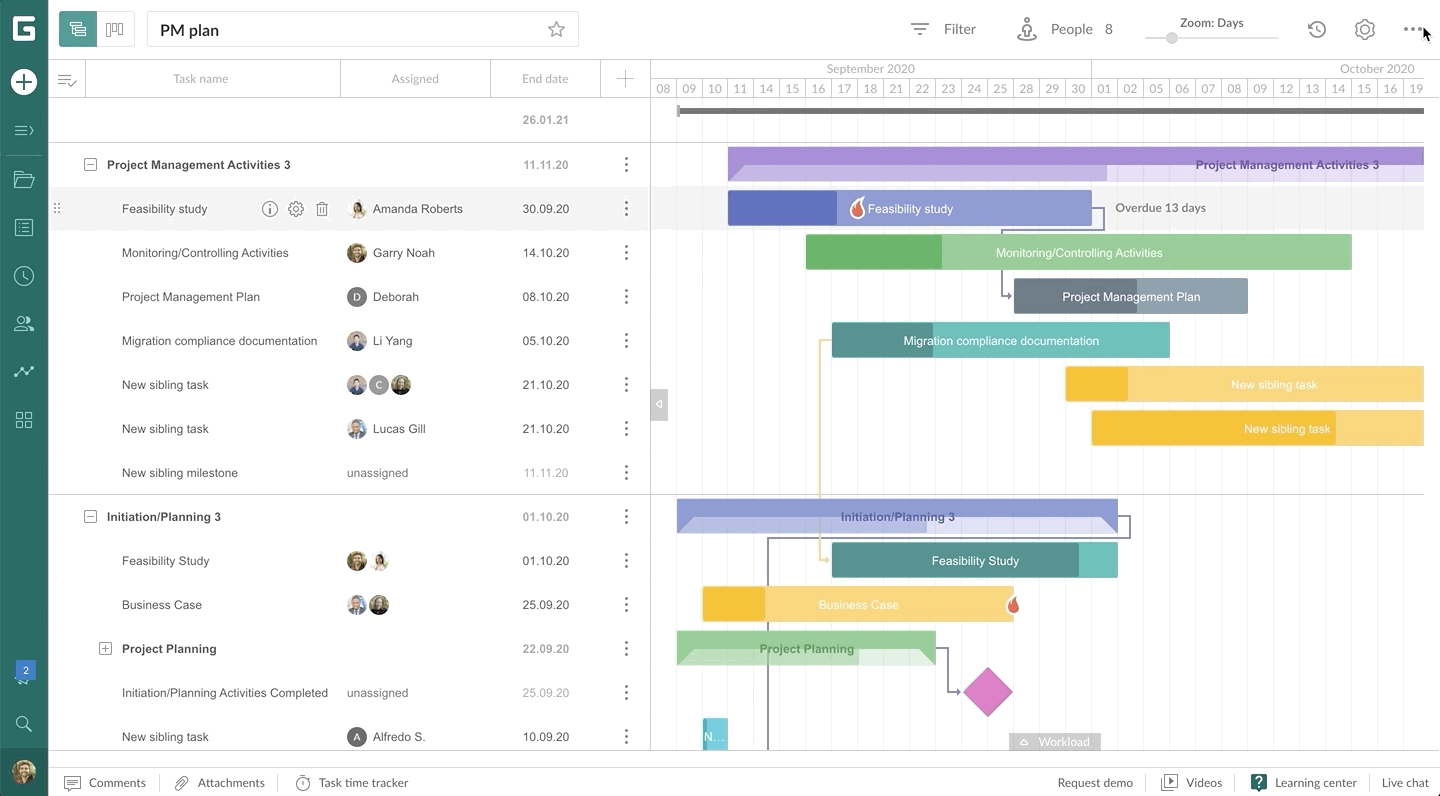
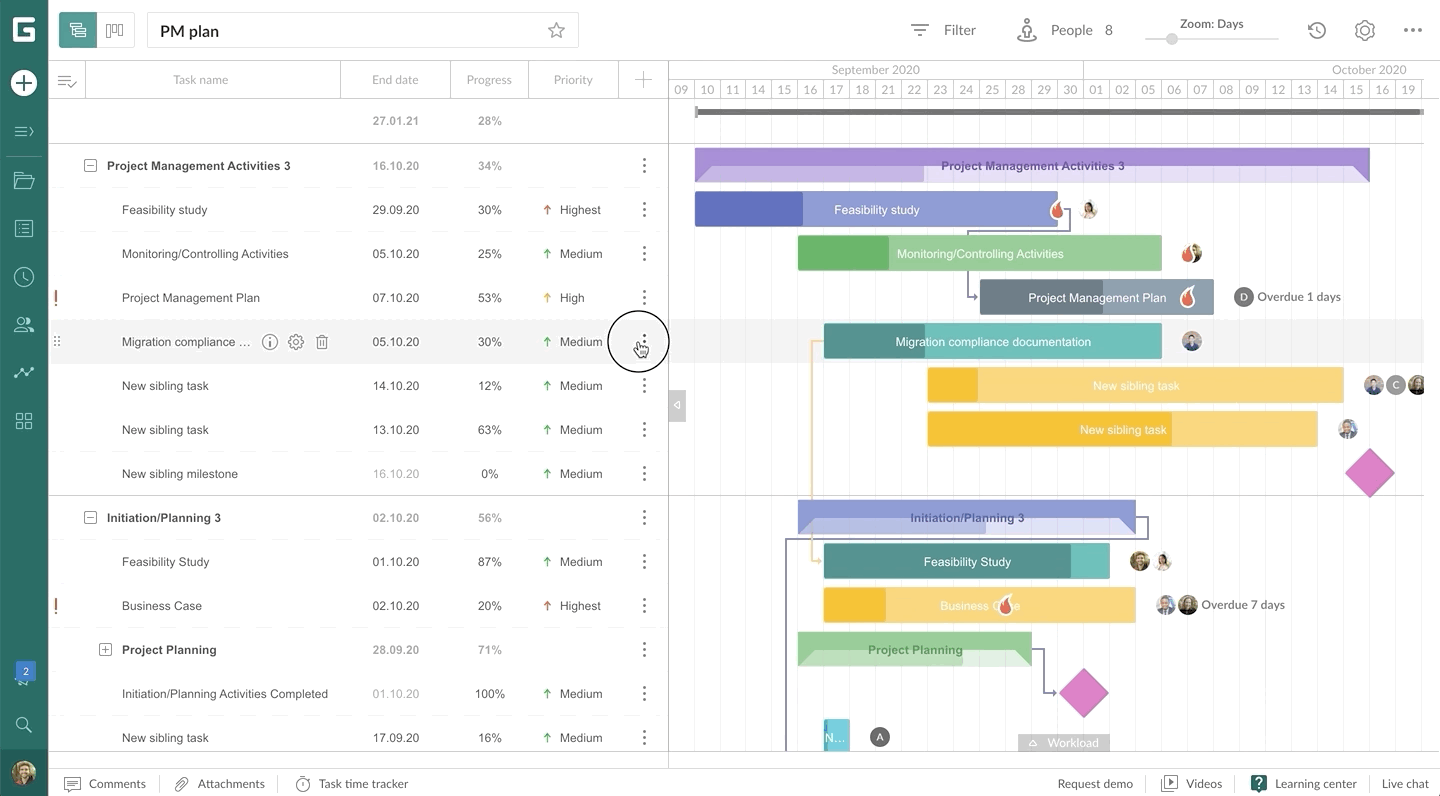
What is an Overdue task?
Overdue tasks are all those tasks that have been due in the past, but currently their progress status is less than 100% or they are defined as “Open/In progress”.
In GanttPRO, there are two ways to track Overdue tasks.
You can just click on a corresponding icon in the top left corner of the project grid, and all the overdue tasks will be highlighted in red.
Similarly, you can use Filters to see all the Overdue tasks.
Just click on Filter in the right corner of the top toolbar and switch on Overdue tasks at the bottom of the drop-down menu. Only overdue tasks will be left on a Gantt chart.
How do I work with a Gantt chart?
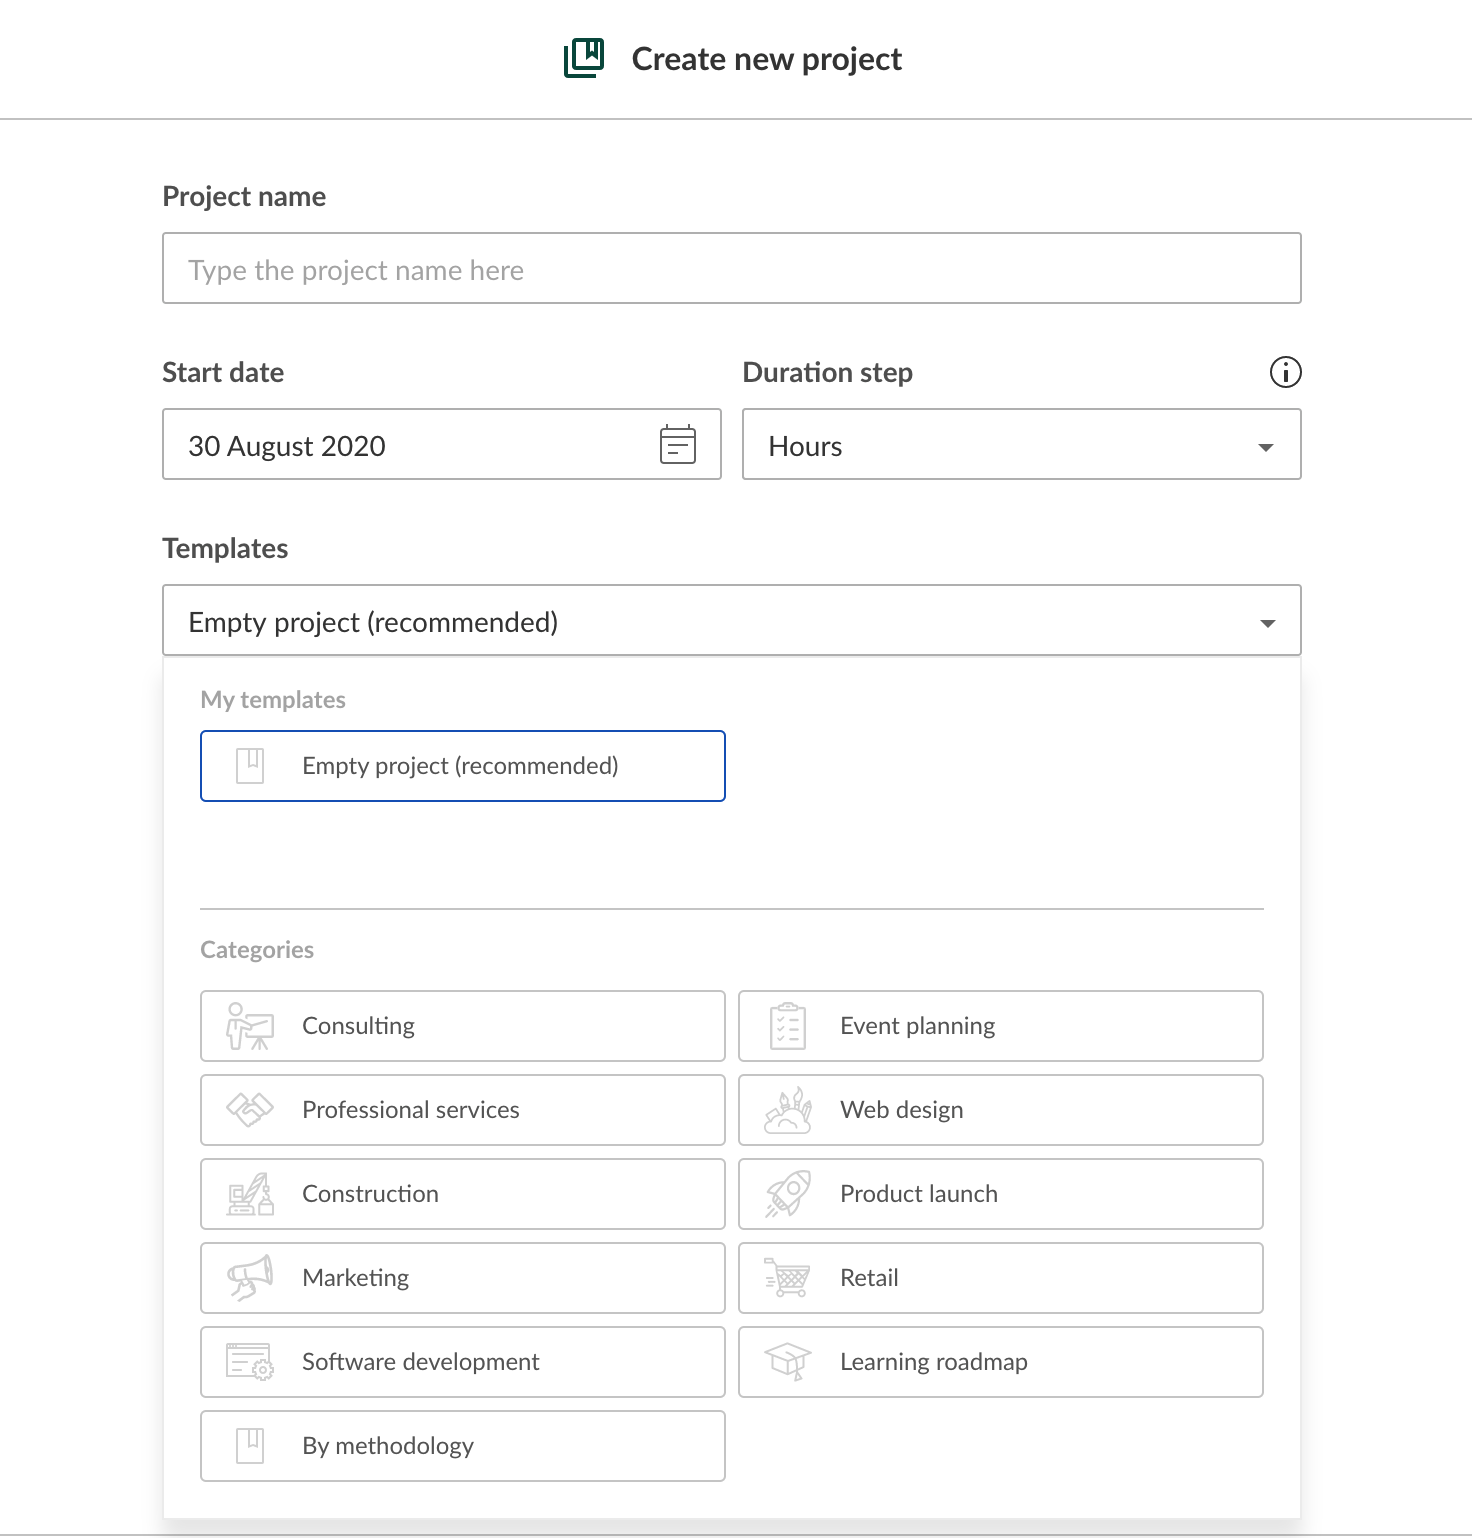
How do I create a project?
Once you log into our Gantt chart app, you will see the “Add a new project” pop-up window. Here you can name your project and set a duration step for it (hours, days, weeks, months). It is more convenient to plan long-term projects in weeks or months and short-term ones in hours or days. In addition, here you can either choose one of the created project templates (Construction schedule template, Event planning template, Design plan template, etc.) or create a new one by choosing the Blank template.
Learn more about how to create a Gantt chart in GanttPRO from this video.
How do I import a project?
Importing from Excel
For successful import, take note of the following requirements:
- Microsoft Excel files must be in .xlsx or .csv format.
- .xls file format is not supported.
- All empty spreadsheets should be deleted.
To import your file from Excel in .xlsx format, click on the + icon in the top left corner of the page and then select Create new project. On the project creation page click on Import.
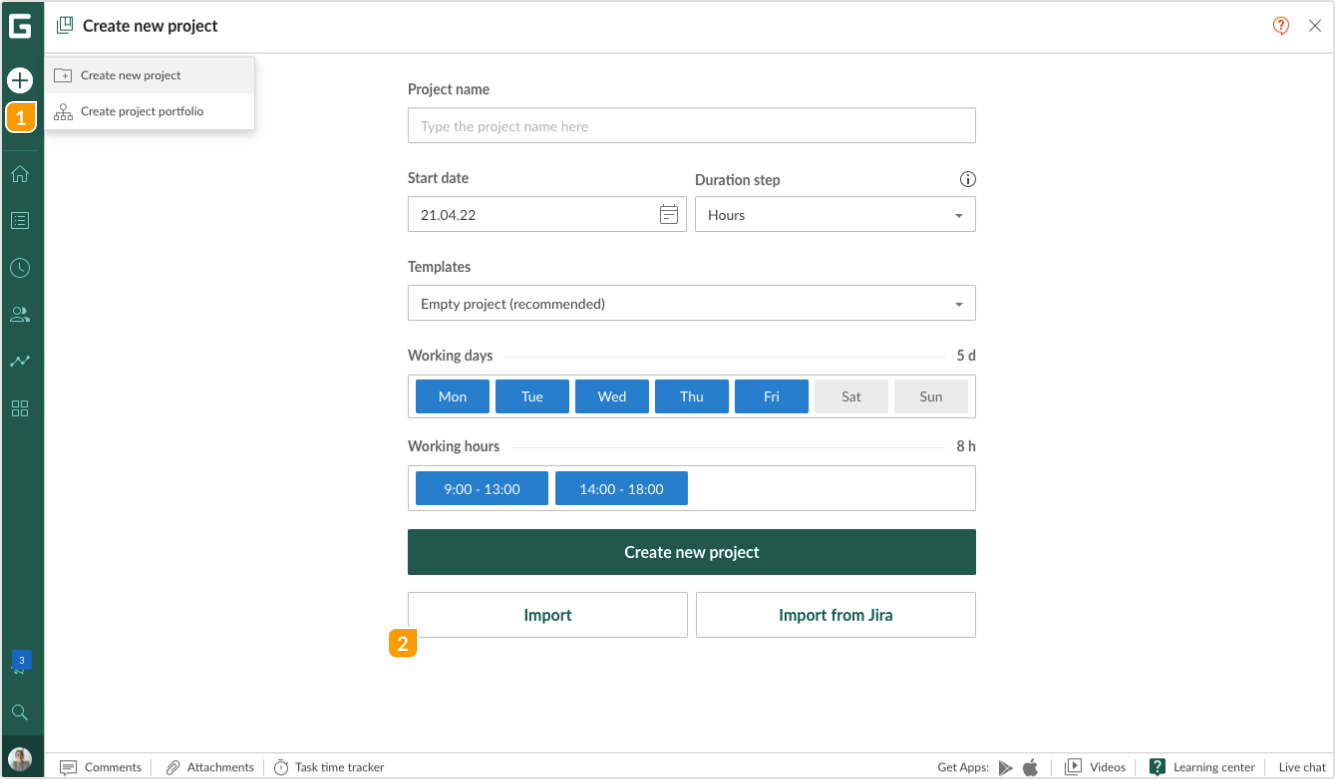
An import window will appear. Type the name of your project if needed, select the document from your computer or just drag & drop it to the designated area, and then click on Import.

Note: If there are several spreadsheets in your original document, you will be asked to choose the one for import.
After that, you will see your project data. Assign the fields according to their contents choosing the options from the drop-down menu of each field. There you have the following options:
- WBS number.
- Task name.
- Start and End dates and time.
- Duration.
- Progress.
- Task description.
- Assignee.
Note: You can also import such Custom fields as Text, Number and Date. But they have to be created beforehand in the Custom field section of Profile settings.
If you don’t need a field or it does not fit into any existing category, leave it within the Not used category.
Do not forget to indicate the format of End and Start dates you have used in your Excel project for a correct import. Additionally:
- make sure there are no extra spaces or irrelevant characters in cells
- all the cells with duration and dates have set values
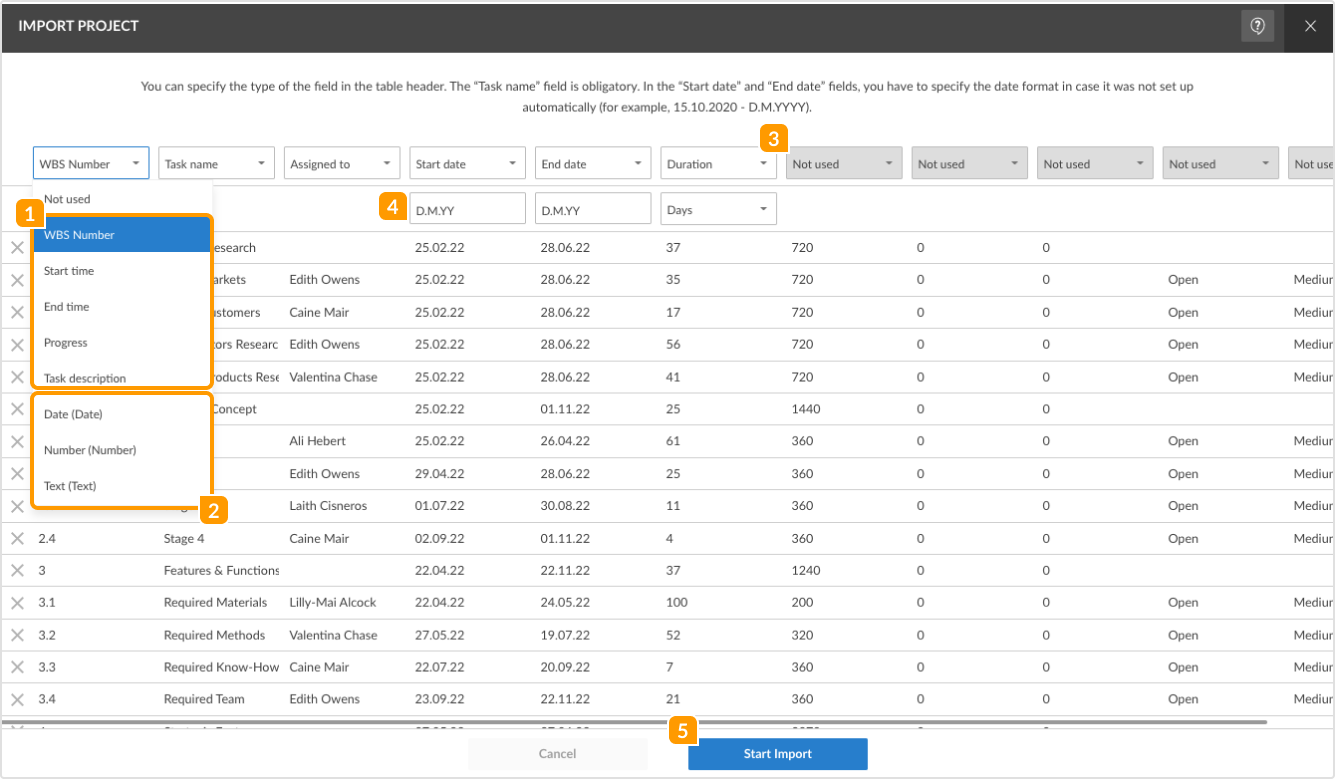
Once you have configured all the necessary fields, click on Start Import. When the import process is finished, you can see your Excel project in GanttPRO.
Importing .csv files from databases
The process is the same as with .xlsx files.
Importing from MS Project
To import your .mpp file from MS Project, click on the + icon in the top left corner of the page and then select Create new project. On the project creation page click on Import.

An import window will appear. By default, the project will be given the name of the project that you import from MS Project. If you want it to be different, you can change it in the corresponding field. Select the document from your computer or just drag & drop it to the designated area, and then click on Import.
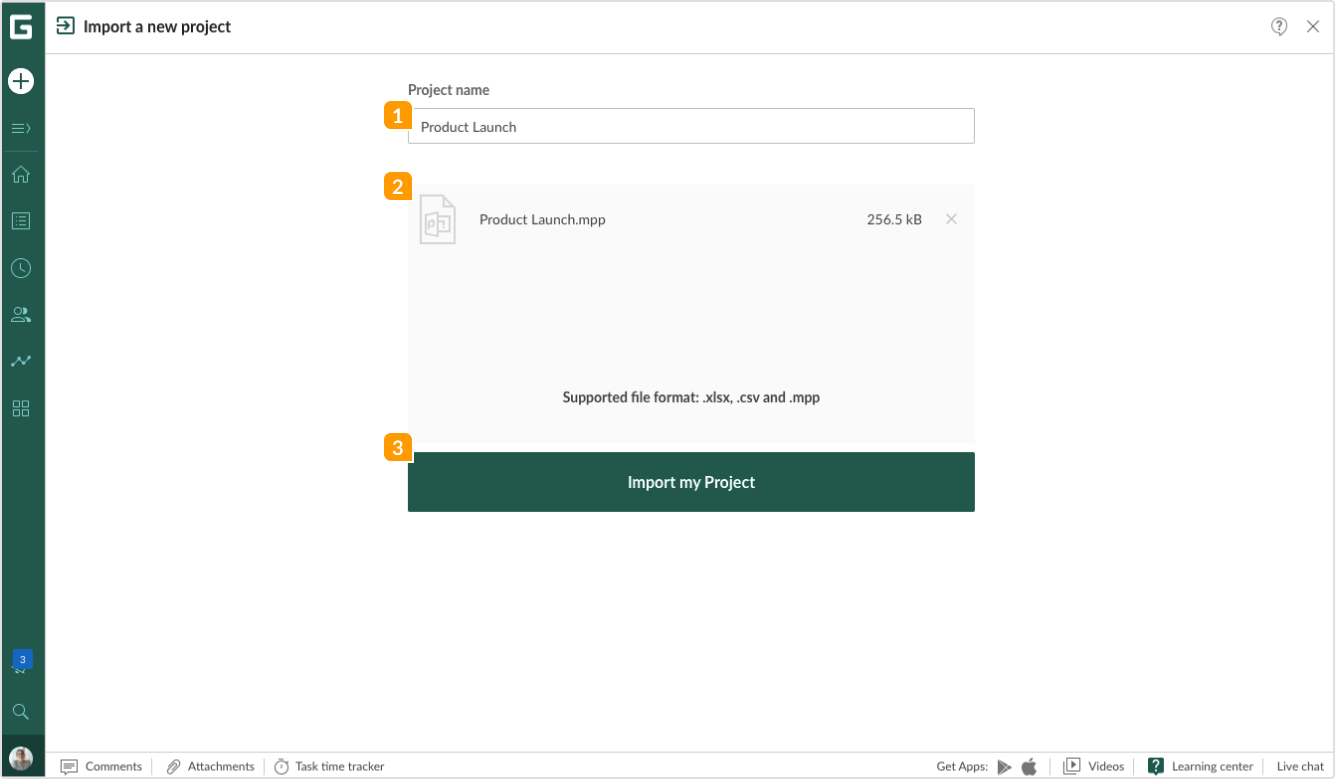
It may take a little to load your document, especially if you have a big project. When the import process is completed, you will see your .mpp project in GanttPRO.
Note: GanttPRO imports project calendar and task dependencies, and also all the resources assigned to tasks in a .mpp project as virtual resources. Task descriptions, comments, and attachments will not be imported.
How do I create new tasks?
There are two ways to add tasks to your project Gantt chart: you can click the “Add a task” button on the left in a task tree. Or you can click the three-dots button on the right side of a task and choose “Add a sibling task”/”Add a subtask”.
A sibling task is added to the same level as a task you are adding it to. A subtask is added as a child task to a sibling one on a lower level. Once subtasks are added to a task, it becomes a “parent” task and is considered as a group of tasks. It estimates the total duration of all tasks comprising it.
What are project and parent tasks?
There is a hierarchy in a Gantt chart. The highest level is a project that consists of parent tasks with a number of subtasks on lower levels.
Parent tasks are tasks that include a number of subtasks. They may have links in between. The duration of a parent task depends on the duration of key subtasks.
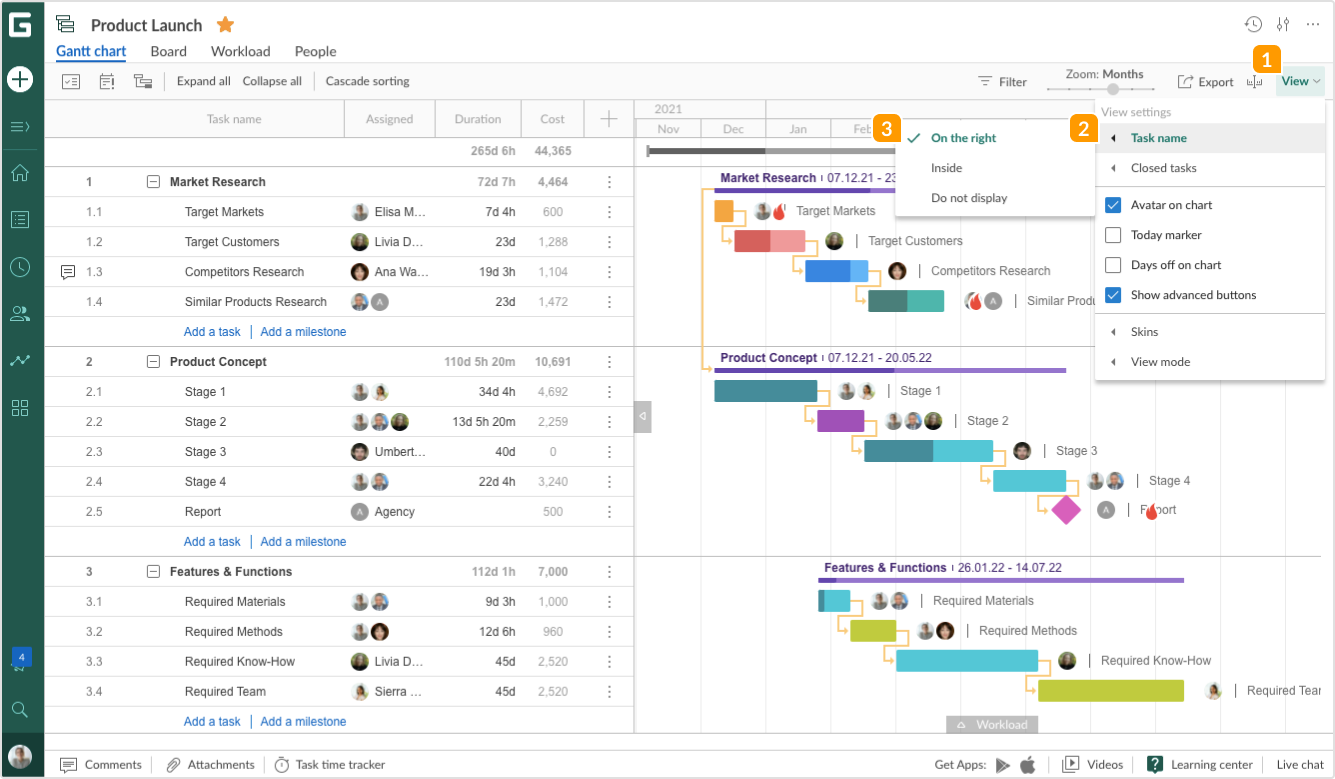
How can I customize Gantt chart view?
In GanttPRO, every user can adjust a Gantt chart view according to personal preferences.
For that, go to the View settings in the upper right corner of the project grid.
- Task name
First of all, you can choose how you prefer to see the Task name on the Gantt chart: On the right to the taskbar, Inside the taskbar, or hidden (Do not display option).
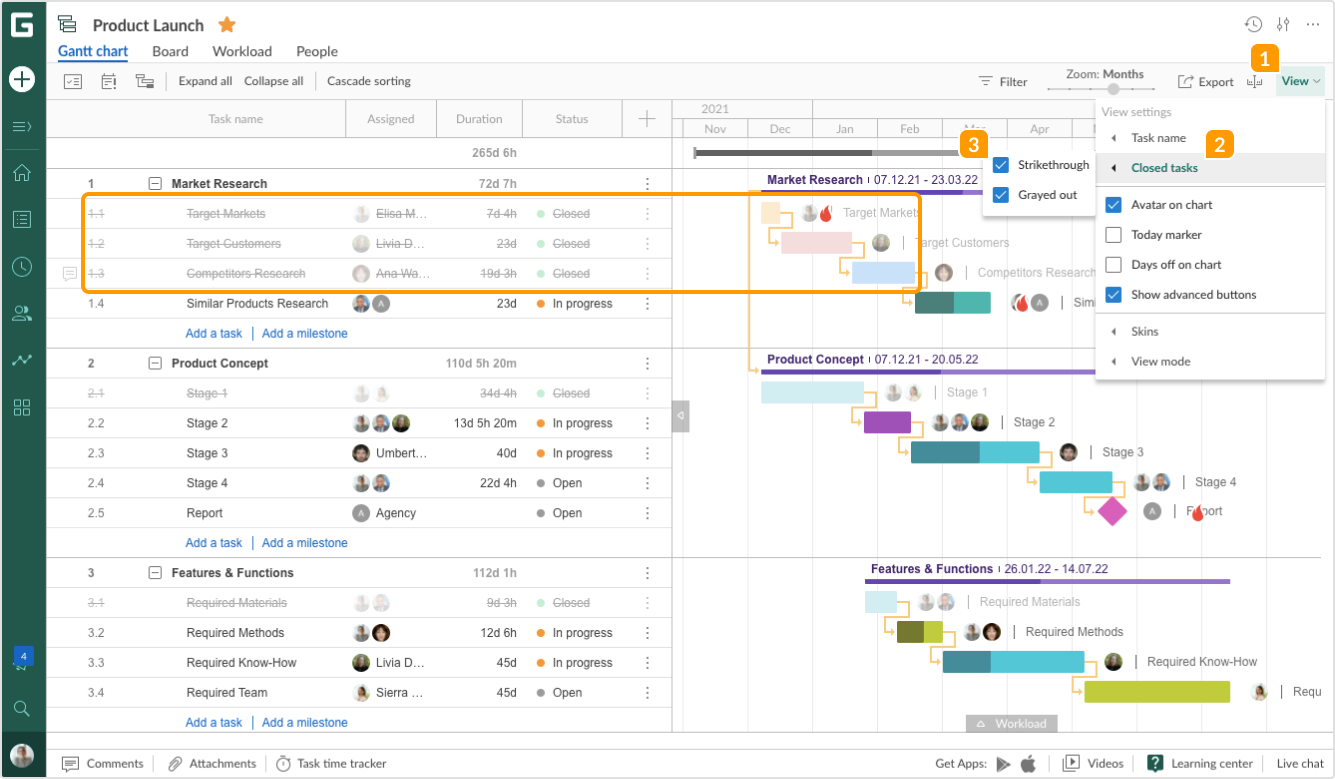
- Closed tasks
Closed tasks that have been marked with such status in Task settings or in Standard fields on a project grid, can be displayed in several ways for better visualization. There are two options available: Strikethrough or Grayed out. You can select only one, have two at the same time or have none at all.
Strikethrough will be applied to a task list, while Grayed out will be shown both in a task list and on a Gantt chart. In this case, the color of task bars with the “Closed” status will be faded.
- Avatar on chart
You can enable Avatar on chart to quickly see on the Gantt chart who is assigned to a task, and disable it when not needed.
![]()
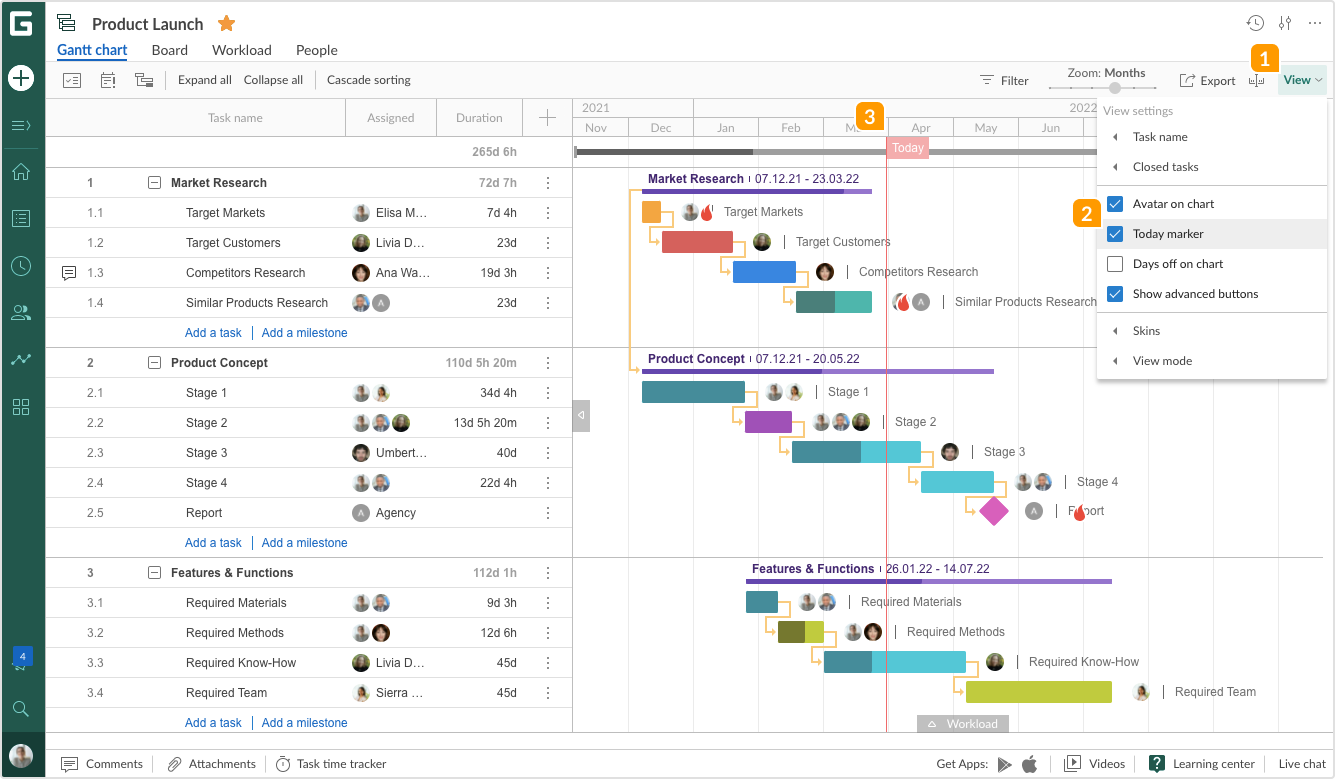
- Today marker
Turning on the Today marker, which is a red line indicating the current day, you can more easily see current tasks and the progress made in the project.
- Days off on chart
You can also choose whether you want to see the days off on the Gantt chart timeline. By default, the timeline shows only weekdays. To see the days off on your Chart, check the box Days off on chart.
Remember to adjust the timeline for that using Zoom, as you can only see the days on the timeline when Zoom is set to days.
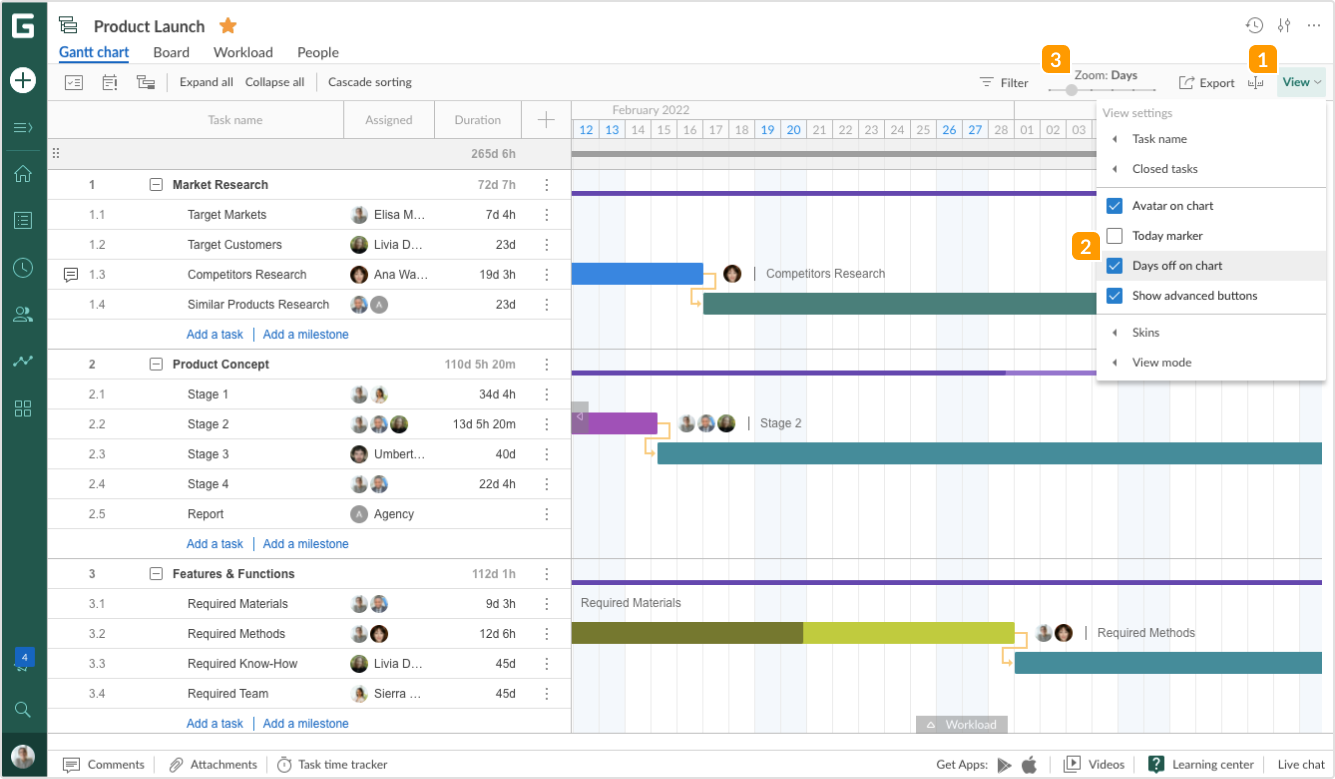
- Show advanced buttons
Check the box for Show advanced buttons to have a possibility to quickly add a task or a milestone on the grid, or uncheck it if you need to save some space.
Note: This option is not available for Members without editing rights.
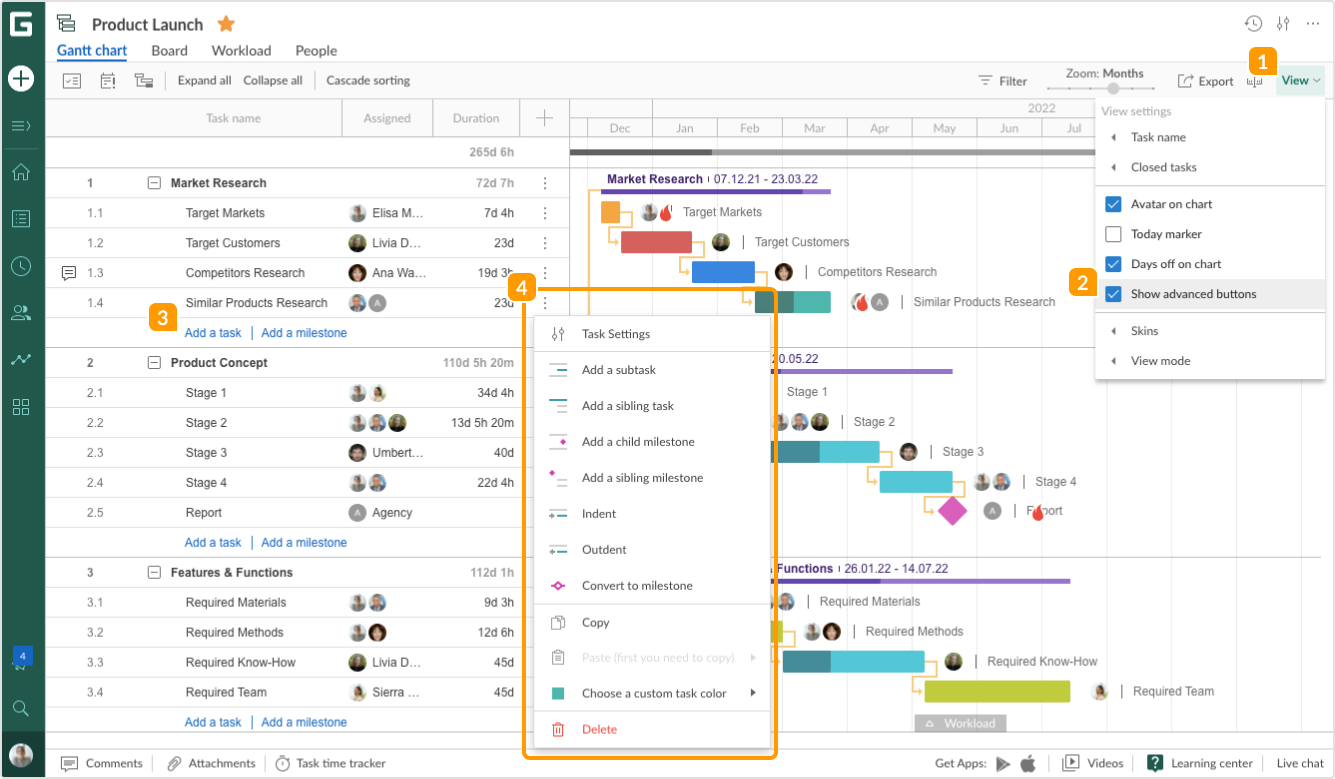
You can always add tasks, subtasks, and milestones by clicking on the three dots to the right of the corresponding subproject and task.
- Skins and View mode
In the Skins mode, you can configure the way your project grid looks like, and in the View mode – the size of the rows.
How do I create a new group of tasks?
If you need to add a new group of tasks to your Gantt chart, you can start by adding a new task (on the left-hand side where a task tree is reflected, press the three-dots button in the place where you need to create a task). You can choose whether you would like to add a New Sibling Task or a Subtask. If you add a subtask to your task, your task will turn into a group of tasks and will have the same features as the project estimate: the group of tasks’ duration will depend on start/end dates of its subtasks.
How do I set task durations?
In GanttPRO, there are 2 ways to set task duration.
1. Inline editing. Just click on a needed cell in the Duration field and set the number of hours, days, weeks, or months.
2. Editing through task settings. Click on the three-dots icon on the right to a task you work on and choose Task Settings. Or double-click on a task in a Gantt chart itself. The pop-up window with task settings will appear. You can change start and end dates in the date-picker or use the Duration field.
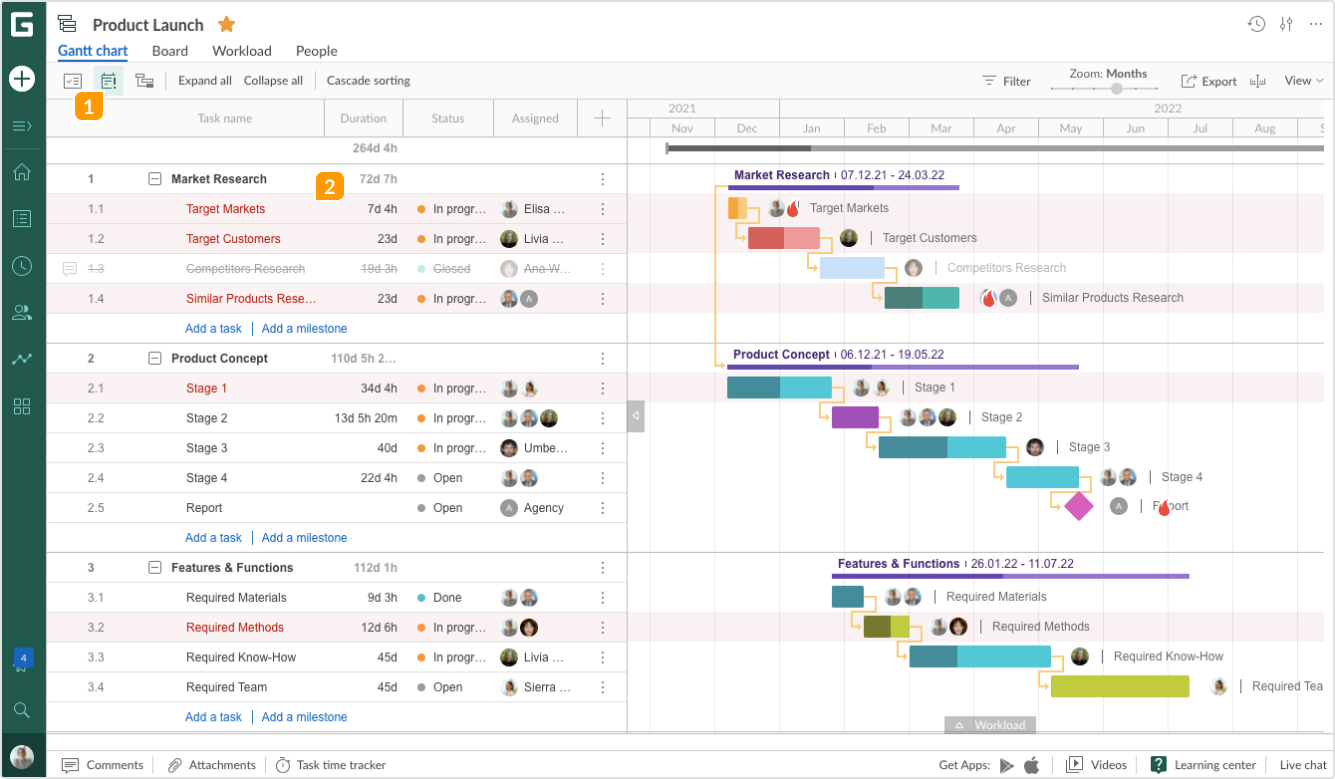
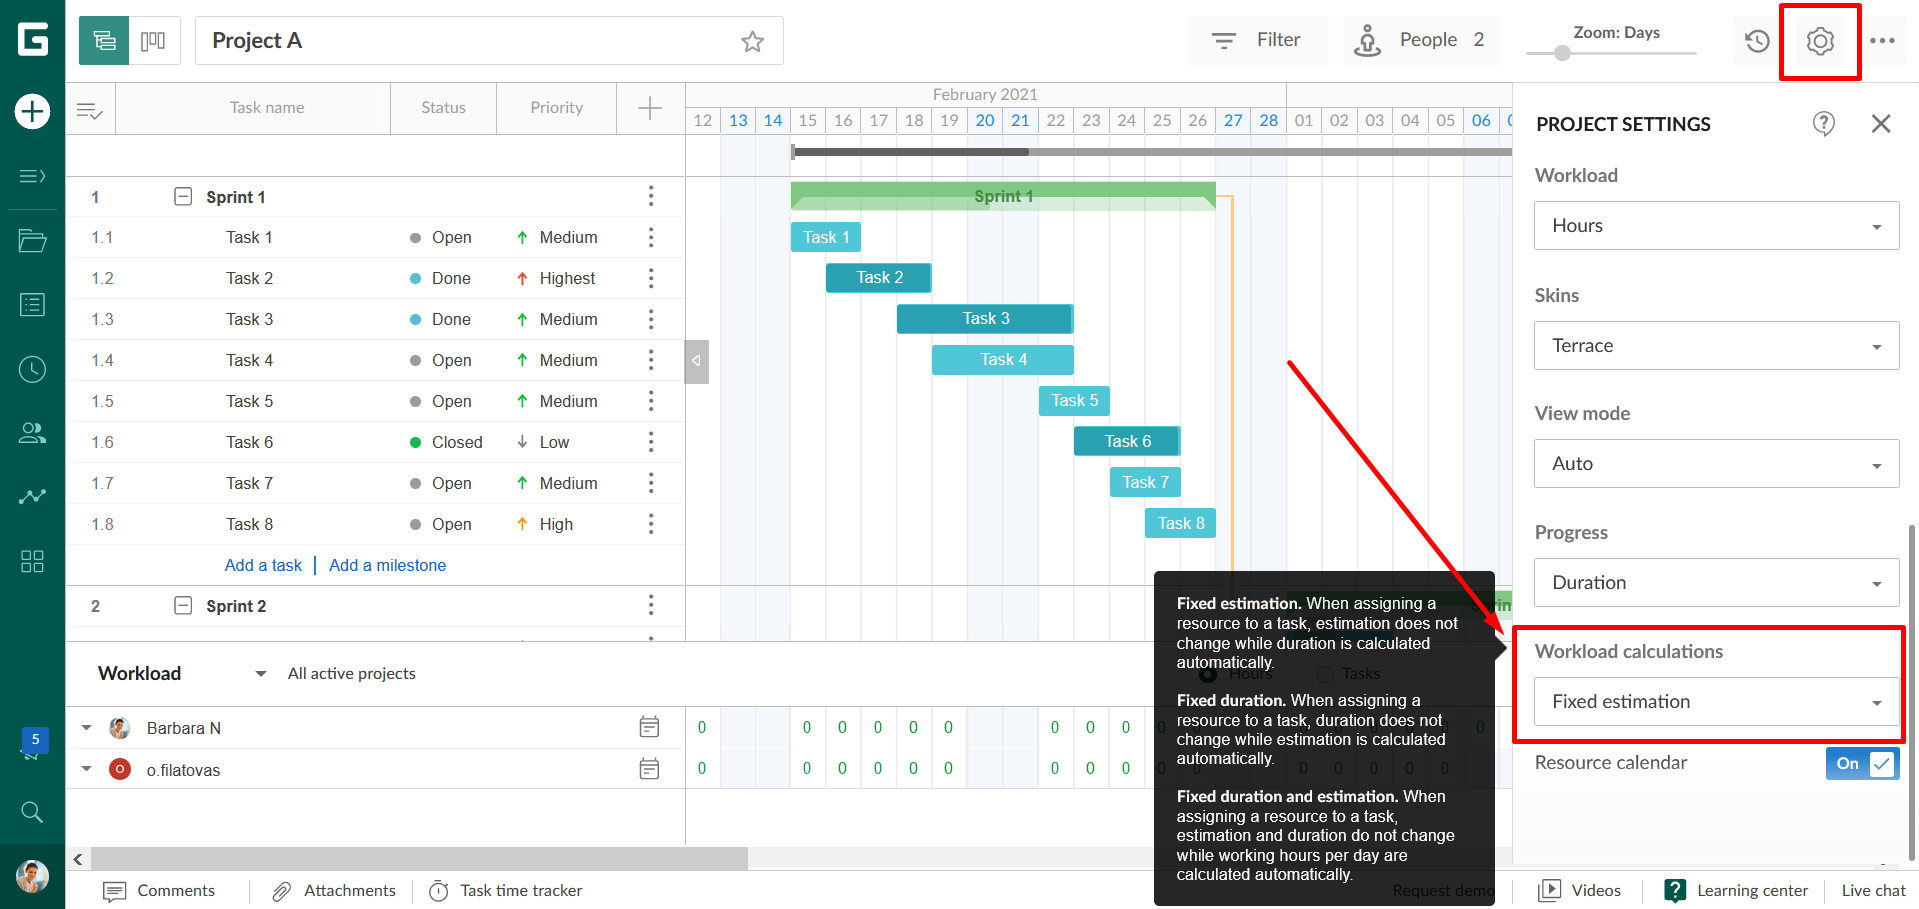
What can I configure in project settings?
In Project settings, you can switch on additional options, set up a project calendar and units in which certain calculations will be displayed.
To open Project settings, click on the corresponding icon (1) in the top-right corner. This will open the following options:
2) Change current working week
3) Auto scheduling
4) Duration step
5) Workload
6) Progress
7) Workload calculations
8) Resource calendar
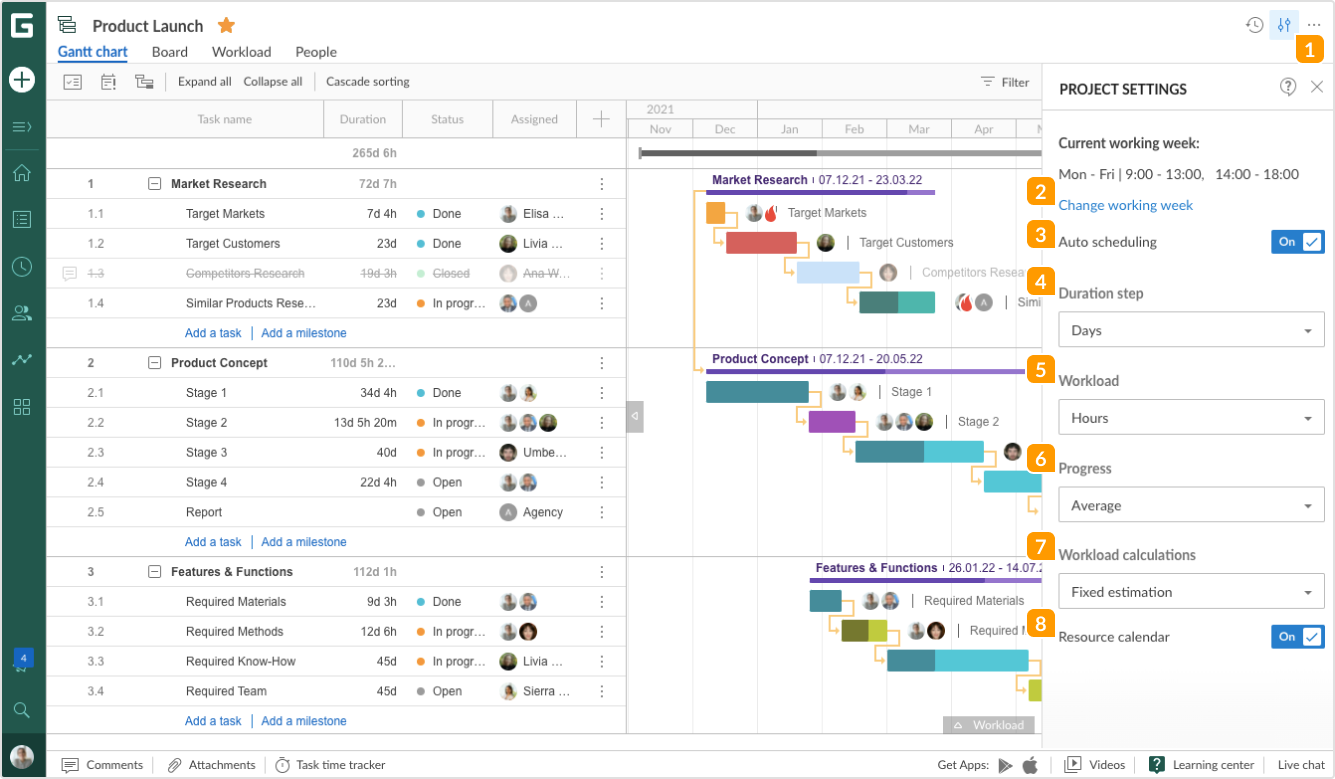
Change current working week
Here you can view and set a work schedule for the project: days off, holidays, exceptions, etc. For a more detailed explanation of how to do that, go to the Project Calendar.
Auto scheduling
GanttPRO’s Auto scheduling recalculates task schedules, when you change the start and(or) end dates of the tasks connected with dependencies or set new dependencies for them.
This feature is enabled by default for all new projects, but you can always turn it off in Project Settings and start planning projects manually.
Duration step
The duration step in GanttPRO is a value that is used for calculating time in a project. There are four options: hours, days, weeks, and months.
It is more convenient to plan long-term projects in weeks or months and short-term ones in hours or days.
You can always change the duration step in Project settings by selecting the most appropriate unit of time from the drop-down. Once you change it, the duration step for all the tasks will be displayed accordingly.
Workload
Here you can choose whether the resource workload should be displayed in hours or %.
Progress
It is possible to choose whether progress will be calculated based on Duration or on Average.
When it is based on Duration, calculations of progress take into account the duration of all the related tasks to come up with automatic estimations where applicable.
For example, you have a parent task containing one task that lasts for 4 days and four tasks that last for 1 day each. The total duration of all those tasks is 8 days. Once you complete a four-day long task, which is a half of all, the overall progress will be calculated as 50%.
When progress is calculated based on Average, the calculations are made by summing up all the related tasks and dividing them by the total number of those tasks to come up with automatic estimations where applicable.
Looking again at the previous example, the emphasis here will be on the amount of tasks, regardless of their duration. So, when one subtask is completed, the overall progress will be calculated as 20%.
Workload calculations
Here you can choose between three ways of duration and estimation calculation:
- Fixed estimation – when assigning a resource to a task, estimation does not change while duration is calculated automatically.
- Fixed duration – when assigning a resource to a task, duration does not change while estimation is calculated automatically.
- Fixed duration and estimation – when assigning a resource to a task, estimation and duration do not change while working hours per day are calculated automatically.
Resource calendar
This option can be enabled for fixed estimation mode in effort allocation. It takes into account the resource calendar to calculate task duration. When assigning a resource to a task, task duration will be automatically calculated based on its working hours.
How do I set working days and hours for the whole project?
In GanttPRO app, you can set working days and hours in the Project Settings.
In the Plans and Pricing (Individual or Team pricing plans) of our Gantt chart software, there is a possibility to customize working days and hours of the whole project. Just once set them and apply to your project.
For example: if your working week is from Monday to Friday and you do not work on Saturday and Sunday, choose Mon, Tue, Wed, Thu, and Fri. In the same way, you can choose working hours and set, for instance, regular lunch or other breaks.
You can choose between Table and Calendar views and set exceptions for your project. They can be days-off, holidays, vacations, etc. Also, you can save your calendar as a template and apply it to other projects.
Can I set personal calendars?
In GanttPRO, there is a possibility to set personal calendars for team members and resources. Go to the Team and Resources button, choose the resource, and click on the button with three dots on the right. Personal calendars are set up with the same approach as a project calendar. You can choose between views and set exceptions in personal calendars.
How do I connect tasks with dependencies?
A task dependency is a relationship between tasks that indicates a particular order in which these tasks have to be performed.
In GanttPRO, dependencies are depicted with orange arrows.
Once you add a new task, hover over its bar on a Gantt chart. You will see little circles at each end of it. To set dependencies, just connect those circles according to the type of the dependency you need.
There are 4 different types of dependencies:
1. Finish to start (task B can’t start before task A is finished);
2. Finish to finish (task B can’t be finished before task A is completed);
3. Start to start (task B can start after task A has started);
4. Start to finish (task B can’t be finished before A starts).
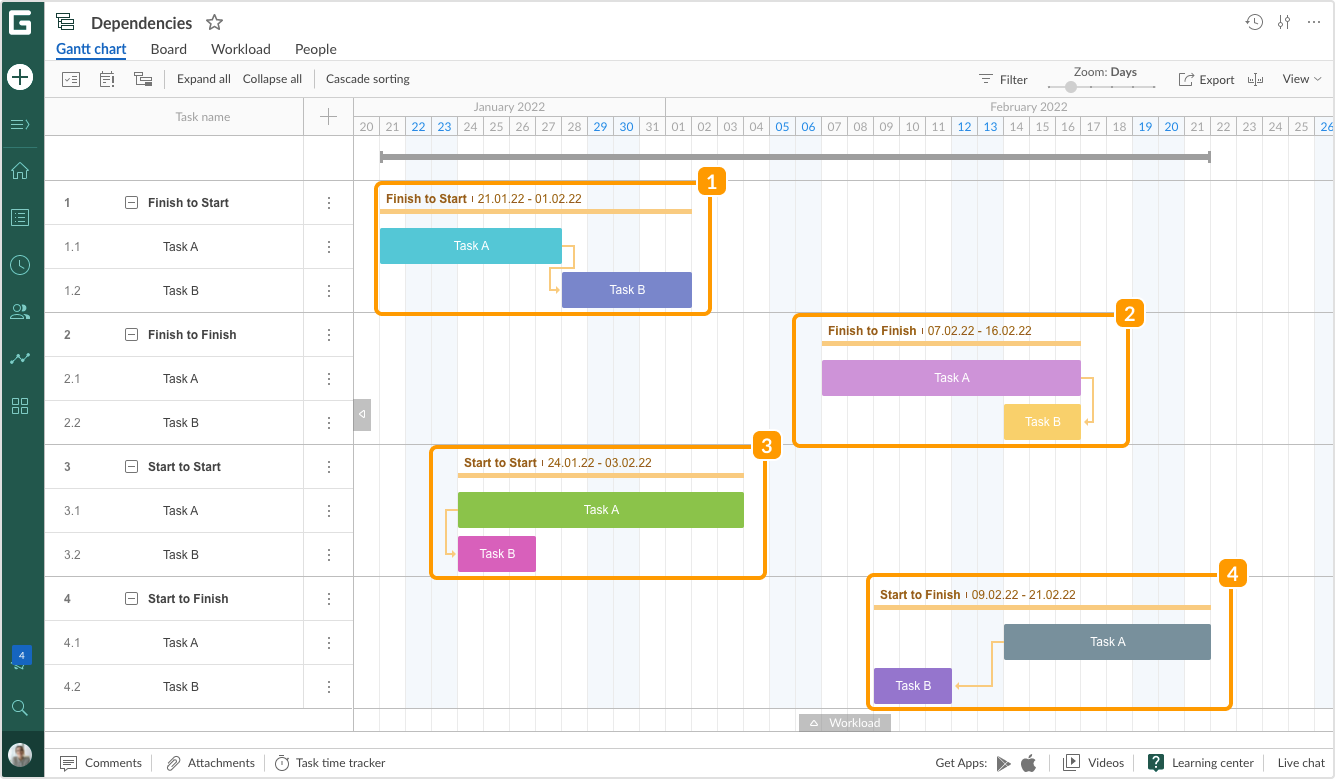
You can also create dependencies between tasks in Task settings and using the Predecessor field in Standard fields.
Note that if you increase or decrease the amount of time for a task with dependencies, all other tasks it is connected to will also move on a timeline. In that case, you will also see the indication of the completion delay for all the connected tasks.
How to delete dependencies?
To delete dependencies between tasks on your Gantt Chart, click on the arrow between the corresponding tasks and select Delete link in the window that will appear.
How do I set progress?
Progress is a basic feature of our Gantt chart software. It allows you to see and set the degree of completeness of each task and a project on the whole.
You can set Progress using drag-and-drop function (by dragging the triangle at the beginning of a task to a needed point). Or you can go to task’s settings and change it in the Progress field using Left or Right arrows or simply clicking on it and setting the value). Also, you can manually change the values in Complete/Left fields (under the Progress in Task Settings). If you change values here, you will see that progress will be recalculated automatically.
Progress is calculated on the basis of either one of the two principles ( Duration or Average) which you can choose in the Settings (Advanced settings).
Let’s say, your project consists of 3 tasks with durations of 2, 3, and 5 hours. The Average principle means that each task (even the shortest one – 2 hours) will be calculated as 33% of the total progress of a project.
The Duration principle means that the shortest task will be calculated as 20% of the total progress (2+3+5 = 10, so 2 hours equals 20% of the total progress). So visually, progress based on the Duration principle will be reflected differently from the Average principle.
The Duration principle gives more accurate data on the progress of a project.
How do I create multiple subprojects in one tab?
The ability to create multiple Gantt chart subprojects in one tab is included in all the pricing plans of GanttPRO, even in a free trial. Just click the “Add a new subproject” button to create a new project.
Can I create multiple overviews of my projects and work with project portfolio?
Yes. In GanttPRO, you can create multiple overviews of required projects and work on consolidated data from them. This is called project portfolio management.
Thanks to the project portfolio management feature in GanttPRO, you’ll be able to:
– See the high-level picture of chosen projects.
– Analyze selected projects and indicate their health.
– Keep projects on track.
– Manage required parameters such as tasks, duration, estimation, cost, etc.
– Determine the optimal resource allocation.
It is very easy to create an overview of multiple projects in GanttPRO. There are two ways to do it:
– Go to the left dashboard, choose All projects, click on the three dots on the right of any project, and choose Create project portfolio.
– Click on the big + sign in the white circle on the left dashboard and choose Create project portfolio.
In both cases, you will see checkboxes. Tick those you need and create an overview of the chosen projects.
What you need to know about project portfolio management in GanttPRO:
– The name of the overview includes all the projects names it consists of separated by a comma. But anytime, you can rename it.
– The structure of each project remains the same in an overview.
– Each change you make in the project portfolio view is reflected in the corresponding projects. However, if you delete an overview, it does not affect projects themselves.
Who has access to project portfolio management?
This feature is available to Owners and Admins.
Can I browse all tasks from all projects in one place?
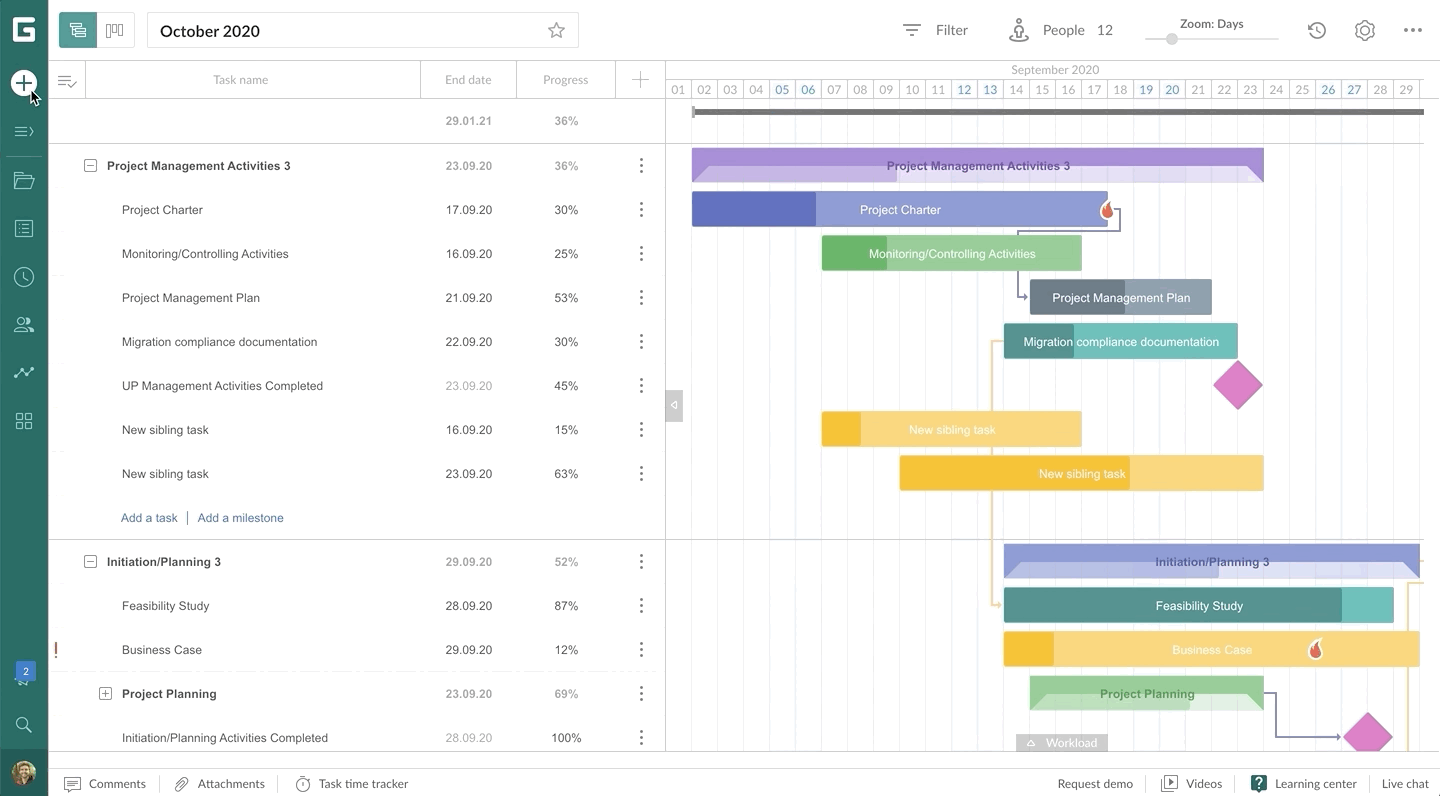
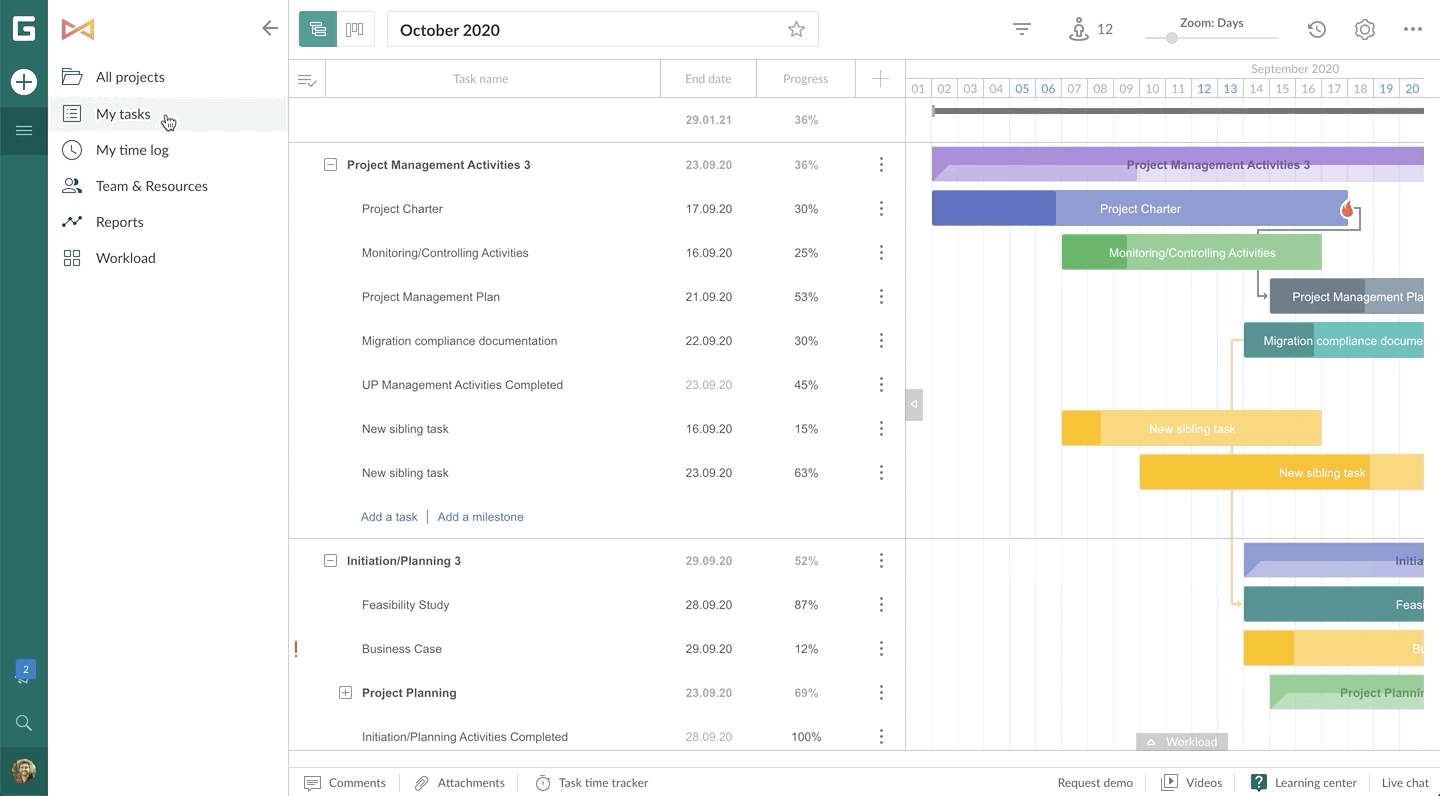
Yes. In GanttPRO, there is a Tasks list view. It shows all the tasks from all the projects that are assigned to a certain resource. To open it, click on “My tasks” on the left dashboard.
You can enable or disable fields in the same way as in the Gantt chart table in your project. The following fields are available: Project, Start date, End date, Duration, Progress, Estimation, Cost, Assigned, Creator, Status, Priority, and Creation date.
Also, you can switch on “My incomplete tasks” option that will make active Open and In progress tasks, apply different filters, and export the list.
Find more information on how to work with the tasks list in GanttPRO in this video.
Standard fields
Standard fields include the most commonly used fields for any type of project. By default, you will only have Assigned and Status fields for an empty project. And different sets of fields for imported projects and projects based on templates.
To add a new field, simply click on the “+” icon in the upper right corner above the list of tasks in your project grid. Then you will see the whole list of available Standard fields.
This list includes both fields that will be added to the table and signs that will be displayed on a project grid / in the list of tasks.
Note that some fields will let you manage certain Task settings straight from the project grid. Those are: Start date and time, End date and time, Assigned to, Progress, Status, Priority, Task type, Duration, Estimation, and Time log.
There are two ways to hide a Standard field:
- click on the “X” button near the field name
- click on the “+” icon in the upper right corner above the list of tasks in your project grid and uncheck the box for the field you want to hide.
Here is the description of all available Standard fields:
Resource overload
Check this box to quickly see when your resources have an excessive workload which is estimated based on their actual working hours and tasks assigned to them. It will be displayed as a sign of a red person near the task name.
Comments
Check this box to open comments straight from the task list and quickly add a comment.
If there are no comments on the task yet, you have to hover over its name to see the icon. A task with comments will always have a corresponding icon on its left in the task list.
Attachments
Check this box to have quick access to task attachments straight from the task list.
If there are no attachments to the task yet, you have to hover over its name to see the icon. Tasks with attachments will always have a corresponding icon on its left in the task list.
Work Breakdown Structure
A work breakdown structure (WBS) is a hierarchical structure of the project plan decomposed into stages and smaller chunks of work.
WBS helps to organize work that needs to be done into manageable sections. Check the box if you want to enable the option. Each task will be given a number according to the hierarchy of tasks.
Assigned
Check this box to instantly see who the task is assigned to. This can either be team members or virtual resources, or both. It will be displayed near the task name as the assignee’s picture or initials.
In this field, you can also assign and remove resources from a task, in addition to Task settings.
Just click on the Assigned field of the corresponding task. The configuration is the same as when you assign tasks in Task settings.
Start date/End date + time
Check this box to add a field with start date, end date, and/or time. Just as with any other field, it’s a quick way to check another task detail, especially when dates are important.
In this field, you can also manage the dates straight from the list of tasks, in addition to Task settings.
Just click on the Start date and time or End date and time fields of the corresponding task. The configuration is the same as when you set dates in Task settings.
Creation date / Creator
Check these boxes to have an instant overview of when the task was created and by whom, correspondingly. These fields may be particularly useful for managerial control.
Duration
Check this box to monitor in one place the time frame that has been established for each project task to be completed.
In this field, you can also set duration straight from the list of tasks, in addition to Task settings.
Just click on the Duration field of the corresponding task. The configuration is the same as when you set duration in Task settings.
Estimation
Check this box to monitor in one place the time that has been allocated to complete each task.
In this field, you can also define estimation straight from the list of tasks, in addition to Task settings.
Just click on the Estimation field of the corresponding task. The configuration is the same as when you introduce estimation values in Task settings.
Progress
Check this box to see the level of task completeness. This value changes automatically while the task is progressing and in accordance with task status.
However, you can also introduce values manually straight from the list of tasks, in addition to Task settings.
Just click on the Progress field of the corresponding task and set the value. Remember that task’s Progress is correlated with its Status. Thus, when you change values in one field, the other adjusts. Check the details here.
Time log
Check this box to instantly see the time that a team member spends on a task and to log time for the tasks you are assigned to.
In this field, you can also log time and open a timer straight from the list of tasks, in addition to Task settings.
Just click on the Time log field of the corresponding task. The configuration is the same as when you log time in Task settings.
Cost
Check this box to see the cost of the tasks. Note that you cannot introduce any value in this field, as they are automatically calculated when costs for team members and resources are set.
Actual cost
The actual cost field will display the actual cost of the task calculated based on the logged time for a team member or the progress for a virtual resource.
Status
Check this box to see the level of task completeness. Unlike the Progress field, the Status field indicates the stage the task is on right at this moment.
In this field, you can also change status straight from the list of tasks, in addition to Task settings.
Just click on the Status field of the corresponding task. The configuration is the same as when you set status in Task settings. Do not forget about the correlation of Status with Progress.
Priority
Check this box to have a quick overview of task importance.
In this field, you can also change priorities straight from the list of tasks, in addition to Task settings.
Just click on the Priority field of the corresponding task. The configuration is the same as when you set priorities in Task settings.
Predecessor
Check this box to see the dependencies in the task list. The Predecessor field shows the preceding task with which the dependency is set using the WBS numbers of tasks.
In this field, you can also change dependencies straight from the list of tasks, in addition to Task settings.
Just click on the Predecessor field of the corresponding task and introduce the WBS number of the dependent task. Alternatively, go to Task settings to establish dependencies or create dependencies on a Gantt chart.
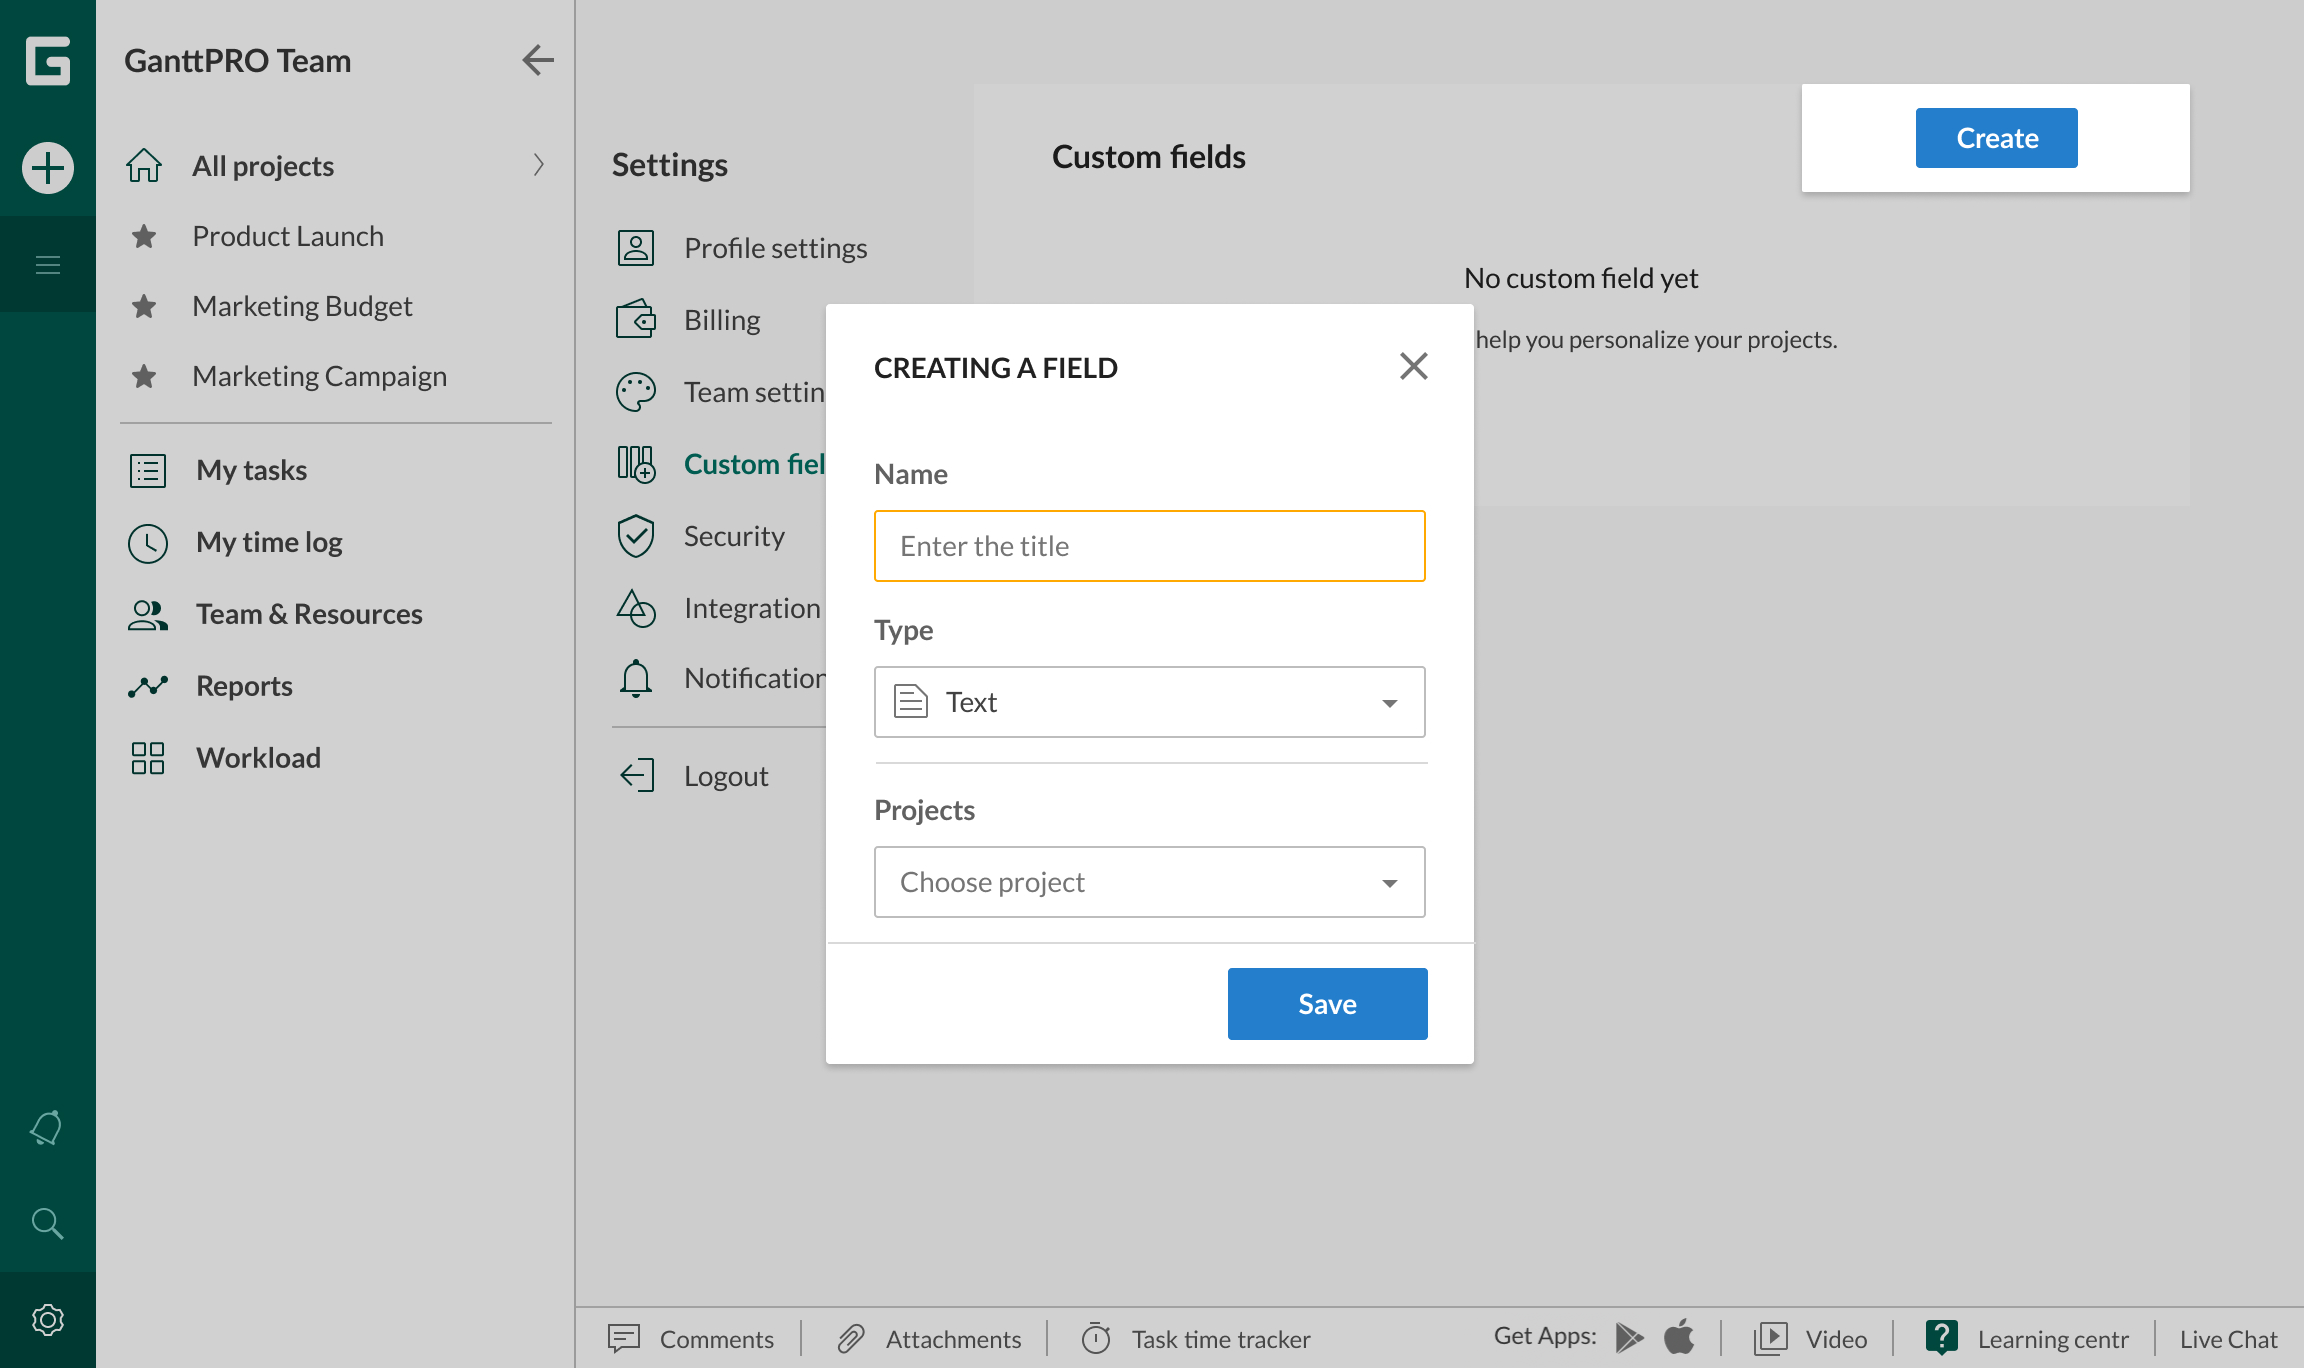
Custom fields
In GanttPRO, in addition to standard fields, you can also create custom ones. They allow you to customize the project for specific needs and personalize it.
- Note that only an Owner, Administrators, and Member with edit rights can create a custom field. The Custom Fields menu in the profile settings is available only to the Owner and Administrators.
Creating a custom field in a project
- Click on the “+” icon in the upper right corner of the table.
- At the bottom of the list, click “+ Create a new field”.
- Enter a name and select a field type.
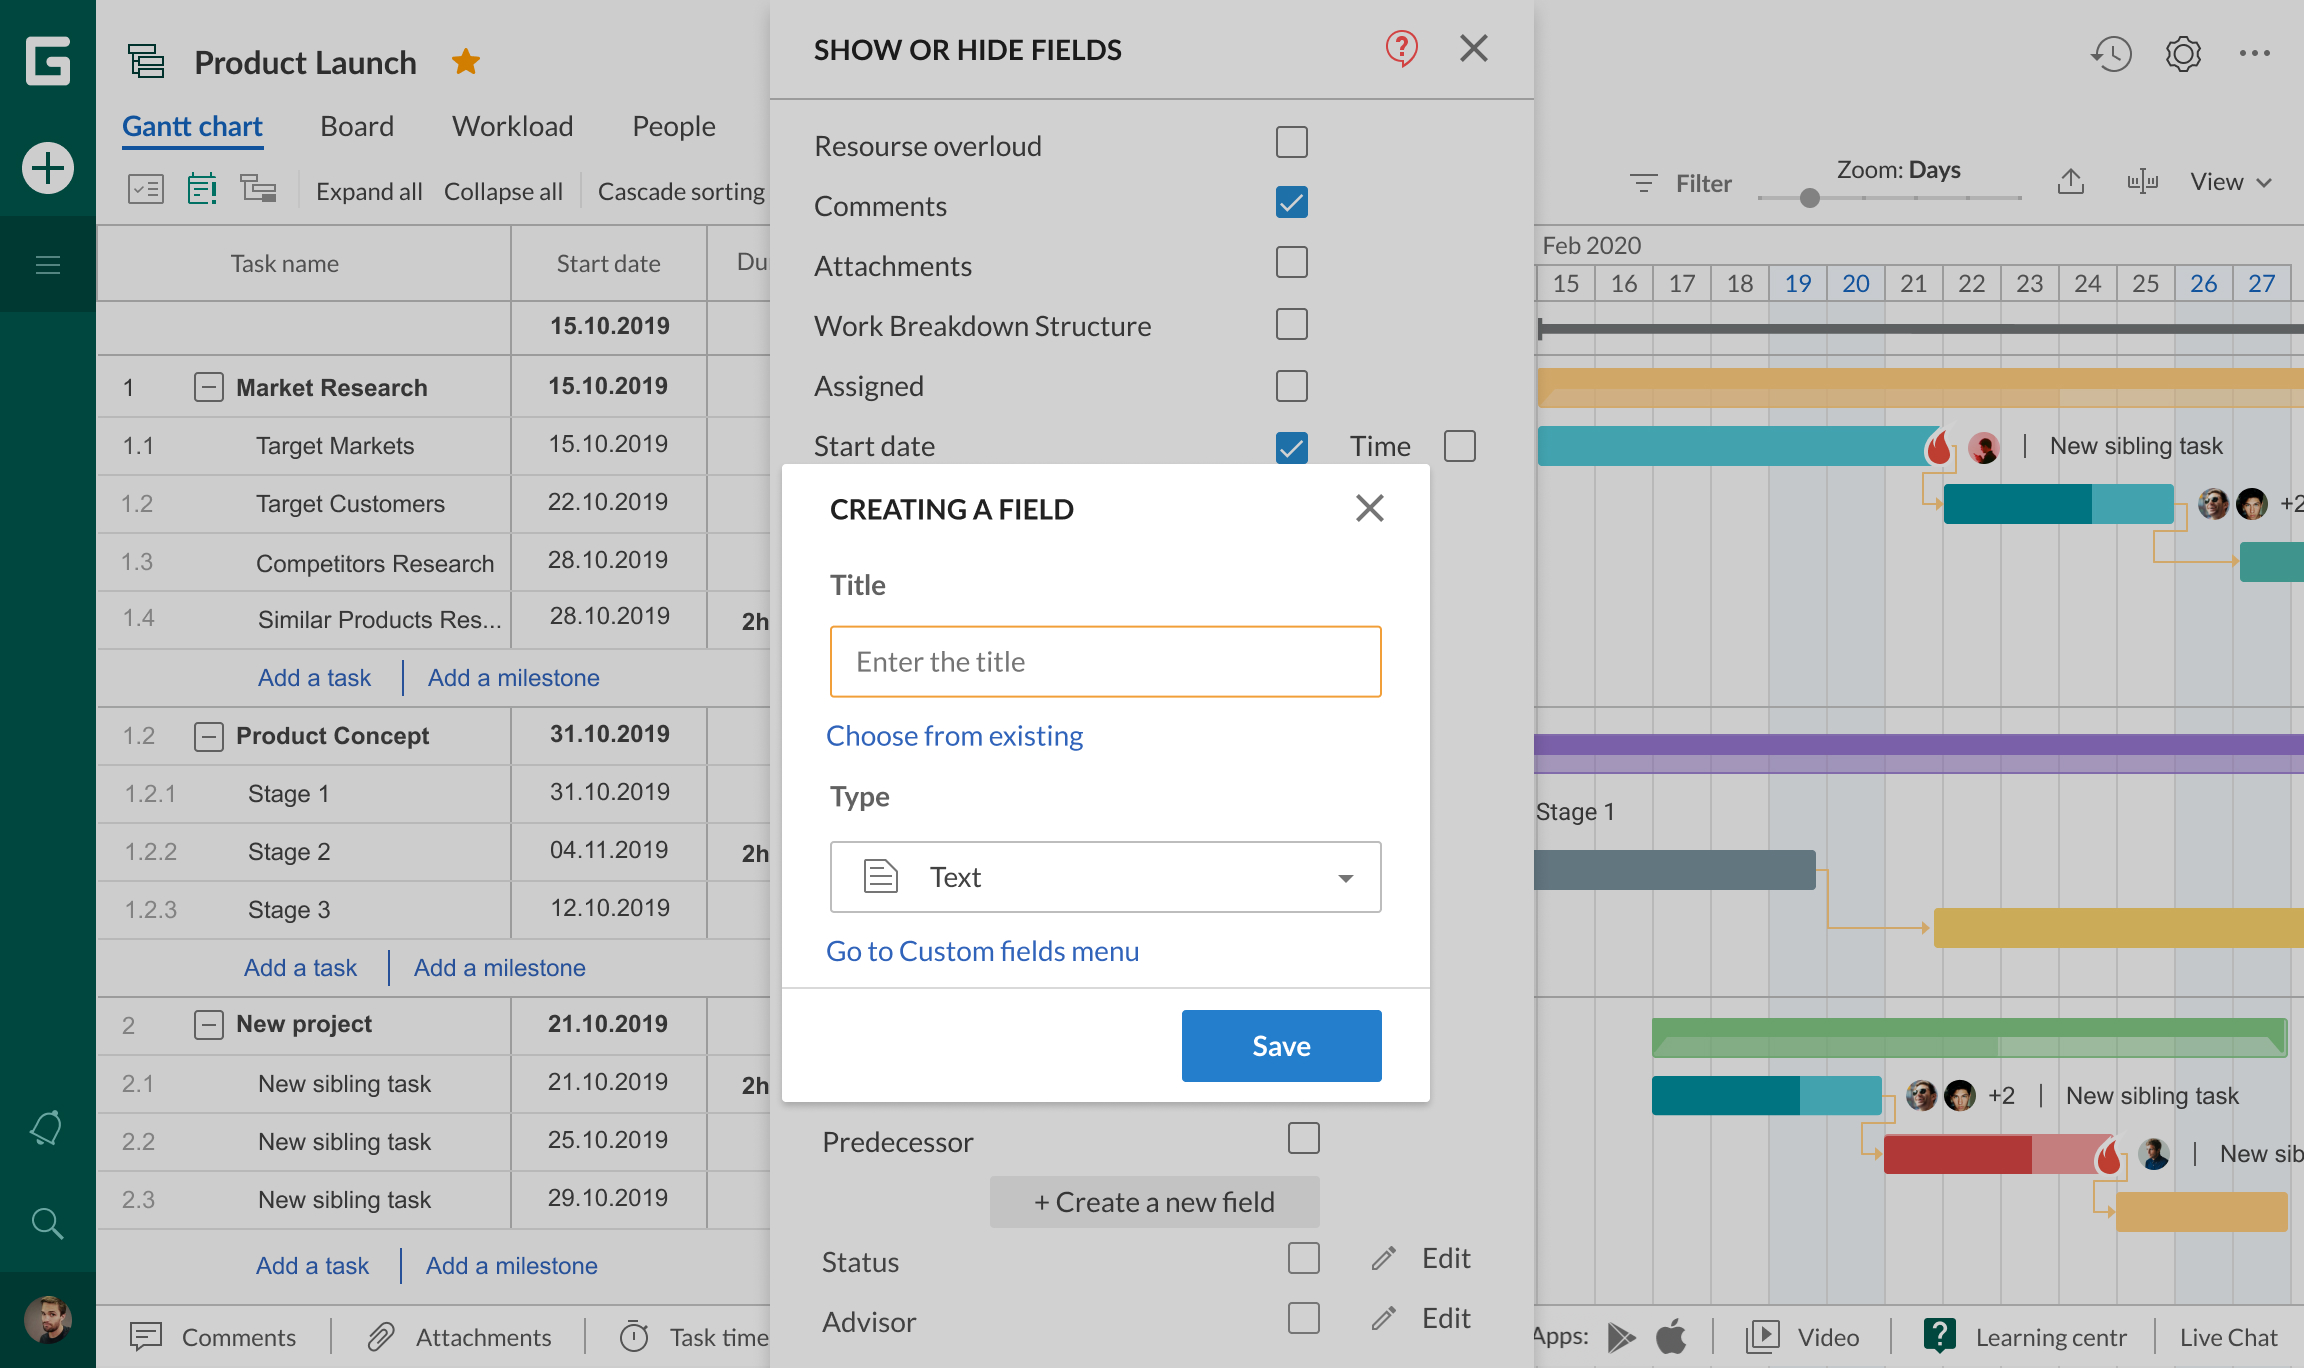
There are nine types of custom fields available: Text, Number, Date, List, Checkbox, Color, Multiselect, People, Label. Let’s check them one by one.
Text
For any text or digital information. It’s like your personal notes with quick access.
Number
For any numbers, you need for your project. When adding this field, choose Aggregation: Sum or Average. The first one is the sum of all the values. The second one is the division of the sum of the values by their number. Sum or average values are reflected for each parent task and the whole project.
Date
For any date, you need to have quick access to it. It doesn’t affect task start and end dates.
List
Here you can create a dropdown list with your own values. The order of these values and their names can be edited or deleted at any time. In the project table, there will be a blank space in this field, by default.
The list field is often used to create individual statuses, priorities, phases, or stages of a project that are not provided by default in GanttPRO.
Checkbox
For marking a field as “Yes” or “No” according to the specified name in the grid.
Color
The “Color” field works similarly to the “List” field. You can fill the list with the colors you need, and assign them to tasks. Note that this field does not affect the color of the taskbar on the graph.
Multiselect
“Multiselect” allows you to list your own values in the drop-down list. The difference from the “List” field is that here you can select several values at once, and not just one.
People
Choose “People” when you need to specify certain resources. Note that for this field resources only from the current project are available. They are not reflected in resource workload and do not require duration and estimation values. For example, you can use this field to set reviewers on a task.
Label
Choose “Label” when you need to combine “Color” and “Multiselect” options. For example, you can use this field to tag certain tasks.
Choose from existing
If you need to create a field similar to an already existing one, you can simply add it to the required project. There is no need to create a second field with the same values.
- In the desired project, select “+ Create new field”.
- Below the field name line, there is an option “Choose from existing”.
- Select a previously created field from the list or enter its name.
- Click the Save button.
You can also quickly go to the Custom Fields menu, where you can manage fields from all projects in one place.
Custom fields menu
You can manage custom fields from all projects in one place. For that, open Profile Settings in the lower-left corner, and go to the “Custom Fields” tab.
Here you can create, edit, or delete a field. And also choose the projects where to display the fields.
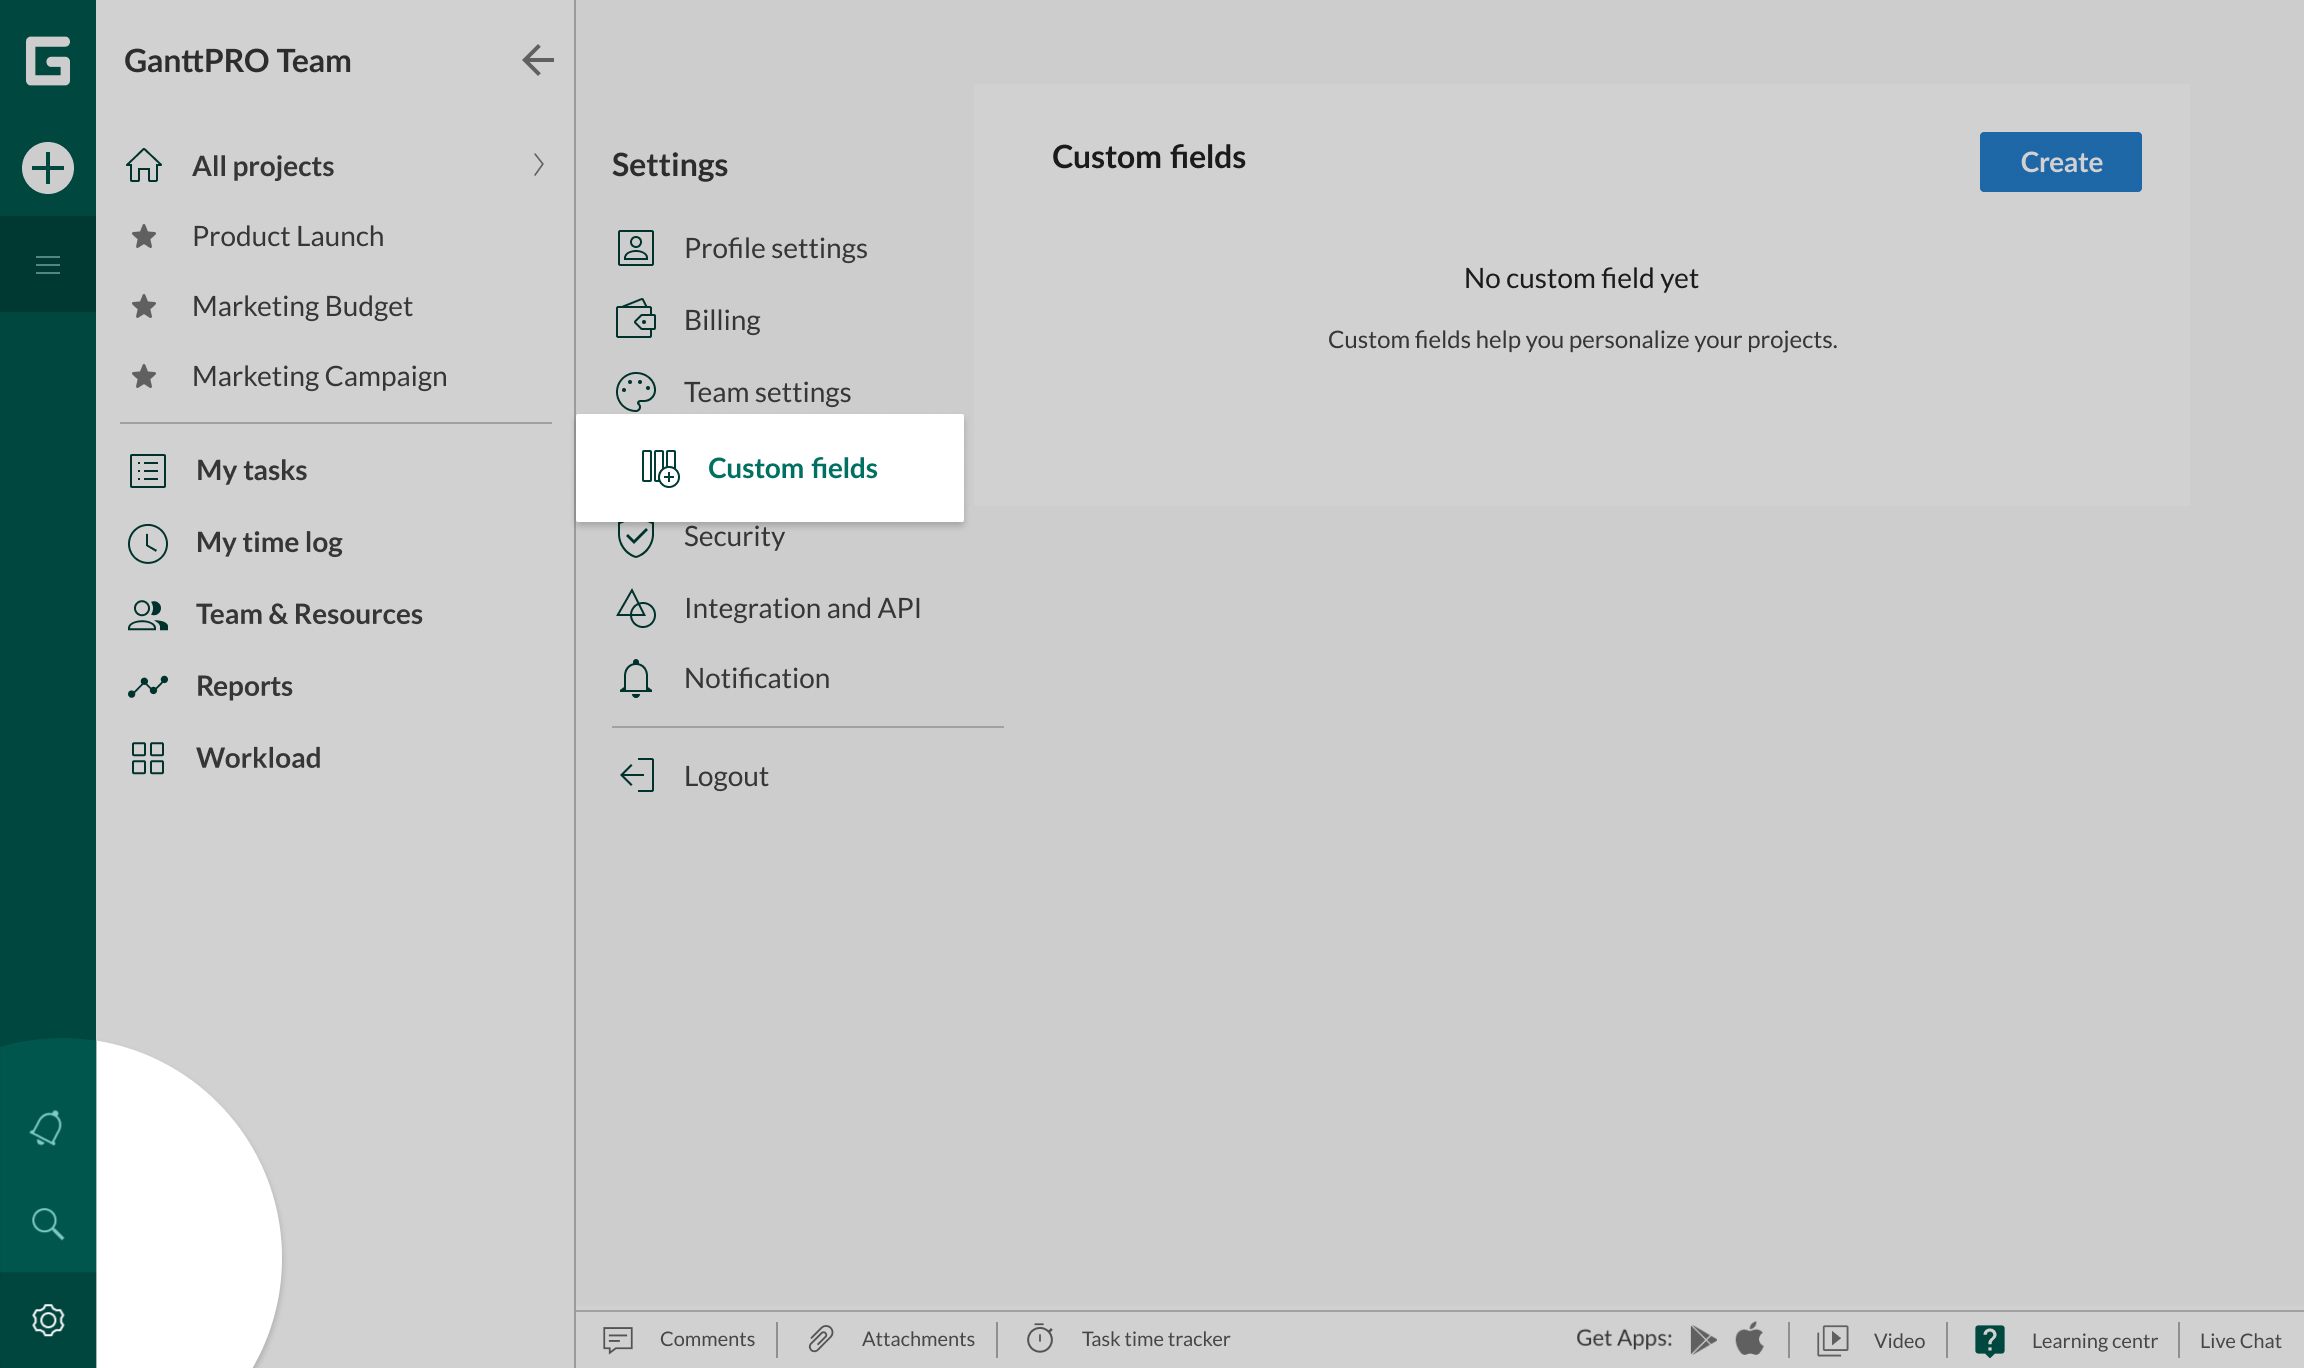
Field creation
- Click on the “Create” button.
- Enter a name and select a field type.
- Mark in which projects the created field will be displayed.
- Save your changes.
Ready! The new field will appear in the general list.
Editing a field
- Click on the icon with three dots to the right of the required field.
- Select “Edit”.
- Change the name, values from the list, or projects. The field type cannot be changed.
- Save your changes.
Deleting a field
- Click on the icon with three dots to the right of the required field.
- Select “Delete”.
- Enter a field name to confirm the deletion.
- Click the Delete button.
Additional features
- By hovering over the “info” icon next to the field name, the field type, its creator and creation date, as well as by whom and when the last change was made, will be shown.
- Use the search box to quickly find the required field.
- All custom fields in projects are preserved when these projects are added to portfolios. They do not need to be added separately.
Can I log my time?
Yes. The software allows Members to log the time they spend on tasks and milestones. You can add time log values for a task in two ways:
– Add a Time log field by clicking on the “+” sign in the top right corner of the project grid.
– Open task settings and find the Time log field.
Note that it is logical to enter log values after you have completed a task.
Either working in the field or in the settings, you will see a window where you can enter hours, minutes, dates, start a timer, and even leave necessary comments.
There, you will find three tabs: Time log itself, Time, and History where you can track who logs the time and how much, dates, and comments. Here you can edit or delete time records, and see the total time spent on this particular task.
To find all personal tasks you have logged time for, click on the “My time log” button on the left dashboard. Personal time log allows:
– Keeping track of the total time spent.
– Seeing the time range.
– Working with filters.
– Exporting it in one click to Excel.
– Grouping by Task name, Project, Date, and Time.
In GanttPRO, you can work with handy human-friendly date input.
You can work with the following units:
– m – minutes.
– h – hours.
– d – days.
– w – weeks.
– M – months.
For example: if you need to set 45 minutes in the “Time” column, enter 45m, etc.
Also, as it was mentioned above, you can start a timer for your tasks to precisely track the time spent on them.
You can find the timer in each task settings window. Alternatively, at the bottom of your working space, you will find the Task time tracker button.
The pop-up window looks almost like a time log window in the project grid with one new option. You can search for any task throughout all your projects and even see the project and subproject they belong to, their dates, statuses, and assignees.
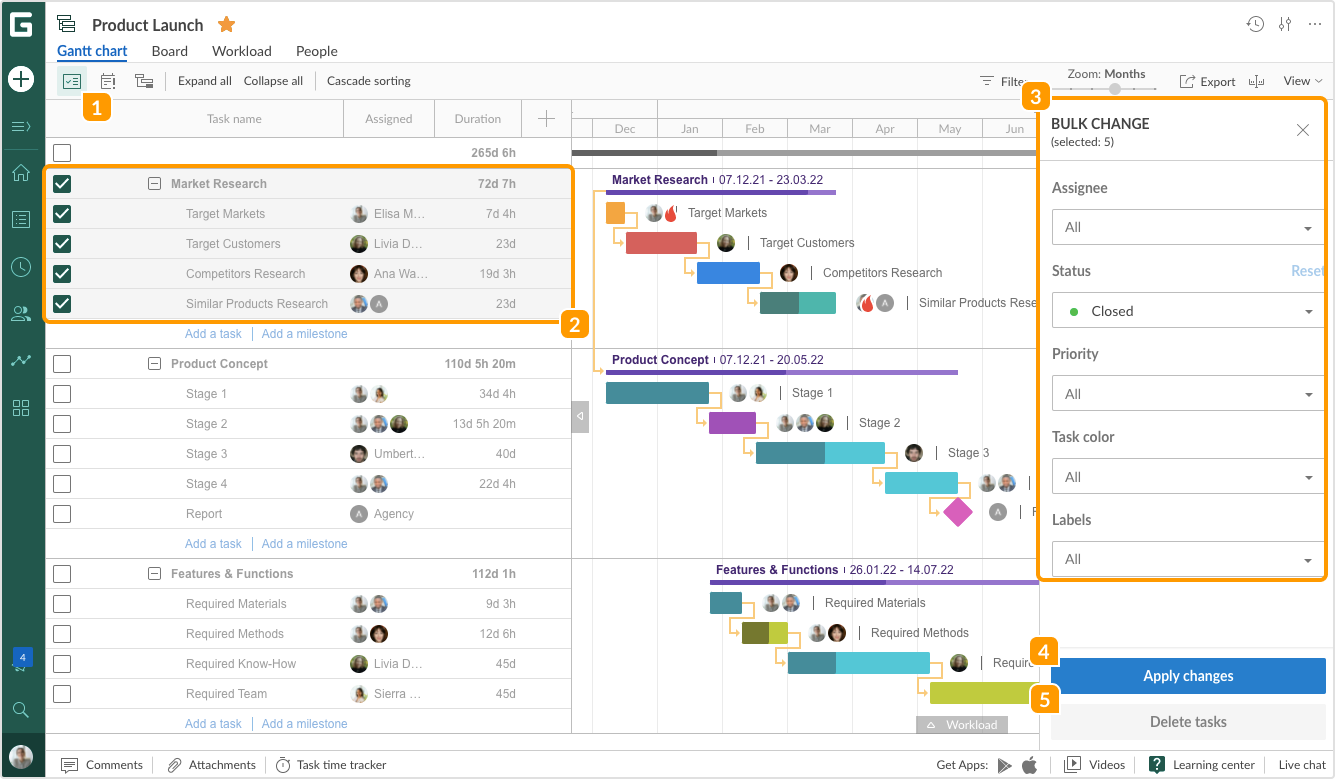
Can I make bulk changes?
With Bulk change you can select multiple tasks and apply changes of the same type to all of them at once. It is available for a few standard and all custom fields. It is available for a few standard and all custom fields.
To perform bulk changes, click on the Bulk change icon ① in the top left corner of the project grid.
Tick the tasks you need to apply changes for ②. It is possible to make bulk changes by: Assignee, Status, Priority, task color, and all Сustom fields if you have added them (e.g. Labels in our case).
Select necessary fields on the right-hand menu ③ and click on Apply changes ④.
Note that you can also delete chosen tasks by clicking on the Delete tasks button ⑤.
What happens after I delete my project?
If you decide to delete your Gantt chart, all the data such as project duration, assignees, tasks, subtasks, tasks’ dependencies will be deleted permanently too. If you would like to keep some of the patterns, information, etc, you can use “Save As Template” option of our project planning software. That way you’ll be able to use it as one of your templates with the saved data in the future.
Can I archive my projects?
Yes. You can easily archive all inactive or not needed projects. Click on the button with three dots on the upper right corner and choose “Archive project”. Your project will immediately become archived, therefore, disabled for all actions. However, it will be stored in your projects dashboard.
Note that Owners can archive all projects; Admins can archive those projects that they have created; Team members can’t archive any project.

You can restore your projects in two ways. The first one is to click on the Restore button at the top of your screen. The second one is to click on the “Show archived projects” in the project dashboard.
How do I work with a team?
How do I invite a team member to join a project?
To invite a team member to work on your project, you should be on one of the team plans. Also, you can invite members to your team on a free trial with no limitations in numbers.
In GanttPRO, it is easy to form your team. To invite a new member to a current project, click on the People button on the top of the screen. Then, you can choose one of the two ways: to enter an email address and click «Invite by email» or choose from those team members who were already invited to a team.
Also, there is a possibility to add people from the Team and Resources button on the left of the screen. But in this case, an Owner or an Admin invites members to the common space where people from all the projects are managed.
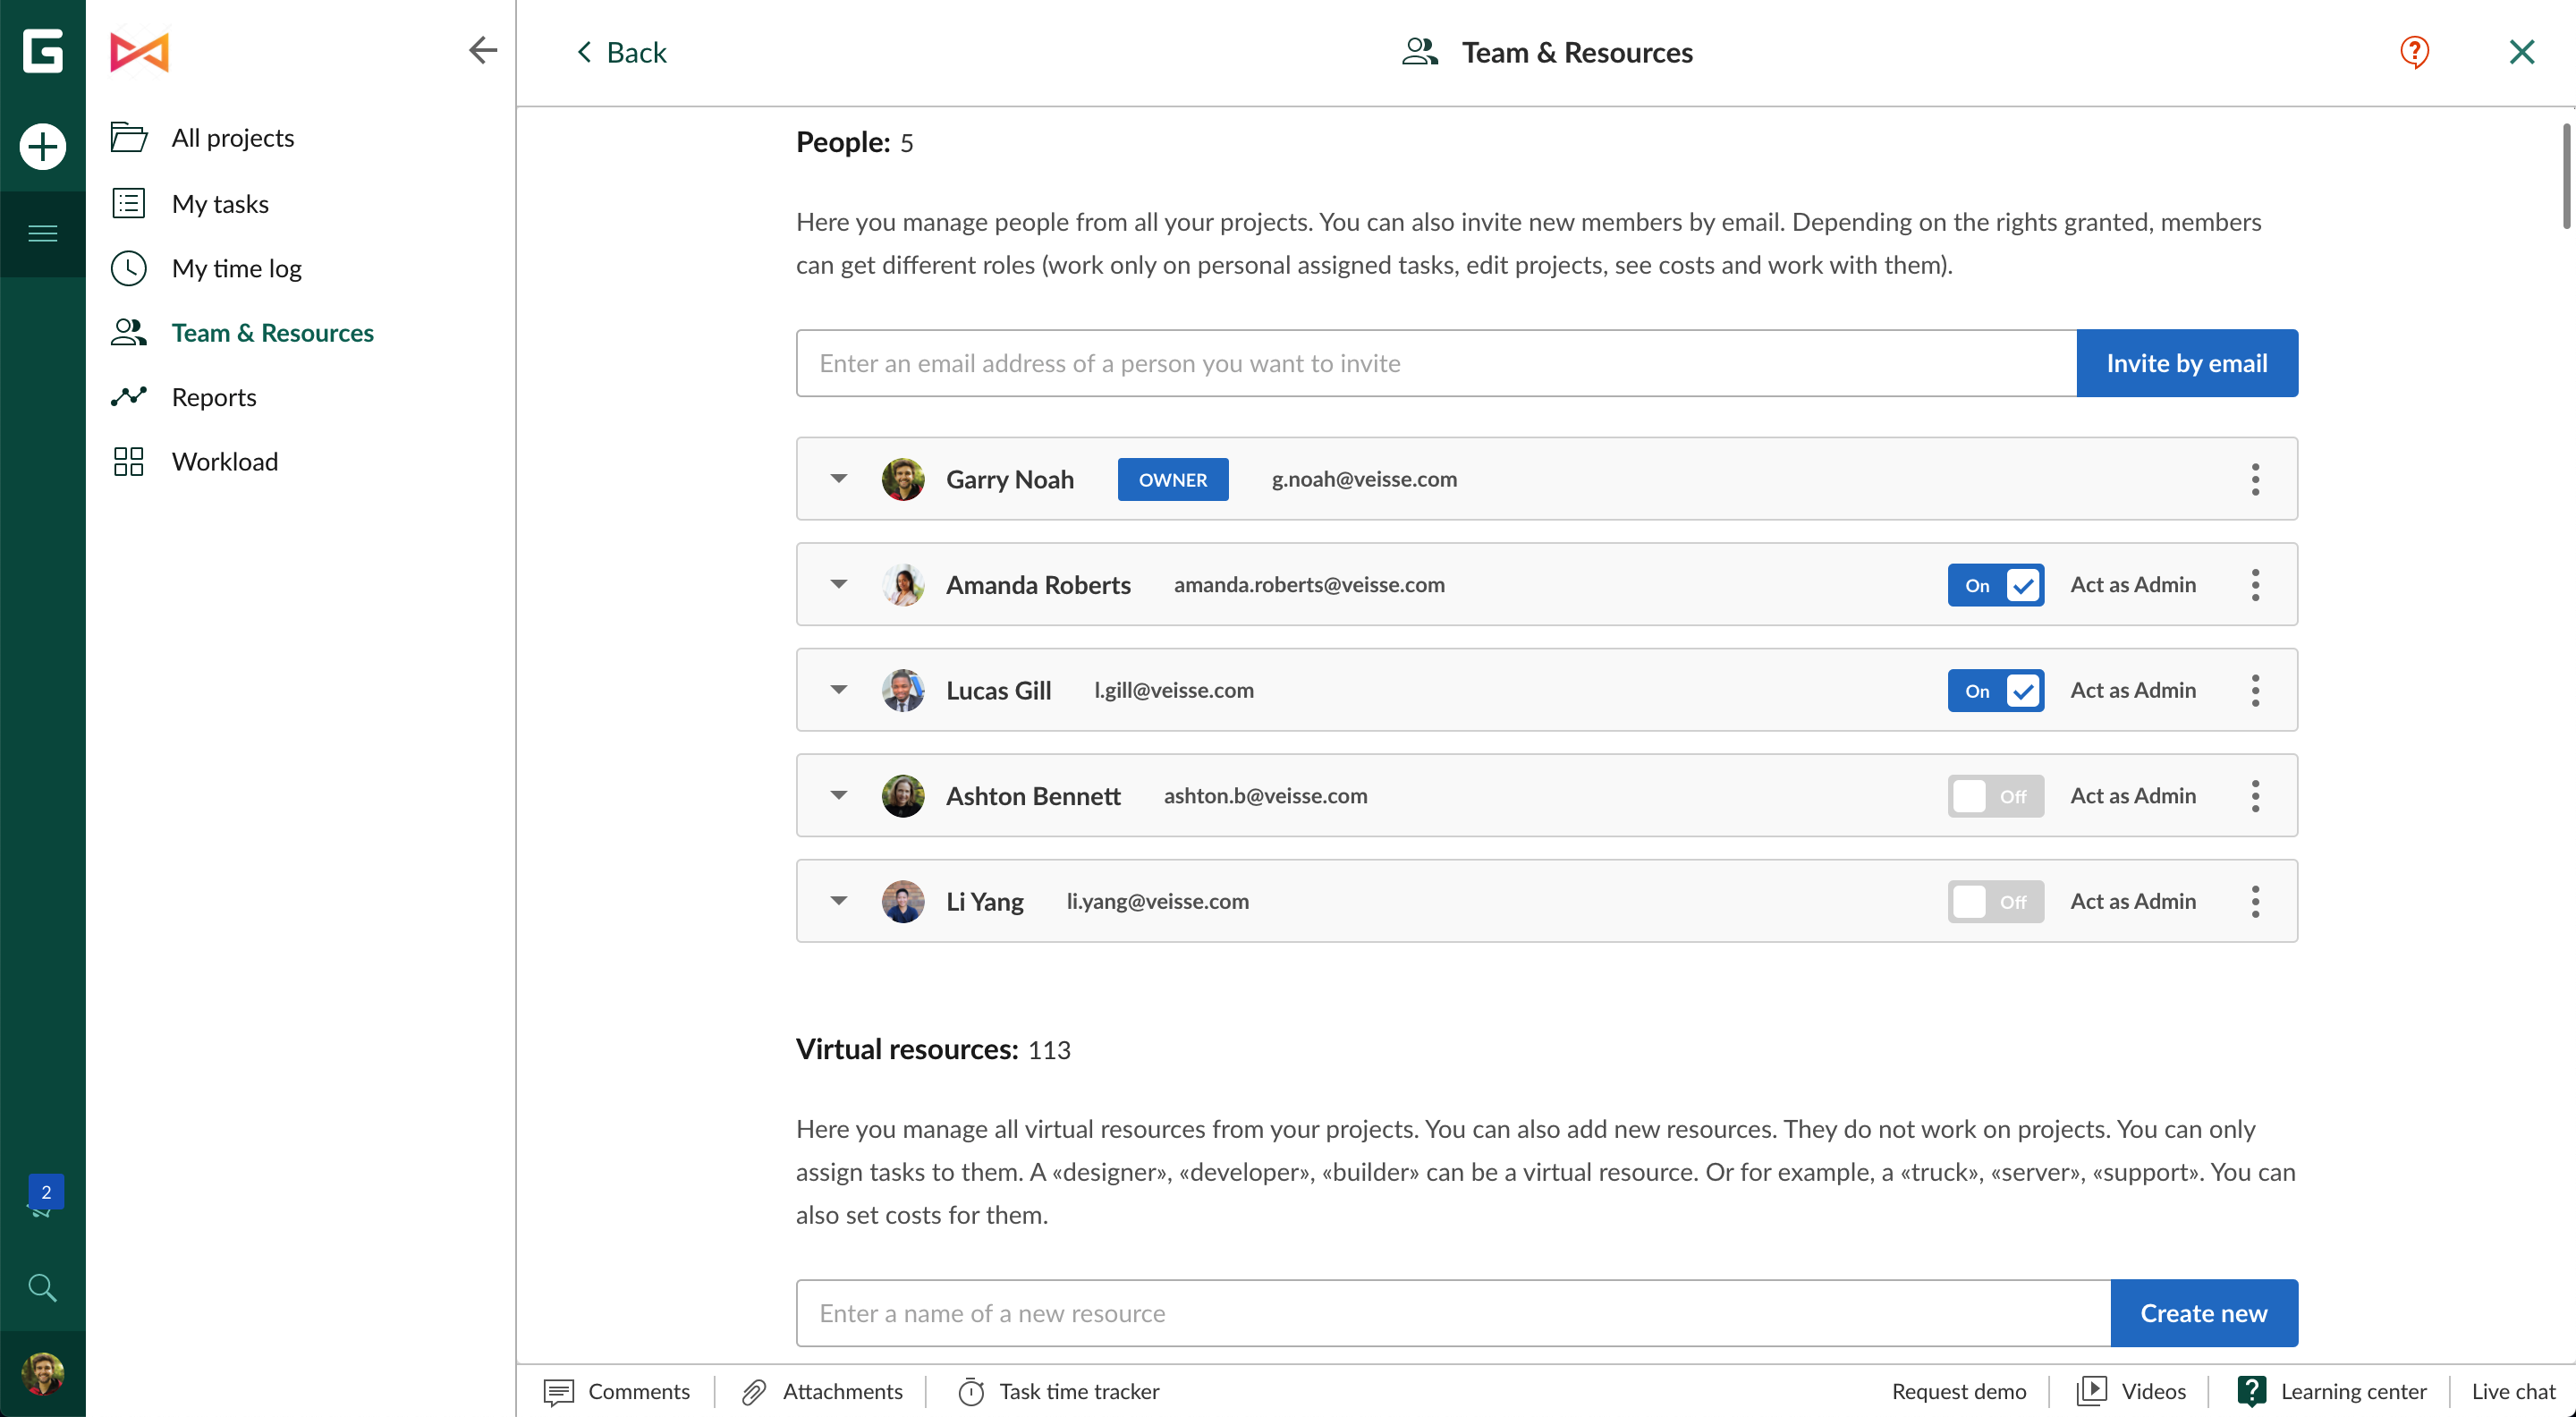
What are project roles in GanttPRO?
In GanttPRO, there are three roles in a project: an Owner, an Admin, and a Member.
An Owner has all the rights on a project. He/she can grant rights (rights to work only on personal assigned tasks, rights to edit a project, rights to see costs on the whole project), set costs, add people and resources to a project and remove them from it. Also, he/she is the one who is in charge of billing.
An Admin has almost the same rights as an Owner. Admins can create projects and work on them inviting other people. Also, they can work on projects where they were invited by an Owner. They can add and remove people from these projects too. They can’t pay for a subscription.
A Member by default can work only on assigned tasks. He or she can’t invite new team members. Also, a Member does not have access to “People” and “Team and Resources” buttons, sees the whole project but can work only on those tasks that are assigned to him/her. However, if a Member has the right to edit, he/she can also see the resource workload on the whole project.
What rights are there in a project?
In a project, there are the following rights: the right to work only on personal tasks, the right to edit a project, and the right to see costs in a project.
The right to work only on personal projects are the default rights for new team members.
If the right Edit is granted, it means that a team member will be able to edit a project and make changes in its settings as well as see the whole workload of a project.
If the right Cost is granted, it means that a team member will be able to see costs on the whole project. It will add the Cost field to the grid where all the costs will be shown.
Find more information on team management in GanttPRO in this video.
Can I create reports for my team?
Owners and Admins can create reports with:
– Time log by every team member.
– Budget analysis.
For this, find the “Reports” button in the lower part of the left dashboard.
By the way, you can export these reports even with the applied filters and with the grouped data.
How to work with virtual resources?
What is a virtual resource?
A virtual resource is anything that you would like to include in your project. These resources don’t work on a project. You can only assign tasks to them. So, a «developer», «sales specialist» could be a virtual resource as well as a «car», «server» or «support».
How do I add a virtual resource to my project?
To add a new resource to your project, click on the People button at the top of your screen. You are free to create new resources or choose from Team’s resources.
Can I work with resource workload?
In GanttPRO Gantt chart software, there is a Resource workload feature. As soon as you add resources to your project, they will appear at the bottom of your screen in a special window.
To assign a task to your resources, choose the needed task and go to the Assigned field in your project grid. In case it is switched off, click on the + sign on the right upper corner of the grid, and tick the box.
All team members and resources fall into three types: a labor resource, a material resource, and a resource with a fixed cost. The material resource and the resource with a fixed cost will not be shown in the Resource workload window.
In the project grid, you will be able to manage all your resources. In the workload window, all the changes will be automatically reflected. Thus, you will be able to see how your resources are loaded: who is overloaded or, vice versa, underperforms. Also, you can choose to show the workload per tasks or per hours.
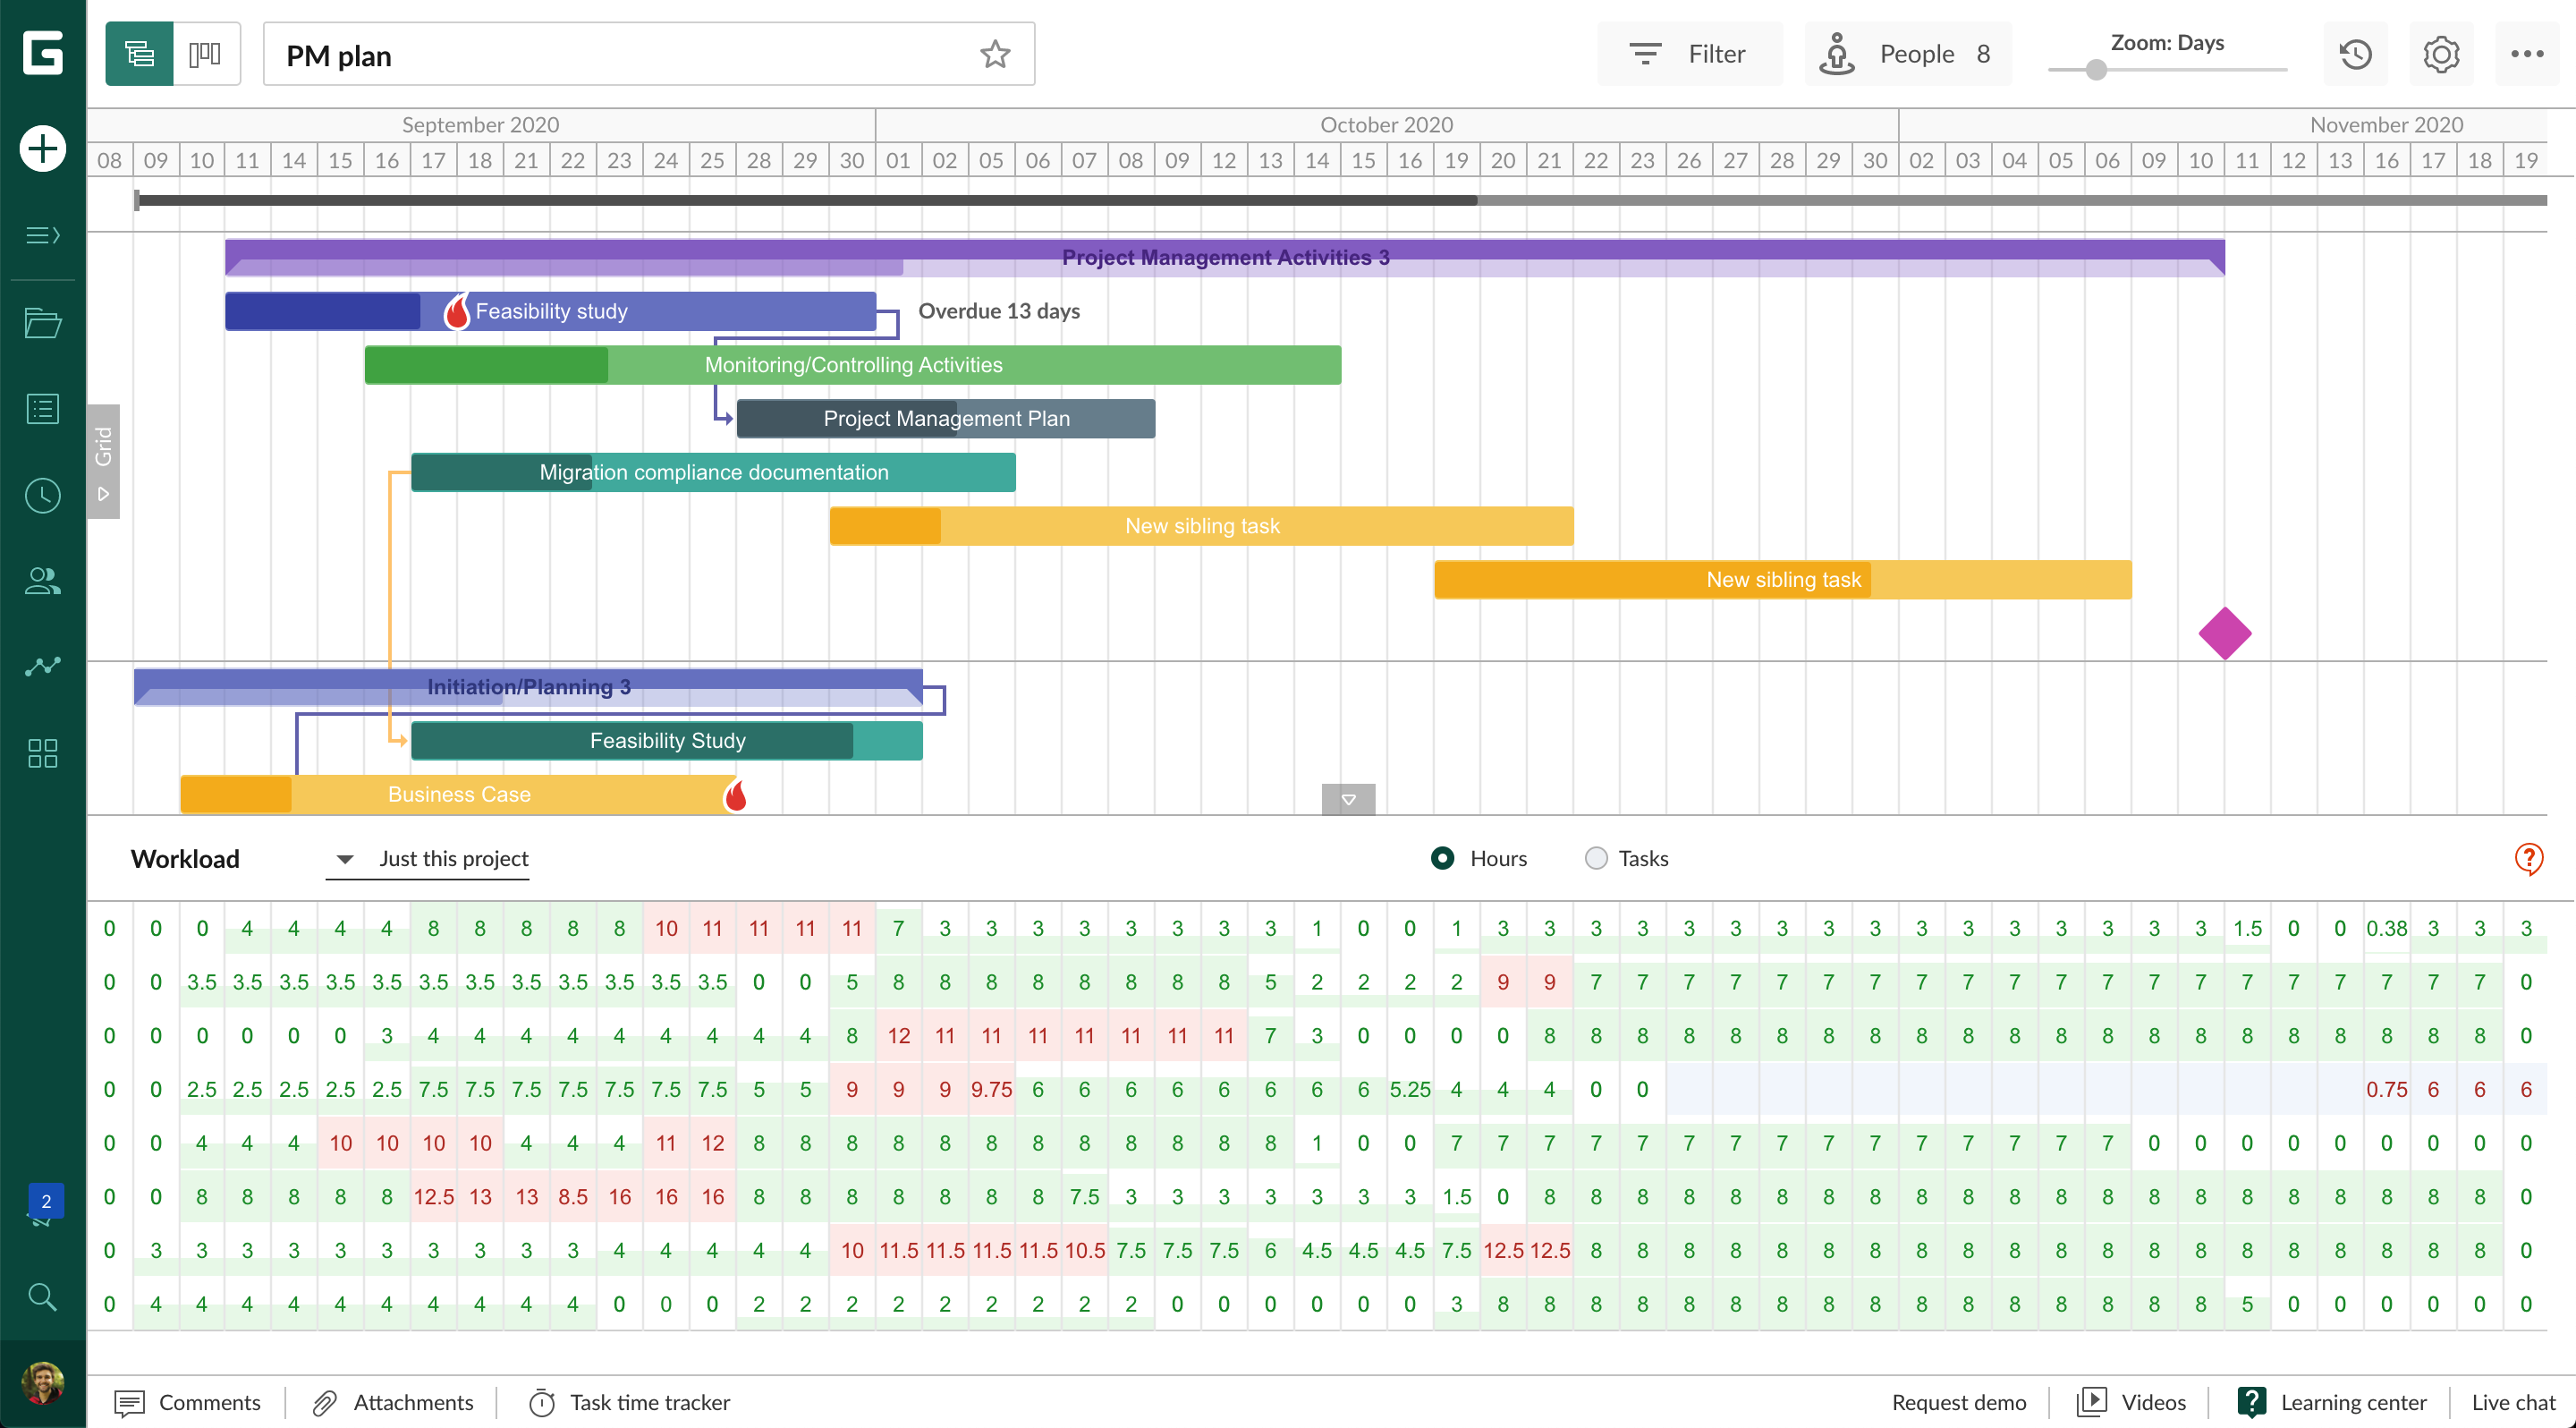
For your convenience, tasks are depicted in two different colors.
– A green one shows that a resource is loaded in an optimal way. In this case, the cell is fully shown in green. Also, green color shows that a resource can be underloaded. But in this case, the cell will be partially green and white. White color means that the resource has time for extra tasks.
– A red one shows that a resource is overloaded.
Also, we show if a resource is overloaded on the grid as well as in the Workload menu.
To enable it, add the Resource overload field. The icon will appear on the left of your grid.
Every time a resource is overloaded, there will be an icon:
– On the left of the grid.
– When assigning a resource.
– In the workload sections.
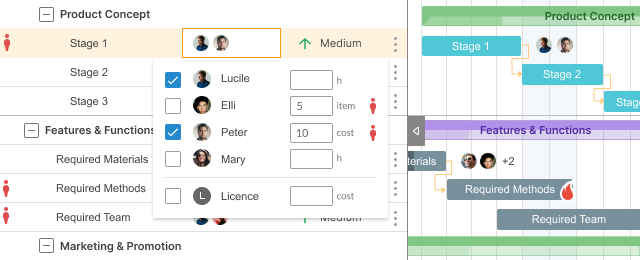
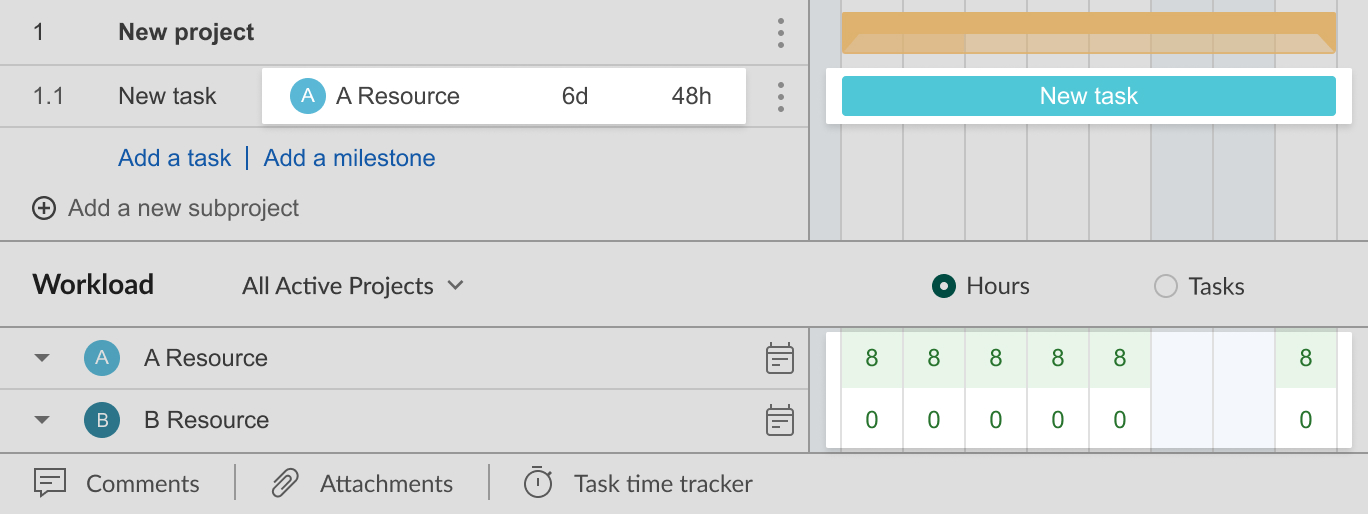
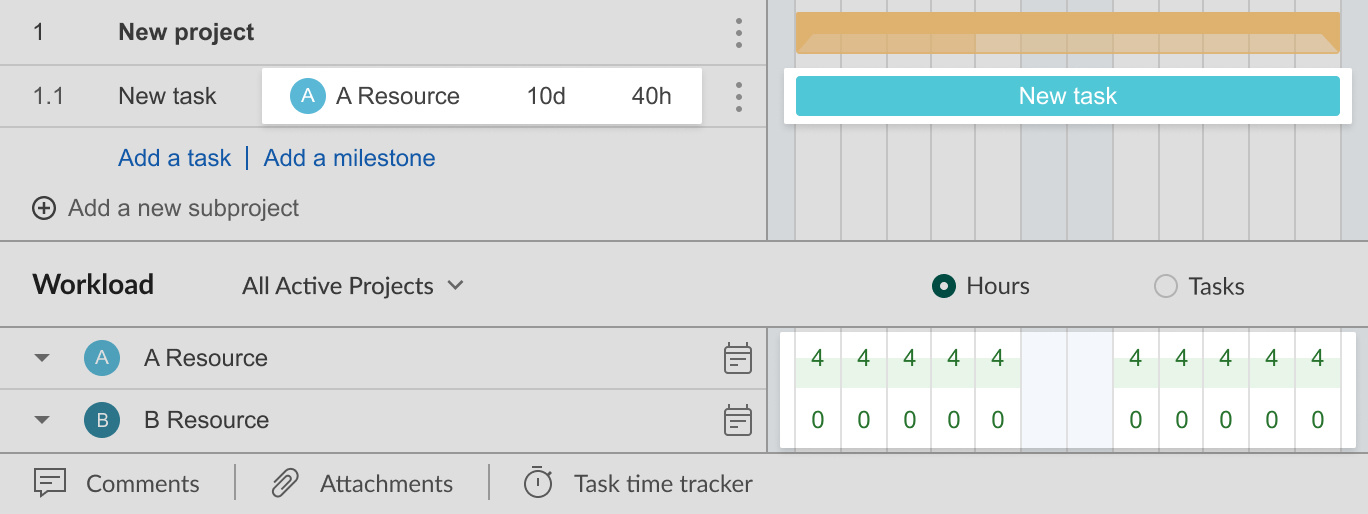
Note: when you add a new task, you set its duration. By default, the estimation value is set as 0. In this case, regardless of their number, all added resources will get the same duration value. But if you set the estimation value beforehand, it will be divided equally between all the added resources. For example, the estimation value of 10 will be divided into 5 and 5 for 2 resources, into 3,33, 3.33, and 3.33 for 3 resources, etc.
Find more information on the resource workload feature in GanttPRO in this video.
Can I manage resource workload from all the projects in one place?
On the left dashboard, there is a Workload menu. It opens the consolidated workflow of all the labor resources with their tasks from all the projects. Also, personal resources’ calendars are available here.
Here, tasks look like bars.
How to work with tasks:
– One click: you will expand the bar and see the number of working hours the task takes each day. However, you can manually change the estimation here.
– Double click: you will open task settings.
– Drag & drop: simply drag your tasks on the timeline and change the workflow. Note: drag & drop works only with Days in Zoom.
– Hover: you will see the card with the task information: project/subproject/group of tasks it belongs to, start and end dates, duration and estimation, status, progress, and priority.
If the workflow is evenly distributed without overloading, all the tasks will spread along the line. If the tasks are on different lines, pay attention to the resource workflow.
Also, on the top right corner, you can choose how to show your workflow. You can choose:
– Hours.
– Tasks.
– Percent.
By default, the timeline in the workload menu shows six months. However, if you need the shorter or even longer period of your project, you can change it in the date picker right on the top of the page.
What cost values can I set?
It is better to set values and cost of your resources when you add them. In GanttPRO cost estimating software, you can set the following values:
Per hour: this is the cost calculated per hour for a labor resource. In the grid, after you assign a task to your resource, you will be able to set the number of hours this task requires.
In the “Assigned” field, you can see the general number of hours for a task that is taken from the “Duration” field as well as the number of working hours per day. By default, it is an 8-hour working day but you can change the values manually in the “Workload” window.
For example, you put 20 hours into the “Duration” field, then go to the “Assigned” field and choose the required resource – you will see that the number of working days is the result of a division of 20 by 8 and equals 2.5 days.
Note that if you manually change the number of working hours in the “Workload” window for a certain day and after that go to the “Assigned” field, there will be an indicator showing that the numbers have been manually changed.
Per item: this is the cost calculated per item for a material resource. It can be the whole sum of a single resource or the cost of a single material unit. In the project grid, you will be able to set the number of items. Note that in this case, there is no connection between task duration and the whole cost.
Cost: this is the fixed value without connections to hours and items. In the project grid, you will be able to set the exact cost for each resource. For example, it can be a bonus for your employees.
Find more information on the kinds of cost values in this video.
Also, you can rely on the actual cost of your tasks. For this, switch on the “Actual cost” field in the project grid.
It will help you track the actual amount of money spent on a certain task.
It means that you can rely not only on estimation values but also on precise spending.
There are a few ways to calculate the actual cost for team members and resources.
– Per hour. The actual cost takes the values from the Time log field.
– Per item. The actual cost is directly connected to the task progress.
– Cost. The actual cost is directly connected to the task progress.
Can I assign more than one resource to one task?
Yes. We have a multi-assign feature that allows assigning multiple resources to one task. All the scenarios will be accurately calculated based on a number of working hours your resources have or you can do it manually.
You can also assign resources with different values to one task.
How do I rename or delete a resource?
To change a resource’s name, simply mouse over a field with a name of an already created resource. The yellow colour of the field means that it is editable.
To delete your resource, click on Remove on the right side of the line with this resource.
How do I set a unique value of a resource for one and different active projects?
To set a unique price value of a resource for a certain project, click on the People button at the top of the page. In the Virtual resources section, you can set any cost for each created resource in this active project, choosing also a cost value. By default, the cost value is set per hour.
To set unique price values for a resource for different projects, click on the Team and Resources button on the left of the page. From here, you can manage virtual resources from all your projects, in particular, set different costs for them. You can choose a cost value for each of them. By default, it is set per hour.
How can I see the calculated price estimate of a project?
In order to see the calculated price estimate of a project in the cost estimating software, first, you need to set prices for your resources. Click on “+” button in the upper menu of the grid. Then tick the box “Cost”. Thus, you will add the Cost field to your grid. Then assign resources to tasks (all the prices for resources should be set in advance).
A price for a task is calculated as the multiplication of Estimation and a price of a resource per hour. The estimate of the whole project is calculated as a sum of all tasks. If no member is assigned to a task or the assigned resource’s price has no price per project, the value will be set as 0.
Find more information on how to work with resources and manage them in GanttPRO in this video.
What is Estimation setting and how is it different from Duration?
Estimation is the actual number of hours required for a task to be completed. Duration is the timespan in which the task should be completed. Once Estimation is activated, the value of Duration will be assigned to it by default in hours.
What are workload calculations?
GanttPRO calculates the duration and estimation per task and allocates the number of working hours per day, based on the selected mode.
To change the calculation mode, open the project settings and select the one you need:
For the sake of clarity, we’ve gathered the data in the table below. It shows how changes in one parameter affect the recalculation of another.
| Changes in estimation | Changes in duration | Changes in the number of hours assigned | |
| Fixed estimation | Duration is recalculated | Working hours are recalculated | Duration is recalculated |
| Fixed duration | Working hours are recalculated | Estimation is recalculated | Working hours are recalculated |
| Fixed estimation and duration | Working hours are recalculated | Working hours are recalculated | Working hours are recalculated |
Notes for each mode:
– When changing assignees on tasks, estimated hours are distributed equally between resources.
– When changing assignees on tasks, personal working hours are reset.
What are tasks with fixed estimation?
When you choose this mode, a task can only contain the specified estimation, despite any changes in duration or the number of assignees.
Let’s look at an example.
The working day of the project is 8 hours. The working day of resources is 8 hours. The duration of the task is 5 days. The estimation for the task is 40 hours.
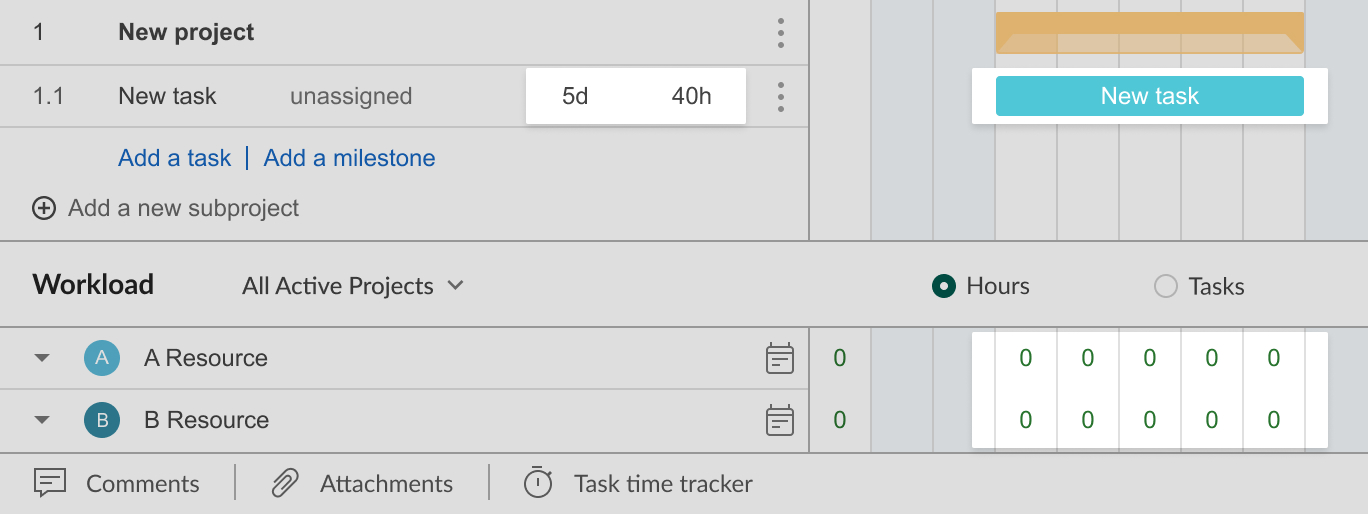
- If 2 resources are assigned to a task, GanttPRO will recalculate the task duration. As a result, the task will last 2.5 days. The estimation will be 40 hours. Each resource will be working on the task for 20 hours.
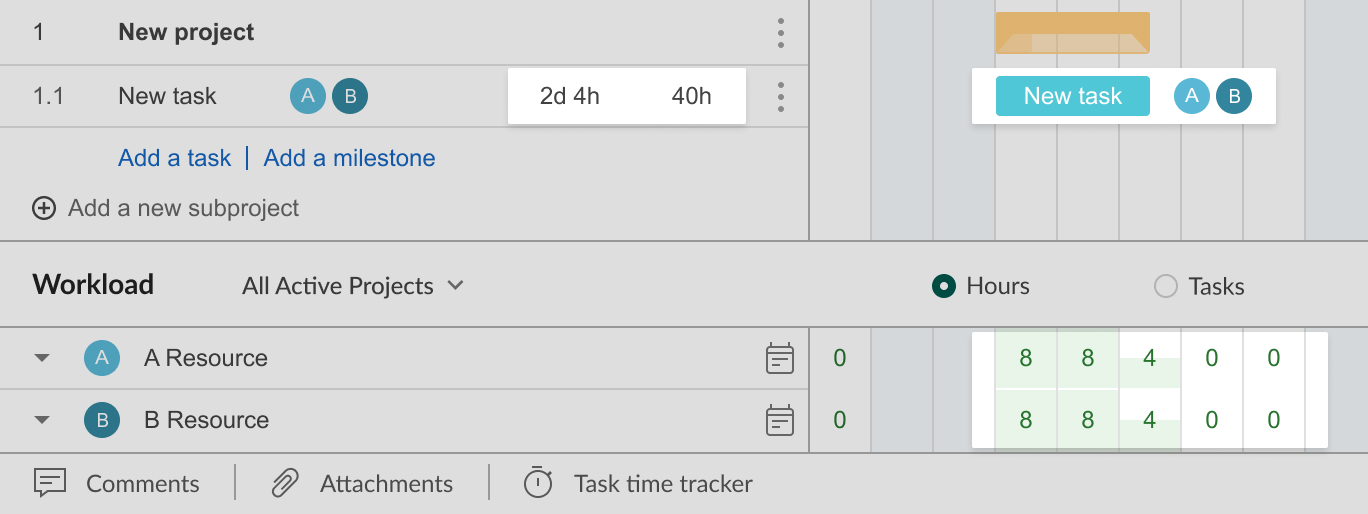
- If you assign a resource to a task, then change the estimation to 48 hours, GanttPRO will recalculate the task duration. As a result, the task will last 6 days.
- If you assign a resource to a task, then change the duration to 10 days, GanttPRO will recalculate the distribution of working hours per day. As a result, the resource will be working for 10 days, 4 hours per day.
Additionally, when fixed estimation is on, a resource’s personal calendar is taken into account. It includes:
- Custom working hours.
- Days-off.
Let’s look at an example.
The working day of the project is 8 hours. The duration of the task is 2 days from Monday to Tuesday. The estimation for the task is 16 hours.
- If you assign a resource available for 4 hours per day to a task, GanttPRO will recalculate the task duration. As a result, the duration will be 3.5 days, the resource will be working on the task for 16 hours, 4 hours a day.

- If a resource has a day-off on Tuesday and you assign them to a task for that day, GanttPRO will recalculate the task duration. As a result, the duration will be 3 days, the resource will be working on the task for 16 hours – 8 hours on Monday and Wednesday.
What are tasks with fixed duration?
Tasks with fixed duration
When you choose this mode, a task must be completed within the specified period, despite the changes in estimation or assigned resources.
Let’s look at an example.
The working day of the project is 8 hours. The working day of resources is 8 hours. The duration of the task is 5 days. The estimation for the task is 40 hours.
- If you assign 2 resources to a task, GanttPRO will allocate the working hours equally between the resources within 5 days. As a result, each resource will be working on the task for 20 hours, 4 hours a day.

- If you assign a resource to a task, then change the estimation to 50 hours, GanttPRO will distribute the working hours over 5 days. As a result, the resource will be overloaded, because they will be working on a task for 50 hours, 10 hours a day.

- If you assign a resource to a task, then change the duration to 10 days, GanttPRO will recalculate the estimation. As a result, the estimation will be 80 hours. The resource will be working 8 hours a day.
What are tasks with fixed duration and estimation?
When you choose this mode, a task must be completed within the specified period with the specified estimation. In this case, GanttPRO will distribute working hours by day without changing the duration and estimation.
Let’s look at an example.
The working day of the project is 8 hours. The working day of resources is 8 hours. The duration of the task is 5 days. The estimation for the task is 40 hours.
- If you assign 2 resources to a task, GanttPRO will distribute the working hours equally between the resources within 5 days. As a result, each resource will be working on the task for 20 hours, 4 hours a day.
- If you assign a resource to a task, then change estimation to 50 hours, GanttPRO will distribute the work hours over 5 days. As a result, the resource will be overloaded, because they will be working on the task for 50 hours, 10 hours a day.
- If you assign a resource to a task, then change the duration to 10 days, GanttPRO will recalculate the distribution of working hours per day. As a result, the resource will be working for 10 days, 4 hours a day.
History of changes and Undo
How to check the changes history of my chart?
You can click on the “History” button at the top of the page. Zoom of the chart in History is the same as in your project. The right list reflects all the changes made in the project. After clicking on a certain action you will be able to see how the chart looked like before this change was implemented.

How to undo the changes?
If you click on the “Restore this version” button you will return your chart to the state before the chosen action was implemented. In this case, the previous actions list will be untouched.
How to detect changes made by another team member?
If you work together with colleagues on the same project, the changes will be reflected instantly when they are made by other team members.
The changes notification will appear at the upper right corner of your project and will display the member’s profile avatar. In the “History” section you can see the list of changes made by your team members and cancel them.
How to filter the changes list?
You can change the History zoom and monitor changes made during the chosen hour, day and month. Besides, you can choose the time period of changes and display only certain changes: new tasks, changes in settings, dependencies, and monitor the changes made by a certain team member. Just click the Filter button in the upper-right corner of the window.
Find more information on the History of changes feature in this video.
Sharing and exporting
How do I save my project template?
In GanttPRO Gantt chart software, users can save their projects as templates. Just click on “Settings” and press “Save as template”. After the project template is saved as one of your preferred templates you can easily use it in the future.
Find more information on how to save a project as a template in this video.
How do I export my project?
You can export your Gantt chart project plan to PDF, PNG, XLSX or XML and send the file to a customer or include it in your presentation, report or business plan. Click on the button with three dots at the right top corner and choose Export.
Please note that if you choose to export your Gantt chart to XLSX, you will only export the list of tasks, not a Gantt chart itself.
The export feature offers a preview and customizable options applied to your Gantt chart. You can choose among the following options:
- Format. There are PDF, PNG, XML, and Excel If you need to export to PDF, all export options are available and customizable. If you need to export to PNG, Paper size and Orientation are not available. If you need to export to XML and Excel formats, all the options become disabled.
- Paper size. The following formats are available: Full size, Letter, Legal, Tabloid, Ledger, A4, A3, A2, A1, A0.
- Orientation. There are Landscape and Portrait
- Filter. In this section, you can choose absolutely the same values as in the Filter inside your project. You can search by Task name, Type, Assignee, Status, Priority, Reporter(for projects exported from JIRA), Start date, and End date. Also, you can apply already created filters from your project and export them.
- Zoom. Choose between Hours, Days, Weeks, Months, Quarters, and Years.
- Critical path. Switch on this option to highlight the most critical tasks for the quickest project completion.
- Today marker. It allows highlighting the current date with the vertical line.
- Workload. This option opens the workload window where you can see all your team members and resources and their workload.
- Fields settings. Choose which fields you need in your exported project.
How do I share my project?
Users can share their projects if they have active subscriptions regardless of a plan. This feature is also open on a free trial.
You can share your project using a public URL. It gives the right only to view projects with no rights to edit. To share a project by public URL, click on the button with three dots in the top right corner of the page, choose Public URL, and click Create public URL. After that you only need to copy it, clicking on the icon in the Link field. Mind that you can switch off the access to the created link disabling it in the Status.

There are two options to share a project. The first one is to share a current state of a plan where all the following changes will be also reflected. This is so to say a dynamic state. This option is set by default.
The second one is to make a snapshot of a current state of a project (to make this, tick the box «Snapshot» in the «Public URL» window). Thus, you will share a static picture of your project taken at the moment you’ve created this public URL. In this case, all the following changes will not be reflected.
Mind that you can share not the whole project but its certain parts. To make this, click on the Filter button and filter your chart according to your needs. After that save your filter and name it. When you share a project, you can choose the whole chart or the filtered version. Also, you can add a description to it.
Find more information on how to share a project in GanttPRO in this video.
Deadline (for tasks and milestones)
What is a Gantt chart deadline in GanttPRO?
A deadline is a target date indicating when you want a task to be completed.
For which items can I use a deadline?
In GanttPRO, you can set a deadline for parent tasks and subtasks as well as for milestones.
How to set up a deadline for specific tasks, milestones?
If you want to set a deadline for a task and monitor it, click on the three-dots button on the right side of a task, choose “Task settings”, turn on the Deadline mode, and set the required date. After that, the “flame” icon will appear at the right side of this task on the chart.
How to understand that I missed a deadline?
If a task or milestone duration exceeds the date set as a deadline, this task will be marked with the exclamation mark icon. Besides, the delay time will be reflected near tasks on a chart.
Tasks filter
What is a tasks filter?
Tasks filter helps you to check only the tasks that you need according to the set criteria.
How to create a task filter?
GanttPRO offers you several task filters. Just click on the “Filter” button at the top of the page. You can set the following filters:
– Display the required task type (task or milestone).
– Display the tasks according to their status (Open, In progress, Done).
– Show the tasks assigned to the particular resource.
– Show the tasks that have a certain priority (Highest, High, Medium, Low, Lowest).
– Filter tasks according to the resource reporter.
– Display the tasks that need to be started or ended at a certain time period or a certain date. Here, you can choose preset date range pickers: today, yesterday, this week, last week, this month, last month.
After you’ve chosen specific criteria for your tasks to be filtered, you can save them using the “Save” button at the bottom of the Filter window or clear the chosen criteria.
Find more about filter options in this video.
How can I export chosen tasks?
If you want to export the filtered list of tasks, you can enter the Export section (click on the three-dots button at the right top of the page), choose the saved filter (or the current filter) and click “Export”.
Find more information in this video.
Where to find saved filters?
Saved filter can be chosen in the drop-down list at the bottom of the Filter section.
How can I share chosen tasks?
You can share only certain tasks that you choose. For this, you need to create your filter and name it. After that click on the button with three dots on the top right corner, choose Share URL, then select your filter and create a link. After that, you will be able to share only these chosen tasks.
Notifications
What are notifications in GanttPRO?
Notifications are messages that let you know what associated with you actions happened in a project. You can choose the way to receive certain notifications – email or push-notifications. We send you only those notifications you’ve chosen in your settings.
Where can I find and change my Notifications?
Notifications can be found in the menu on the left side of your screen in your GanttPRO account.
You can go there in two ways. Сlick directly on Notifications, then click on the gear icon on the top. Or click on Profile settings, then choose Notifications.
What kinds of notifications do I receive?
All notifications are divided into 2 groups – common and personal. All marketing notifications fall under the common group. They are sent on special occasions when we have something new to share with all our users. You can find them in the activity feed. They can’t be disabled.
Personal ones include those you’ve chosen in your settings as well as some other notifications sent by GanttPRO. You may also choose how to receive them: email, push-notification or, disabling these options, only in the activity feed.
There are 6 actions that we will notify you about.
1. When you were mentioned in a project or a task.
2. When you were assigned a task.
3. When someone commented on your tasks.
4. When someone attached a file to your tasks.
5. Deadlines. You can choose time frames for this notification – from 1 to 7 days before a deadline.
6. A start date of a task. You can choose time frames for this notification – from 1 to 7 days before a task starts.
How can I receive my notifications?
There are 2 types of notifications in GanttPRO:
– email-notifications;
– push-notifications.
You can use two of them, choose the one you prefer or disable at all. If email and push notifications are disabled, anyway, you will get notifications in your activity feed to keep up on your projects.
How do notifications work?
When someone takes an action you’ve chosen to notify you about, you will be sent a notification according to your settings. Meanwhile, on the left menu you will find the corresponding number. For example, if you have 3 notifications, you get number 3 there, etc.
The same applies to letters we send you.
Can I disable notifications or receive not all of them?
Yes, it’s up to you to decide what to receive as an email or a push-notification. Simply check or uncheck corresponding boxes.
Anyway, notifications are shown in the activity feed.
Can I disable marketing newsletters on special offers and updates?
Yes. To switch this option off, simply uncheck “Email notifications on special offers and updates” box in the Notification tab in the profile settings.
Can I view notifications for all the time?
Yes. As soon as a new project is created, all relevant actions (mentions, assignments, comments, attachments, day(s) before a deadline, day(s) before a start date of a task, and notifications letters themselves) are registered in the activity feed. To find them, click on Notifications menu on the left side in your GanttPRO account. Your most recent notifications will be shown first in the feed. To see all others, scroll down the feed.
Can I switch back to default Notifications settings?
At any moment you can switch back to default settings. In this case, all email notifications will be on, all push – off.
You will find the option at the bottom of the Notification pop-up.
Can I get a sound when I receive a notification?
By default, the sound is played when you receive any kind of notifications. You can switch it off at any moment in Notifications settings.
Find more information on how to work with notifications in GanttPRO in this video.
How can I disable push-notifications?
You can easily turn push-notifications off in different browsers.
If you want to block notifications from certain sites, just right click on any notification from this site and choose Block notifications from this site.
Here are steps how to turn all notifications off in commonly used browsers.
In Google Chrome:
Click on Customize and control button on the top right corner – choose Settings – scroll down and choose Advanced – Content Settings – switch on Ask before sending in Notification field.
If you want to block notifications only from GanttPRO.com, click on View site information on the top left corner of your screen (the lock sign) – choose Notifications – Always block on this site.
In Opera:
Click on Settings – from the left column сhoose Sites – scroll down to find Notifications – Block for all sites.
In Mozilla Firefox:
Click on Settings button – choose Privacy and security – Permissions – choose a needed site and click “Delete” or “Delete all sites” to block notifications from all sites.
How do mentions work?
As you are engaged in a team project, you can mention in comments people you work with. Just enter @ and you will see the list of all people from your project. After that choose team members you need to mention. Consequently, he or she will receive a notification in the activity feed and, depending on the options, email or push-notification as well.
Billing details
Сan I change my payment card or add a new one?
You may attach a new credit card to current order (subscription payments) in your personal PayPro Global account.
In order to update your credit card information, follow the instructions:
1. Enter your PayPro Global account: https://cc.payproglobal.com/Customer
Enter your login: it is your billing email.
Enter your password: it was sent to the email that was used for the purchase (billing email).
If you have difficulties with finding your password, use Forgot Password option (follow this link https://cc.payproglobal.com/Customer, enter your email and press on Forgot Password button. New password will be sent to your email).
2. After you entered your account, use Add New Card option in section MY CREDIT CARDS on the left side of the screen. If you have several credit cards in your account, choose Make primary in the box Actions next to the credit card that should be used for the payment.
3. Go to section SUBSCRIPTIONS and attach needed credit card to the subscription that should be renewed/billed (in case you have several subscriptions and several credit cards in your account).
If subscription has status active, there will be an automatic attempt to charge your card. If status is suspended, press on renew and the payment attempt will be made during following 12 hours. If subscription status is terminated, contact PayPro Global at:
+1-866-933-4313 (USA/Canada toll free).
+1-646-873-6857 (International).
+44 207 993 4222 (UK).
support@payproglobal.com
GanttPRO and JIRA integration
How do I connect GanttPRO and JIRA?
Make sure you have both GanttPRO and JIRA Cloud active accounts. Integration is possible only with GanttPRO Team plans and CLOUD version of JIRA. GanttPRO does not integrate with JIRA Software Server!
To connect your GanttPRO and JIRA accounts, follow these easy steps.
1. On the left-side dashboard, choose Integrations, then Connect.
2. Open JIRA, choose Settings on the left-side dashboard.
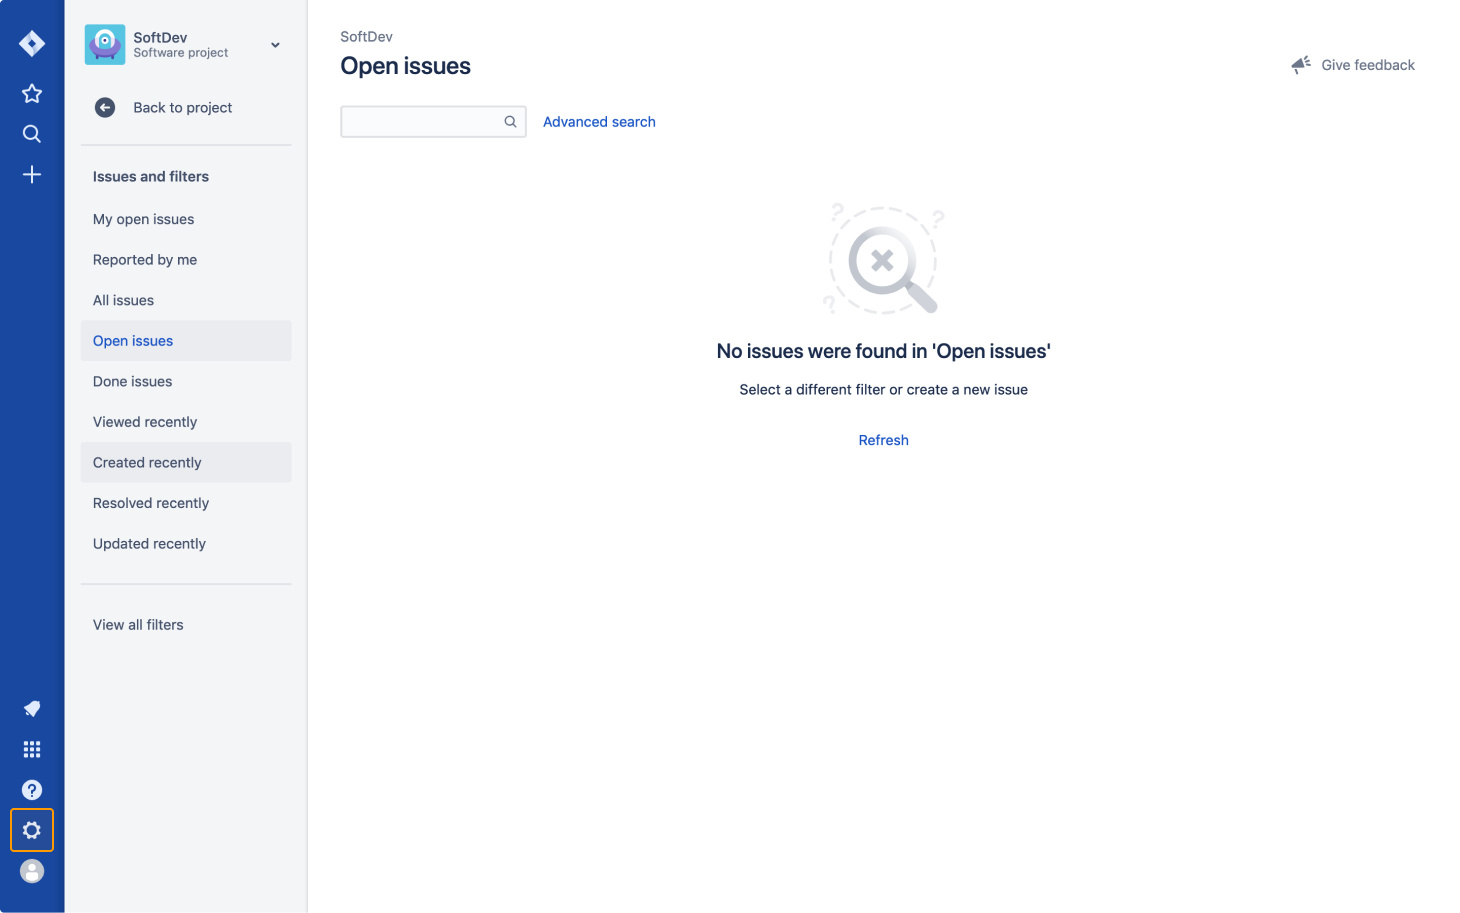
3. Choose Products.
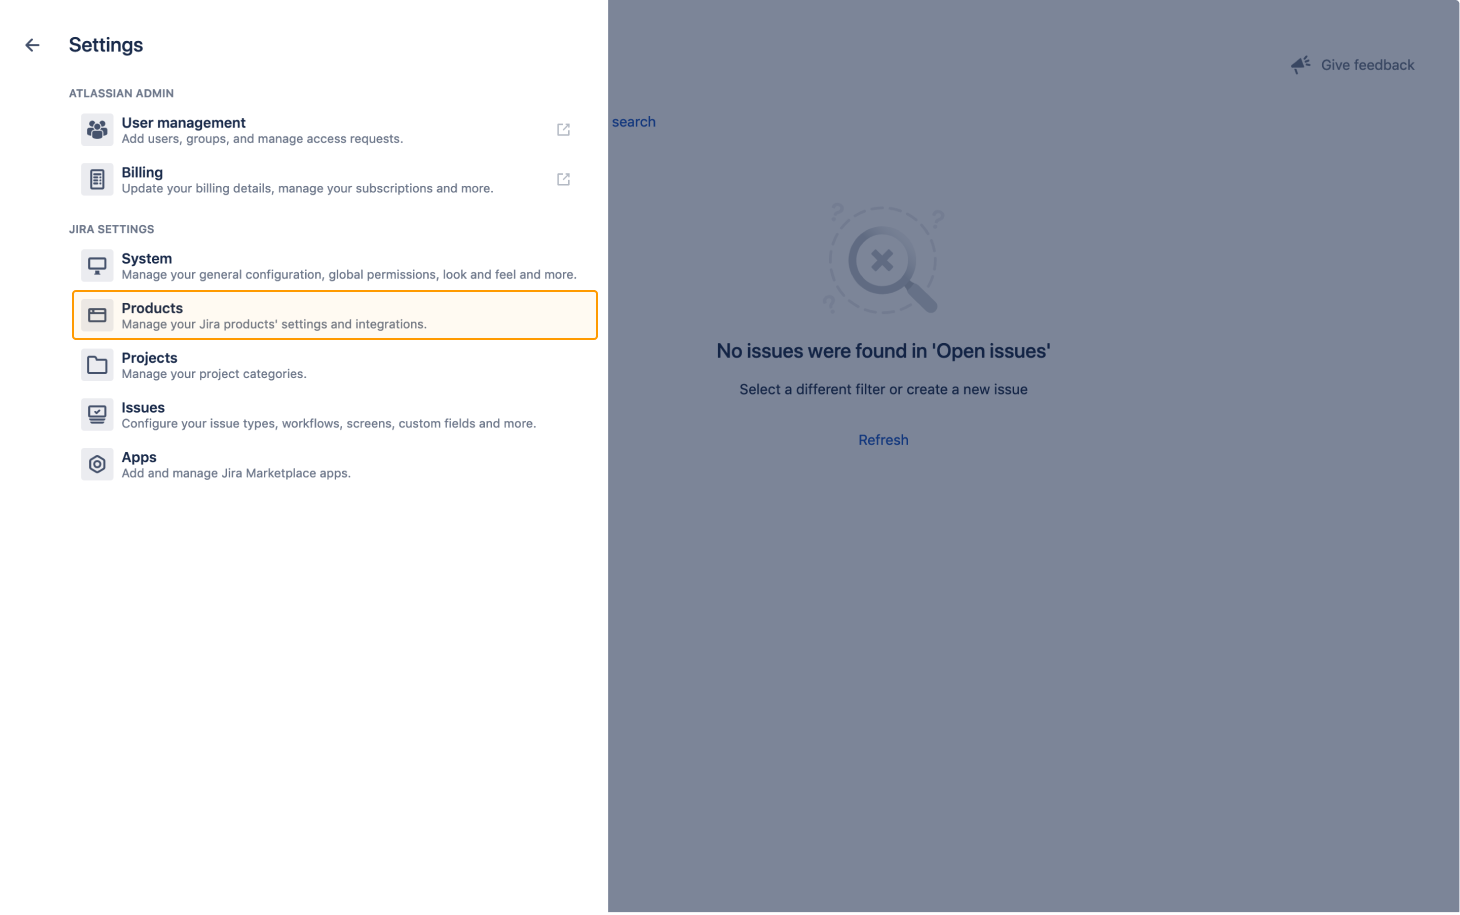
4. Then Application links.
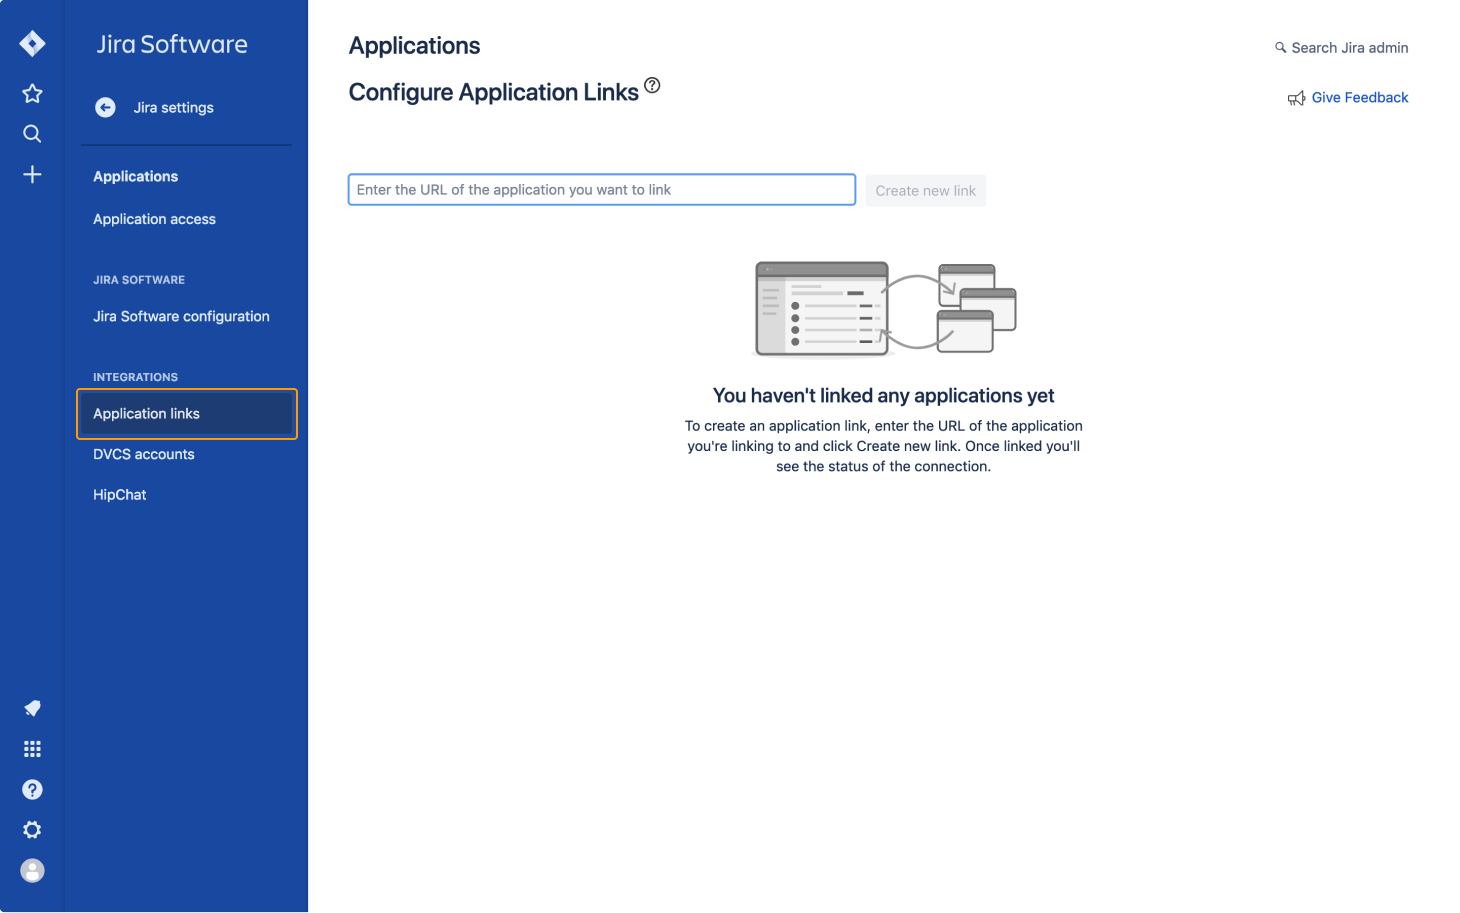
5. Go to GanttPRO and stick to the step-by-step instruction. In JIRA, enter jiraapi.ganttpro.com in the URL field and click Create new link.
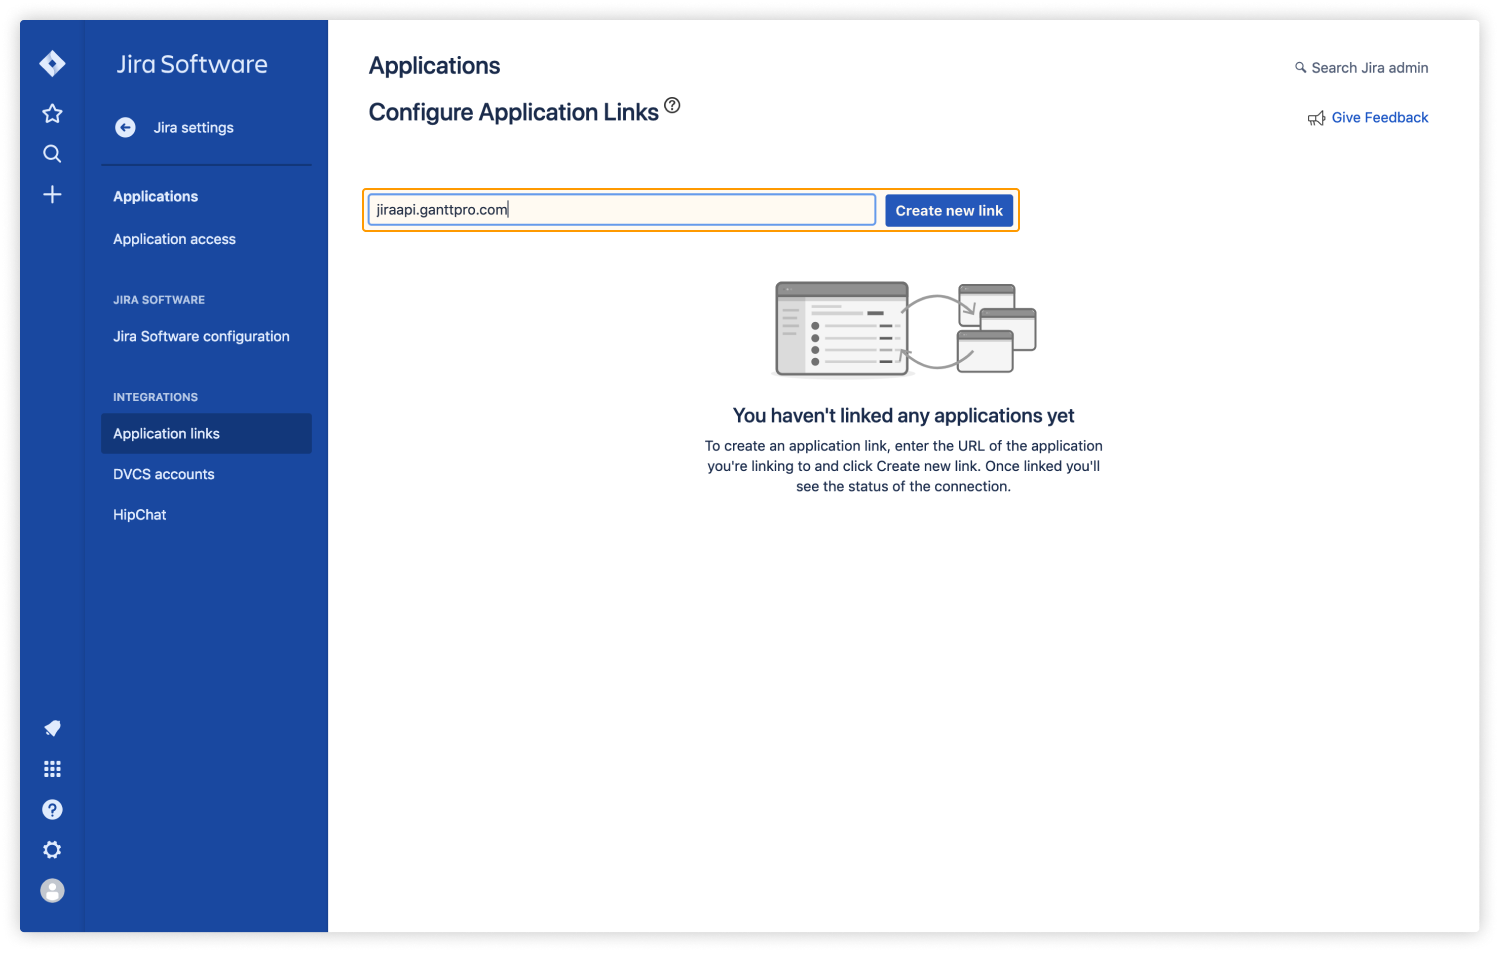
6. The window will appear. Click Continue.
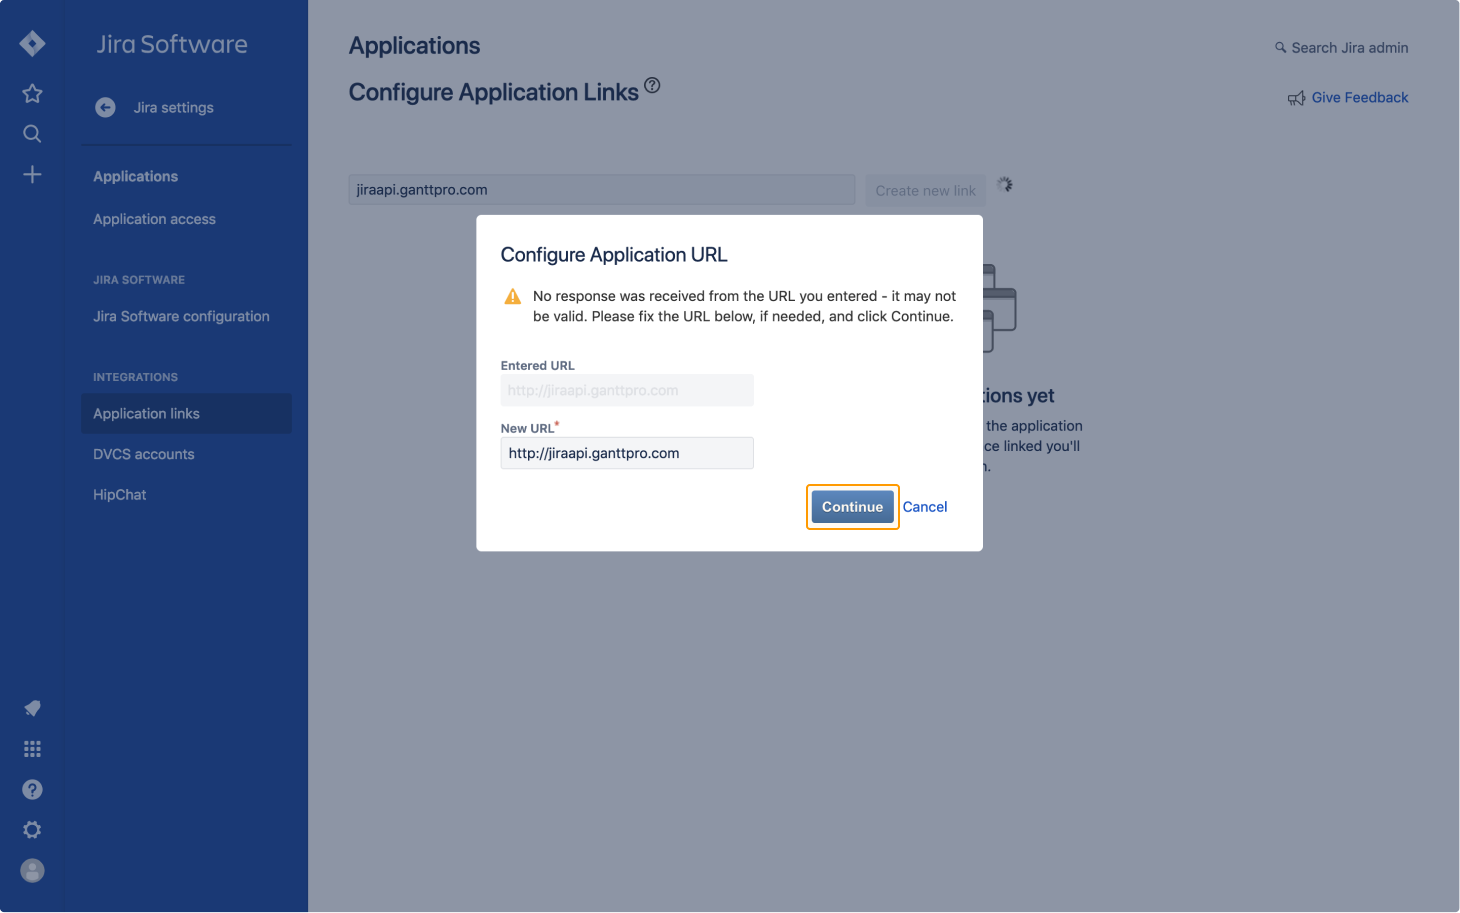
7. In the Application Name field, enter GanttPRO and click Continue.
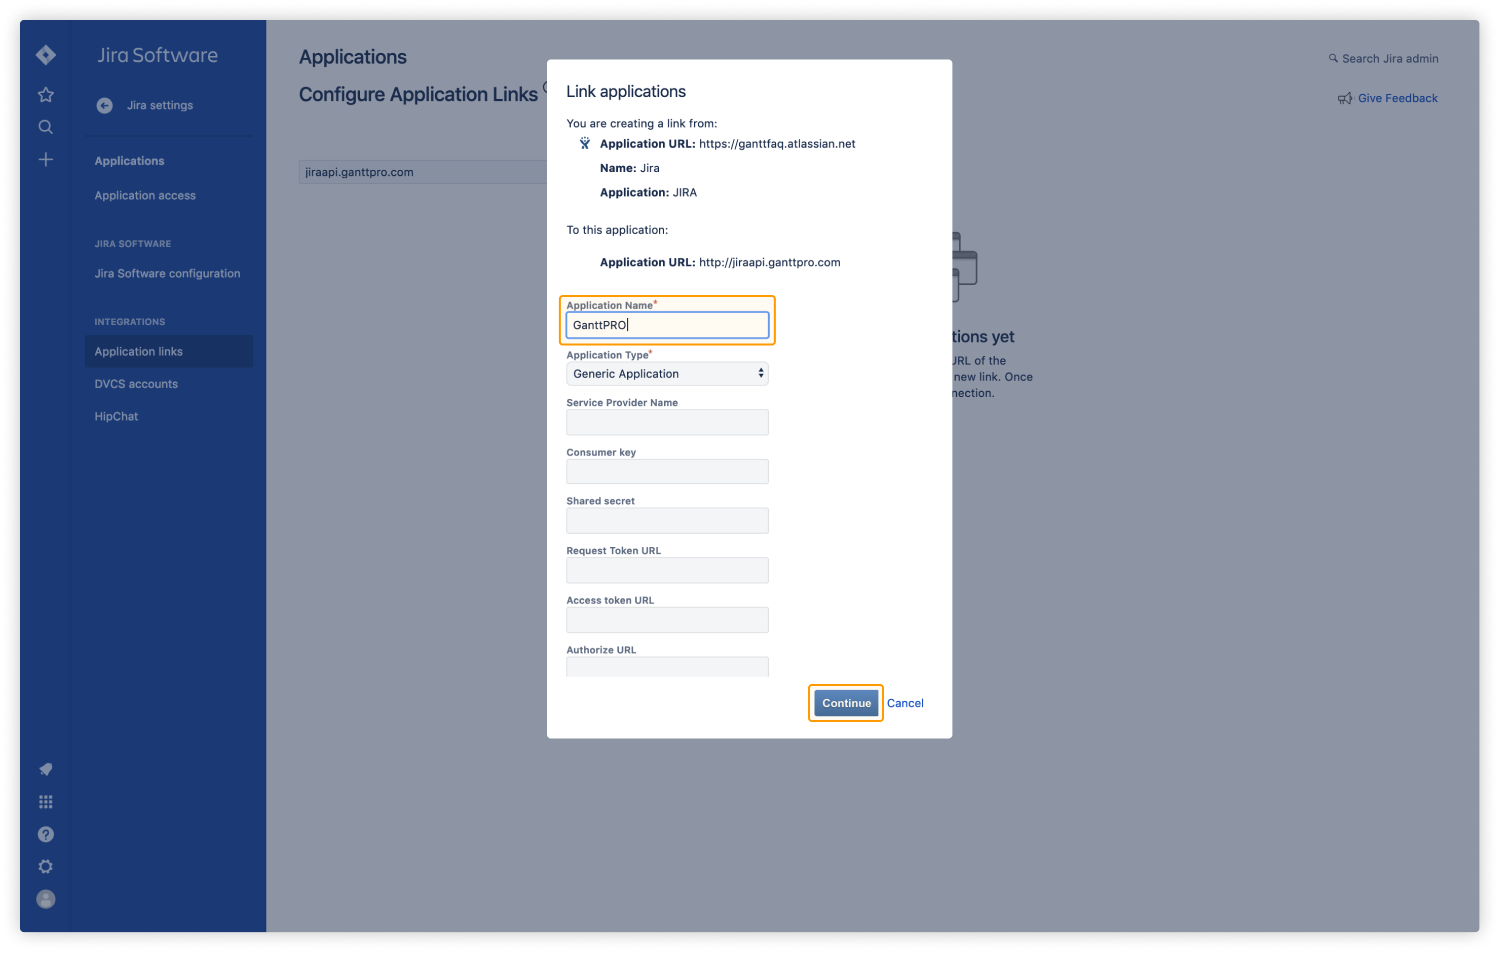
8. Open the Integration settings by clicking the Edit icon.
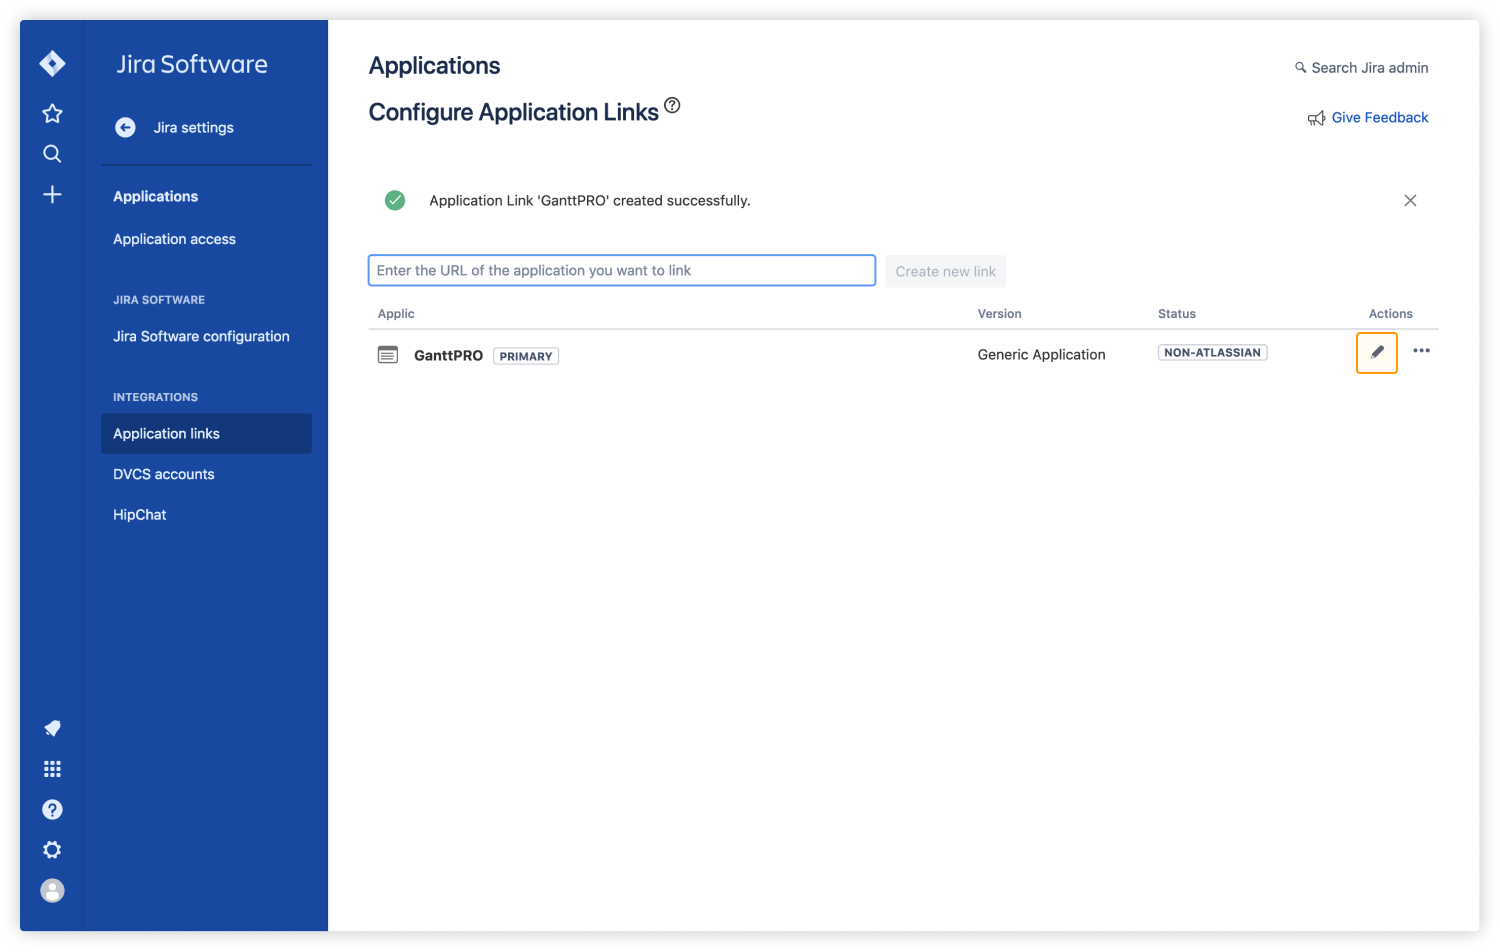
9. Choose Incoming Authentication and enter values in the corresponding fields in JIRA settings.
Fill in the Consumer Key field.
Fill in the Consumer Name field.
Fill in the Public Key field.
Fill in the Consumer Callback URL field.
Then Save and Close.
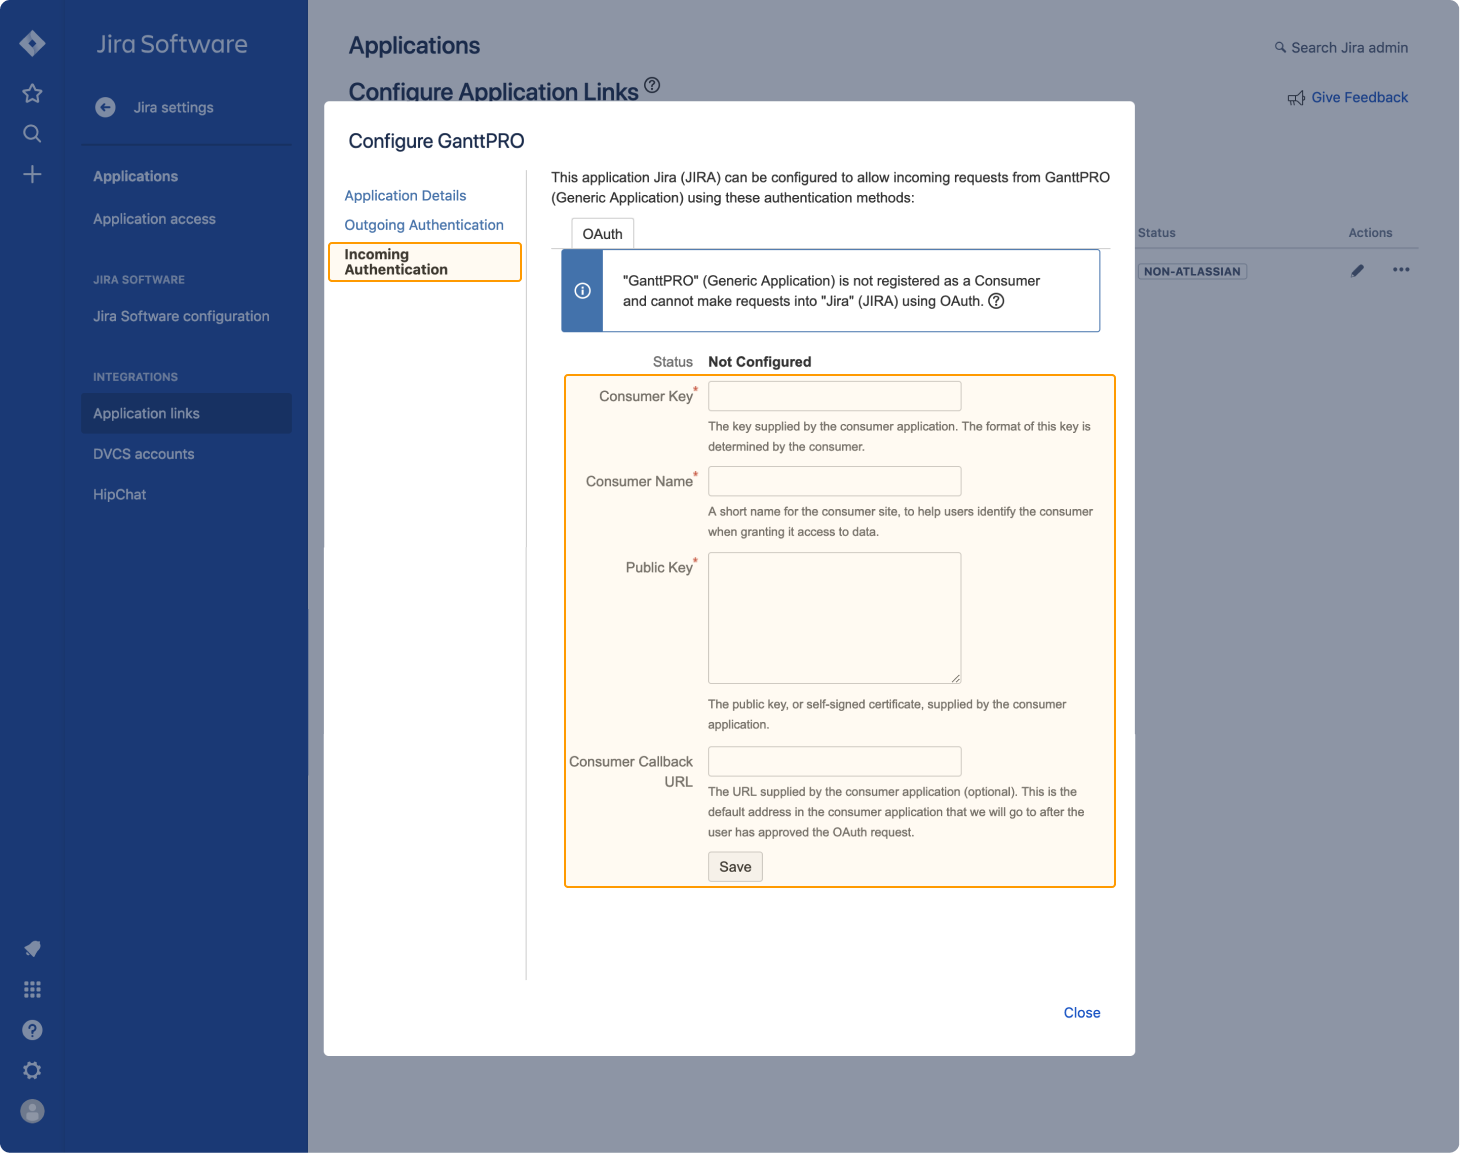
10. Copy your JIRA link from the address bar of your browser and enter it in GanttPRO, step 4.
Find the detailed step-by-step instructions in this video.
How can I set Start Date and End date fields in JIRA?
GanttPRO Start Date and GanttPRO End Date fields are automatically created in Jira after GanttPRO integration with Jira.
To display End date and Start date in Jira, follow these steps:
1. Open the project settings in JIRA Software.
2. Select Fields in the sidebar and click on the edit icon.
3. Find the GanttPRO End Date field and press Screens.
4. Find your project and tick all the boxes.
5. Press the Update button.
6. Do the same for the GanttPRO Start Date.
Find the detailed step-by-step instructions in this video.
How can I synchronize dependencies between tasks in GanttPRO and JIRA?
To synchronize dependencies between tasks in GanttPRO and JIRA Software, you need to add new issue linking in JIRA.
For this:
1. Open Settings in JIRA.

2. Choose Issues.
3. Then choose Issue linking and add the following types of dependencies:
Gantt End to End: outward description — has to be finished together with, inward description – has to be finished together with.
Gantt End to Start: outward description – has to be done before, inward description – has to be done after.
Gantt Start to End: outward description – earliest end is start of, inward description – start is earliest end of.
Gantt Start to Start: outward description — has to be started together with, inward description – has to be started together with.
Find the detailed step-by-step instructions in this video.
Where are GanttPRO data stored?
All GanttPRO data are stored in private network at Microsoft Azure Cloud infrastructure with servers located in Western Europe. Even Microsoft can’t access the data and dataflows.
Are data encrypted?
All sensitive data are encrypted. The whole database isn’t encrypted for access speed reasons, but it is protected with Secure Socket Layer (SSL) inside a private network.
To prevent your information from being read or changed while in transit and provide the strongest privacy and integrity protection, the developers use Hypertext Transfer Protocol Secure (HTTPS).
Thus, we use SSL, private VPN on MS Azure cloud infrastructure, and real-time data replication.
Where are JIRA data stored?
All the information synchronized between apps is stored on GanttPRO servers.
All other data have no connections with GanttPRO servers and are subject to Atlassian Policy.
Who else has access to the hosting servers?
Only GanttPRO developers and monitoring teams have access to the platform as they need to monitor and maintain performance. Also, access to the cloud platform is possible upon customer’s support requests.
Do you make backups?
We make backups every day at 2 p.m. PST.
GanttPRO Mobile App
Mobile App
The mobile app is an additional opportunity to manage assignments and receive notifications on the go. You have to be a registered user in the Web version to get all the advantages from the mobile experience. All your work will be synchronized between the Web and mobile versions in real-time.
The GanttPRO mobile app is available at both App Store and Google Play.
As soon as you login to the app, you will see three tabs: Tasks, Notifications, and Settings. Let’s dive deeper into the features and discover what you can do right from your phone.
Manage tasks
On the Tasks tab, you will find all the tasks from all the projects available.
You can search tasks by their names and use filters by:
-
- Assignee
- Project
- Status
- Priority
- Type
- Start date
- End date
Additionally, you can sort tasks by:
-
- Task name
- Start date
- End date
- Creation date
- Status
- Priority
- Project name
Let’s look at the task details available. Basically, you will find almost the same options as in the Web version.
Just tap a task to open its settings:
-
- Task name
- Path
- Start date
- Description
- Status
- Assigned to
- Time log
- End date
- Priority
- Estimation
- Attachments
- Comments
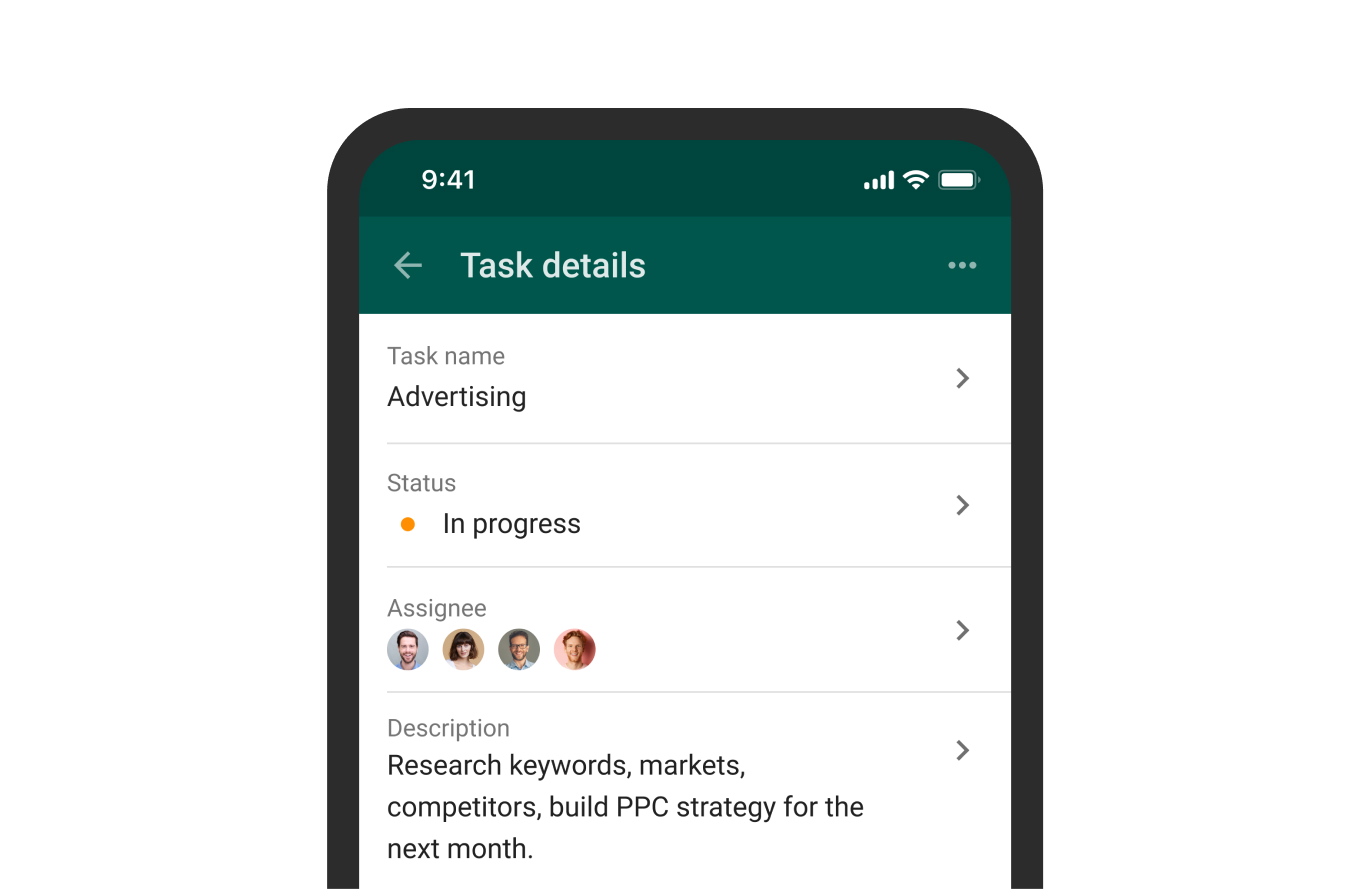
You can easily create new tasks right in the app. Just tap the + button on the screen with your tasks and specify a few default details: a task name, a path (a project where this new assignment will belong to), a start date, and its description.
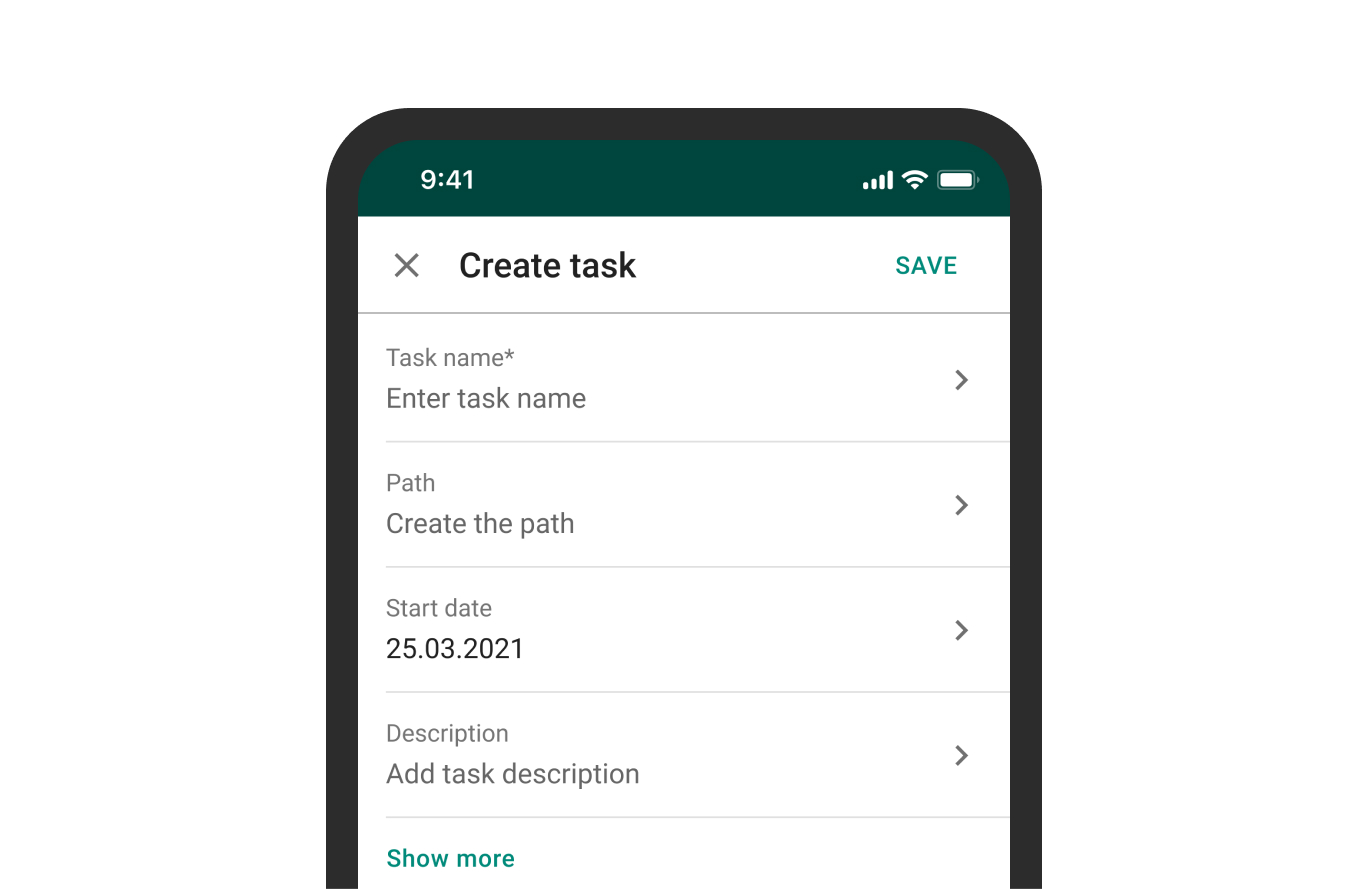
Track time spent on tasks
With the mobile app, you can track the precise time spent on tasks wherever you are: in the field, on the way to the office, or any other working location.
Just a few clicks, even far from your workspace, and you log your working time and describe it.

Collaborate with your team
Stay connected with your team and provide your tasks even with the smallest details whenever it is needed. Write descriptions, leave comments, attach files, and assign resources right from your phone, in seconds.
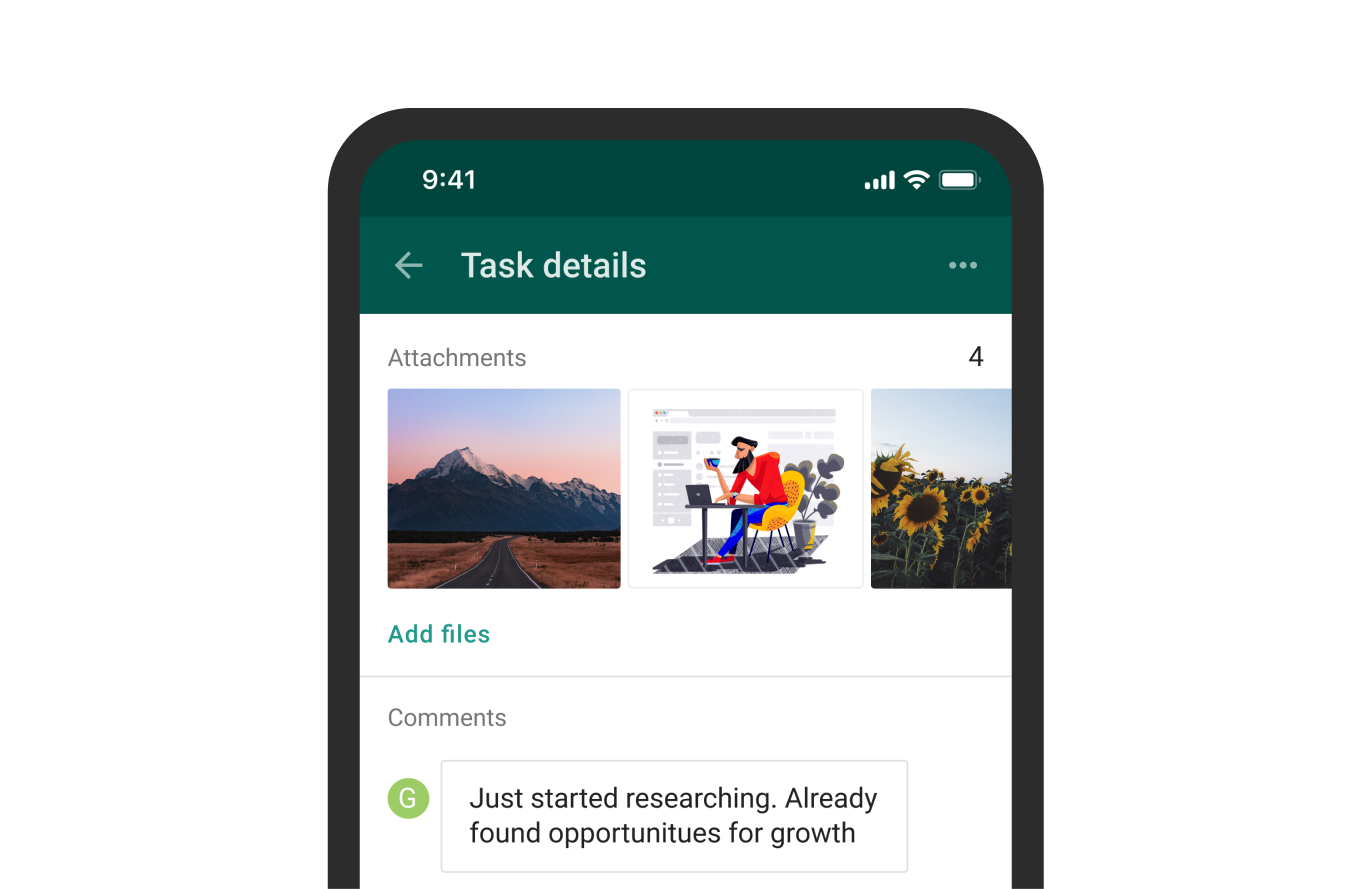
Receive notifications
This is what actually keeps you and your team in the loop and engaged.
Go to the Settings tab, then Push notifications. Here, you can turn on notifications for:
-
- Start date
- End date
- Deadlines
- Mentions
- Assignments
- Comments
- Attachments
Once any above-mentioned change in any task happens, you will receive the corresponding instant notification.
For Android, all the notifications are turned on by default. You can change them anytime.
For iOS, in case you allow receiving notifications, they will be turned on. Otherwise, you have to do it manually.
You can find all of your notifications in the Notification tab.
Please note that the mobile and Web notifications do not correlate with each other. You have to turn on or off them for each version of the tool separately.
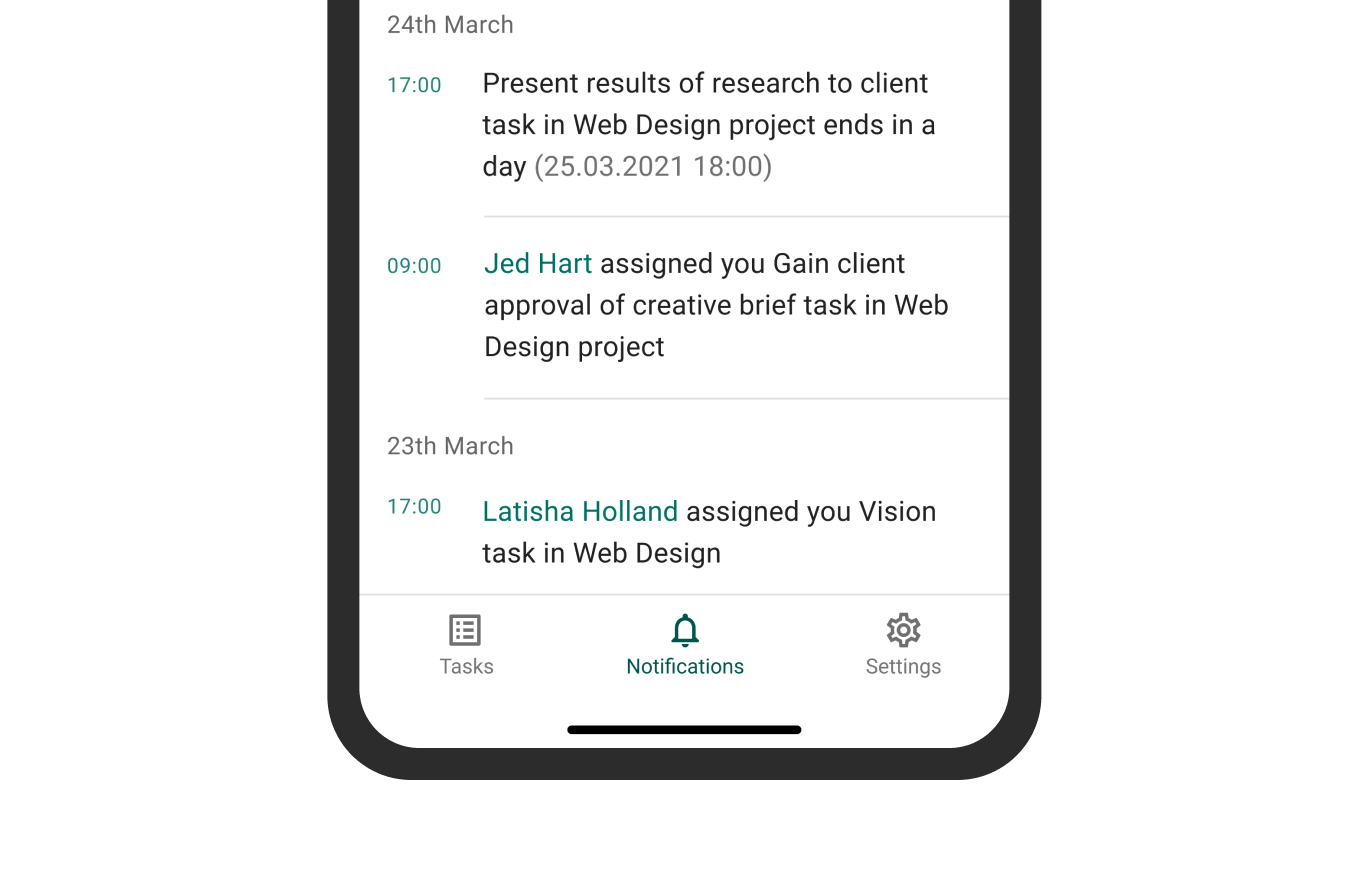
Shortcuts
Shortcuts in GanttPRO
In GanttPRO, for your convenience, you can use shortcuts. There are the following combinations:
↑↓ ←→ + focus – navigation between cells and fields.
↑↓ ←→ + edit mode – move the cursor across the text.
Duration + edit mode + ←→ – move the cursor.
Duration + edit mode + ↑↓ – +1/-1 to values.
Duration + edit mode + Shift + ↑↓ – +10/-10 to values.
Duration + edit mode + Alt (Option) + ↑↓ – +0.1/-0.1 to values.
Enter/Space + focus – open the cell in the edit mode; open the drop-down; open the date picker.
Enter + edit more – close the cell and save the data – the focus goes down to the next cell; close the cell and leave previous data if nothing has been entered – the focus goes down to the next cell.
Tab/Shift + tab + focus – move to the next/previous cell.
Tab/Shift + tab + edit mode – save the data and move to the next/previous cell.
Shift +→/← + focus – indent/outdent tasks.
Shift + ↑/↓ + focus – collapse/maximize the parent task.
Delete/Cmd+Backspace + focus – delete the task.
Delete/Cmd+Backspace + edit mode – delete the task name.
Esc + focus – focus remains on the cell.
Esc + edit mode – close the cell without saving.
Ctrl + Z + focus – open the history of changes.
Ctrl + Z + edit mode – undo.
Shift + Enter + focus – open task settings.
Space + resource from the drop-down – choose the resource.
Integrations and API
Slack
GanttPRO integration with Slack can help you to optimize processes and increase productivity within your team. It will help you work in two platforms at the same time – in the messenger and online project management tool. Moreover, your working processes will be synchronized.
Connecting GanttPRO to Slack
To integrate GanttPRO and Slack, go to your profile settings, then “Integration and API”, and choose Slack.
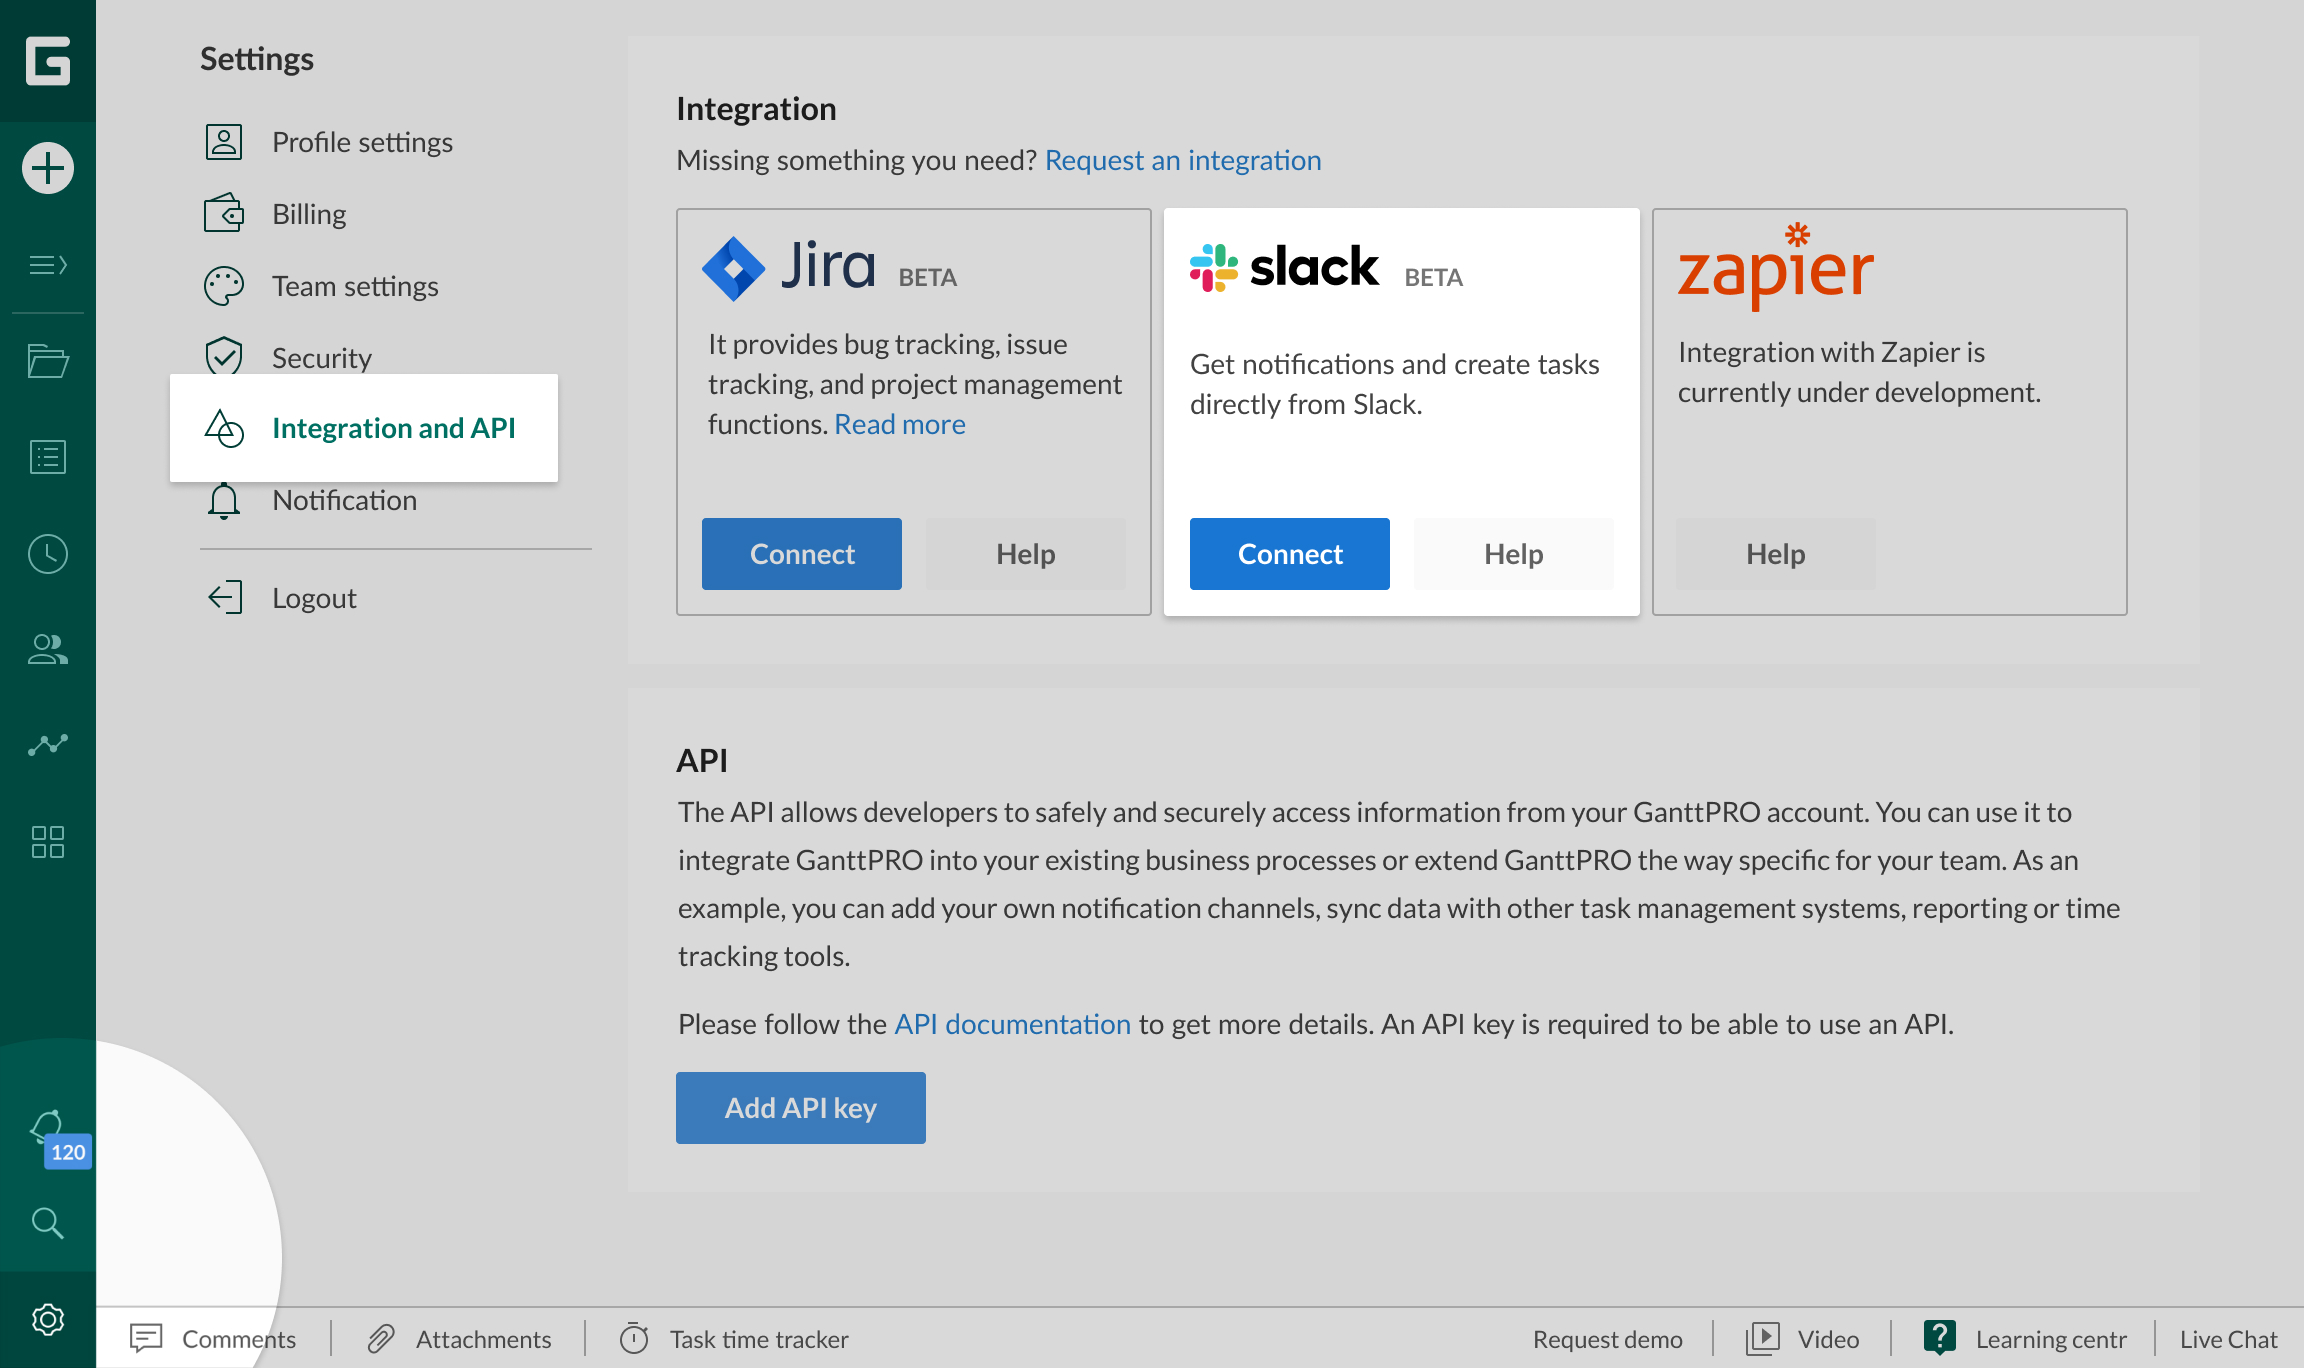
In the next tab, choose a Slack account that you need to connect to and click “Allow”.
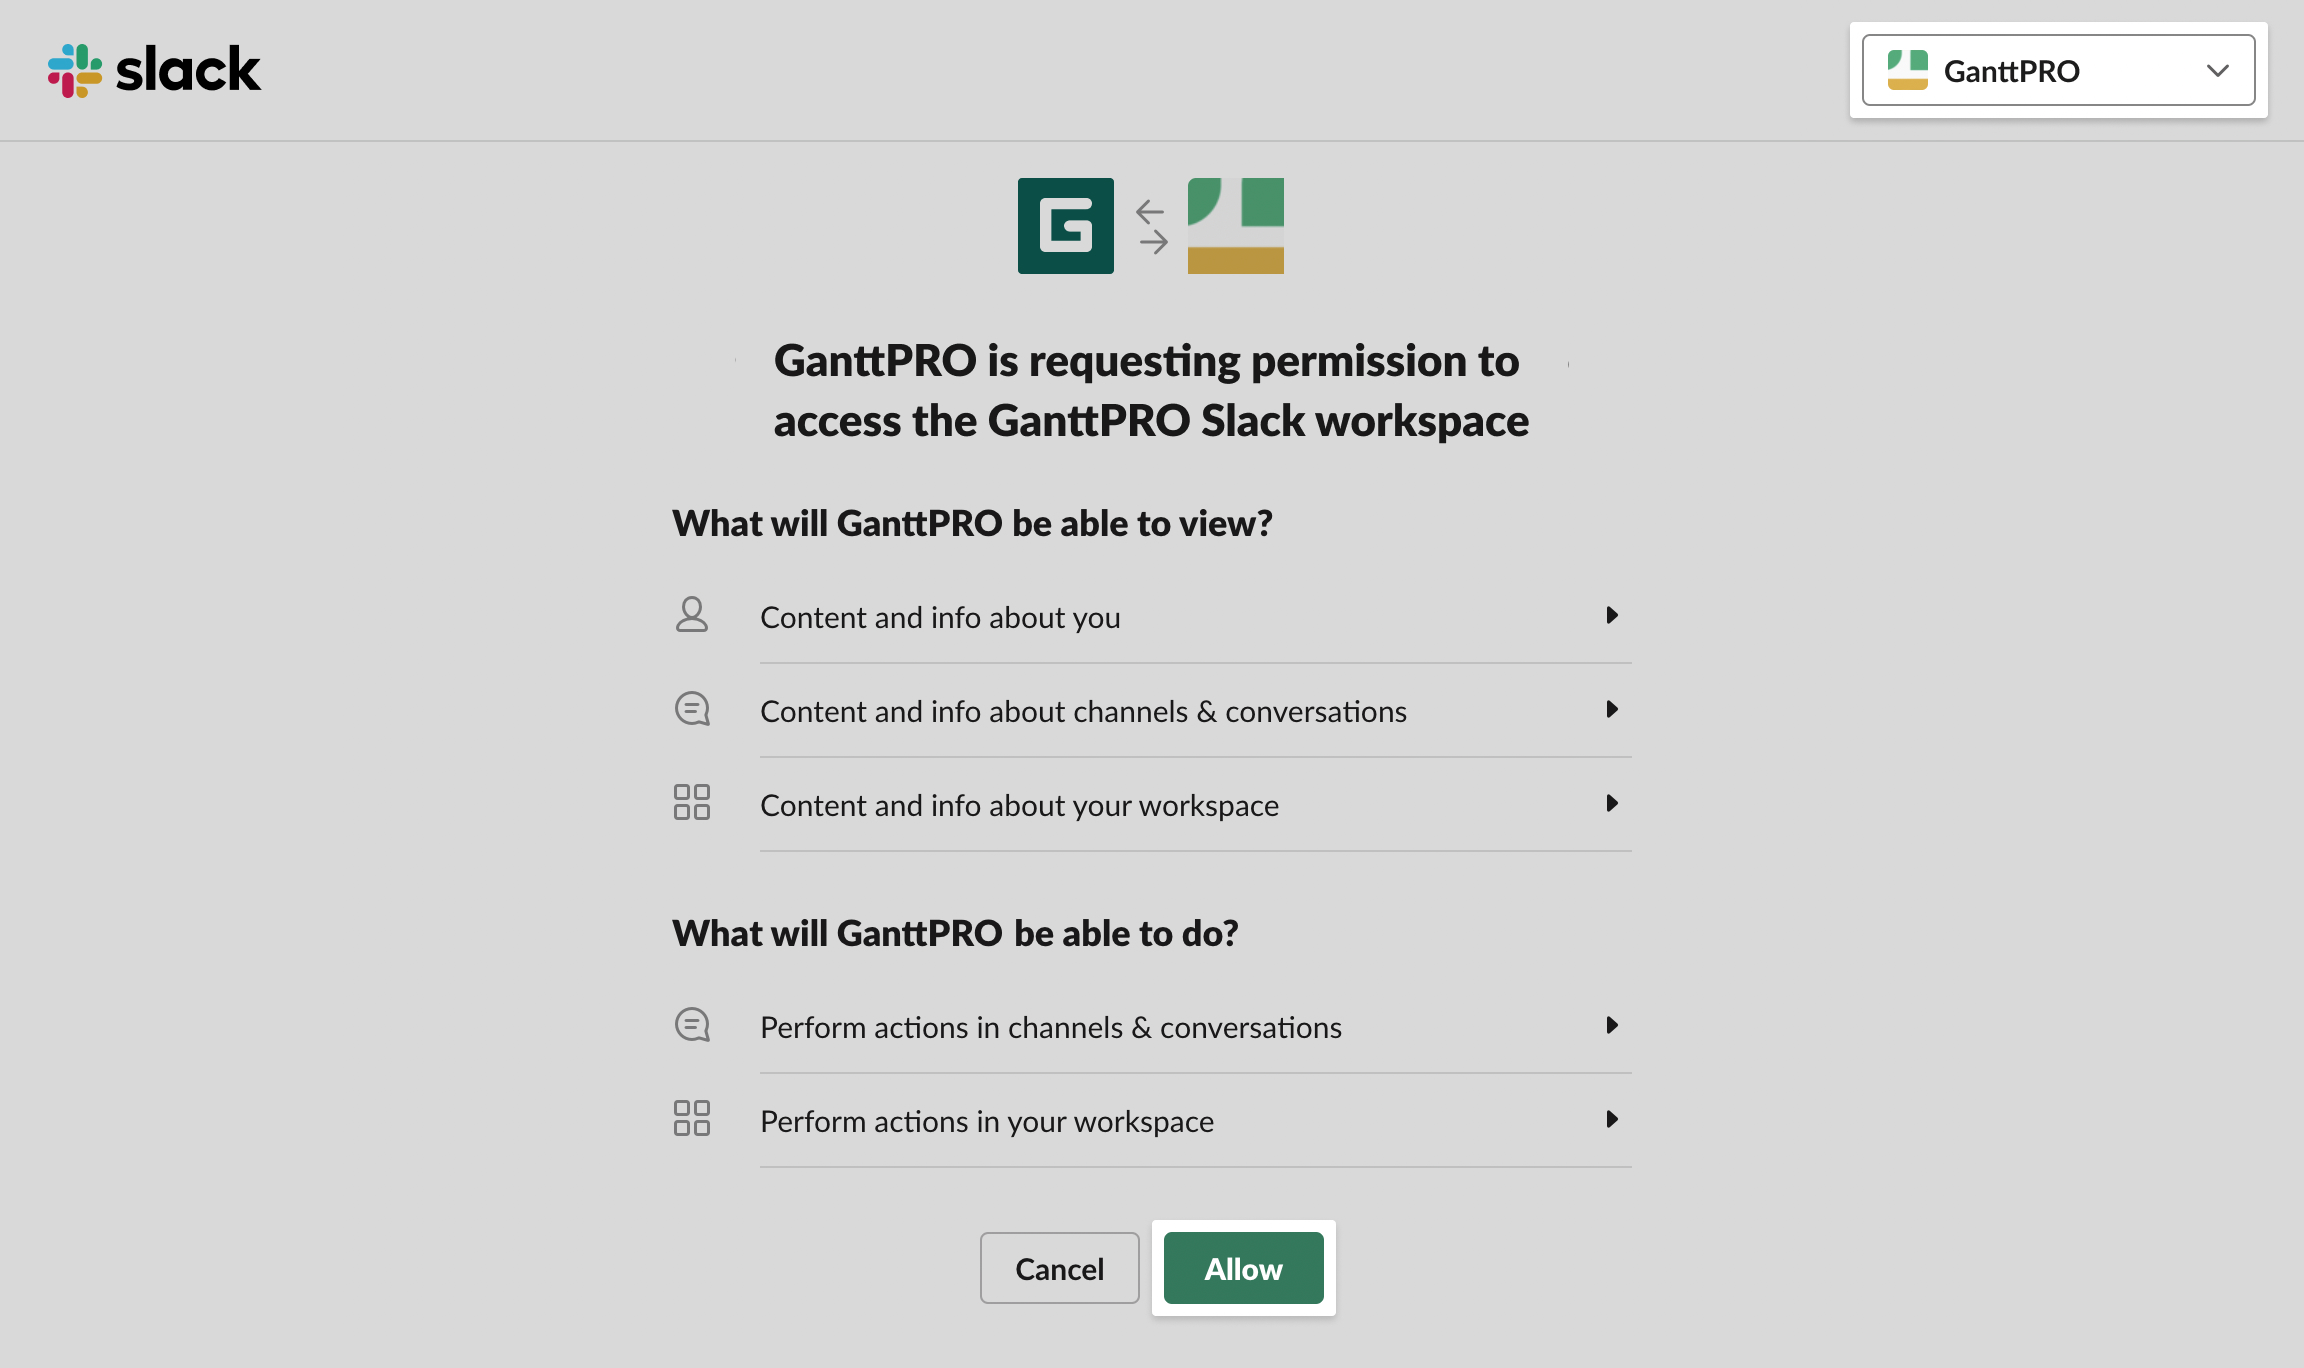
Please note: an account Owner should be the first one who creates this connection. After that, the connection will be available for Admins and Members.
Due to security reasons, an Admin and a Member can’t connect any other Slack account. It should match the account that the Owner has connected.
Connecting GanttPRO projects to Slack channels
As soon as the integration is on, any user can connect projects from GanttPRO online Gantt chart software to Slack channels.
The connection has a many-to-many relationship. It means that you can connect more than one project to one channel or one project to a few channels.
After choosing a project and a channel, you need to specify the notifications you want to receive. They will be sent to the channel automatically.
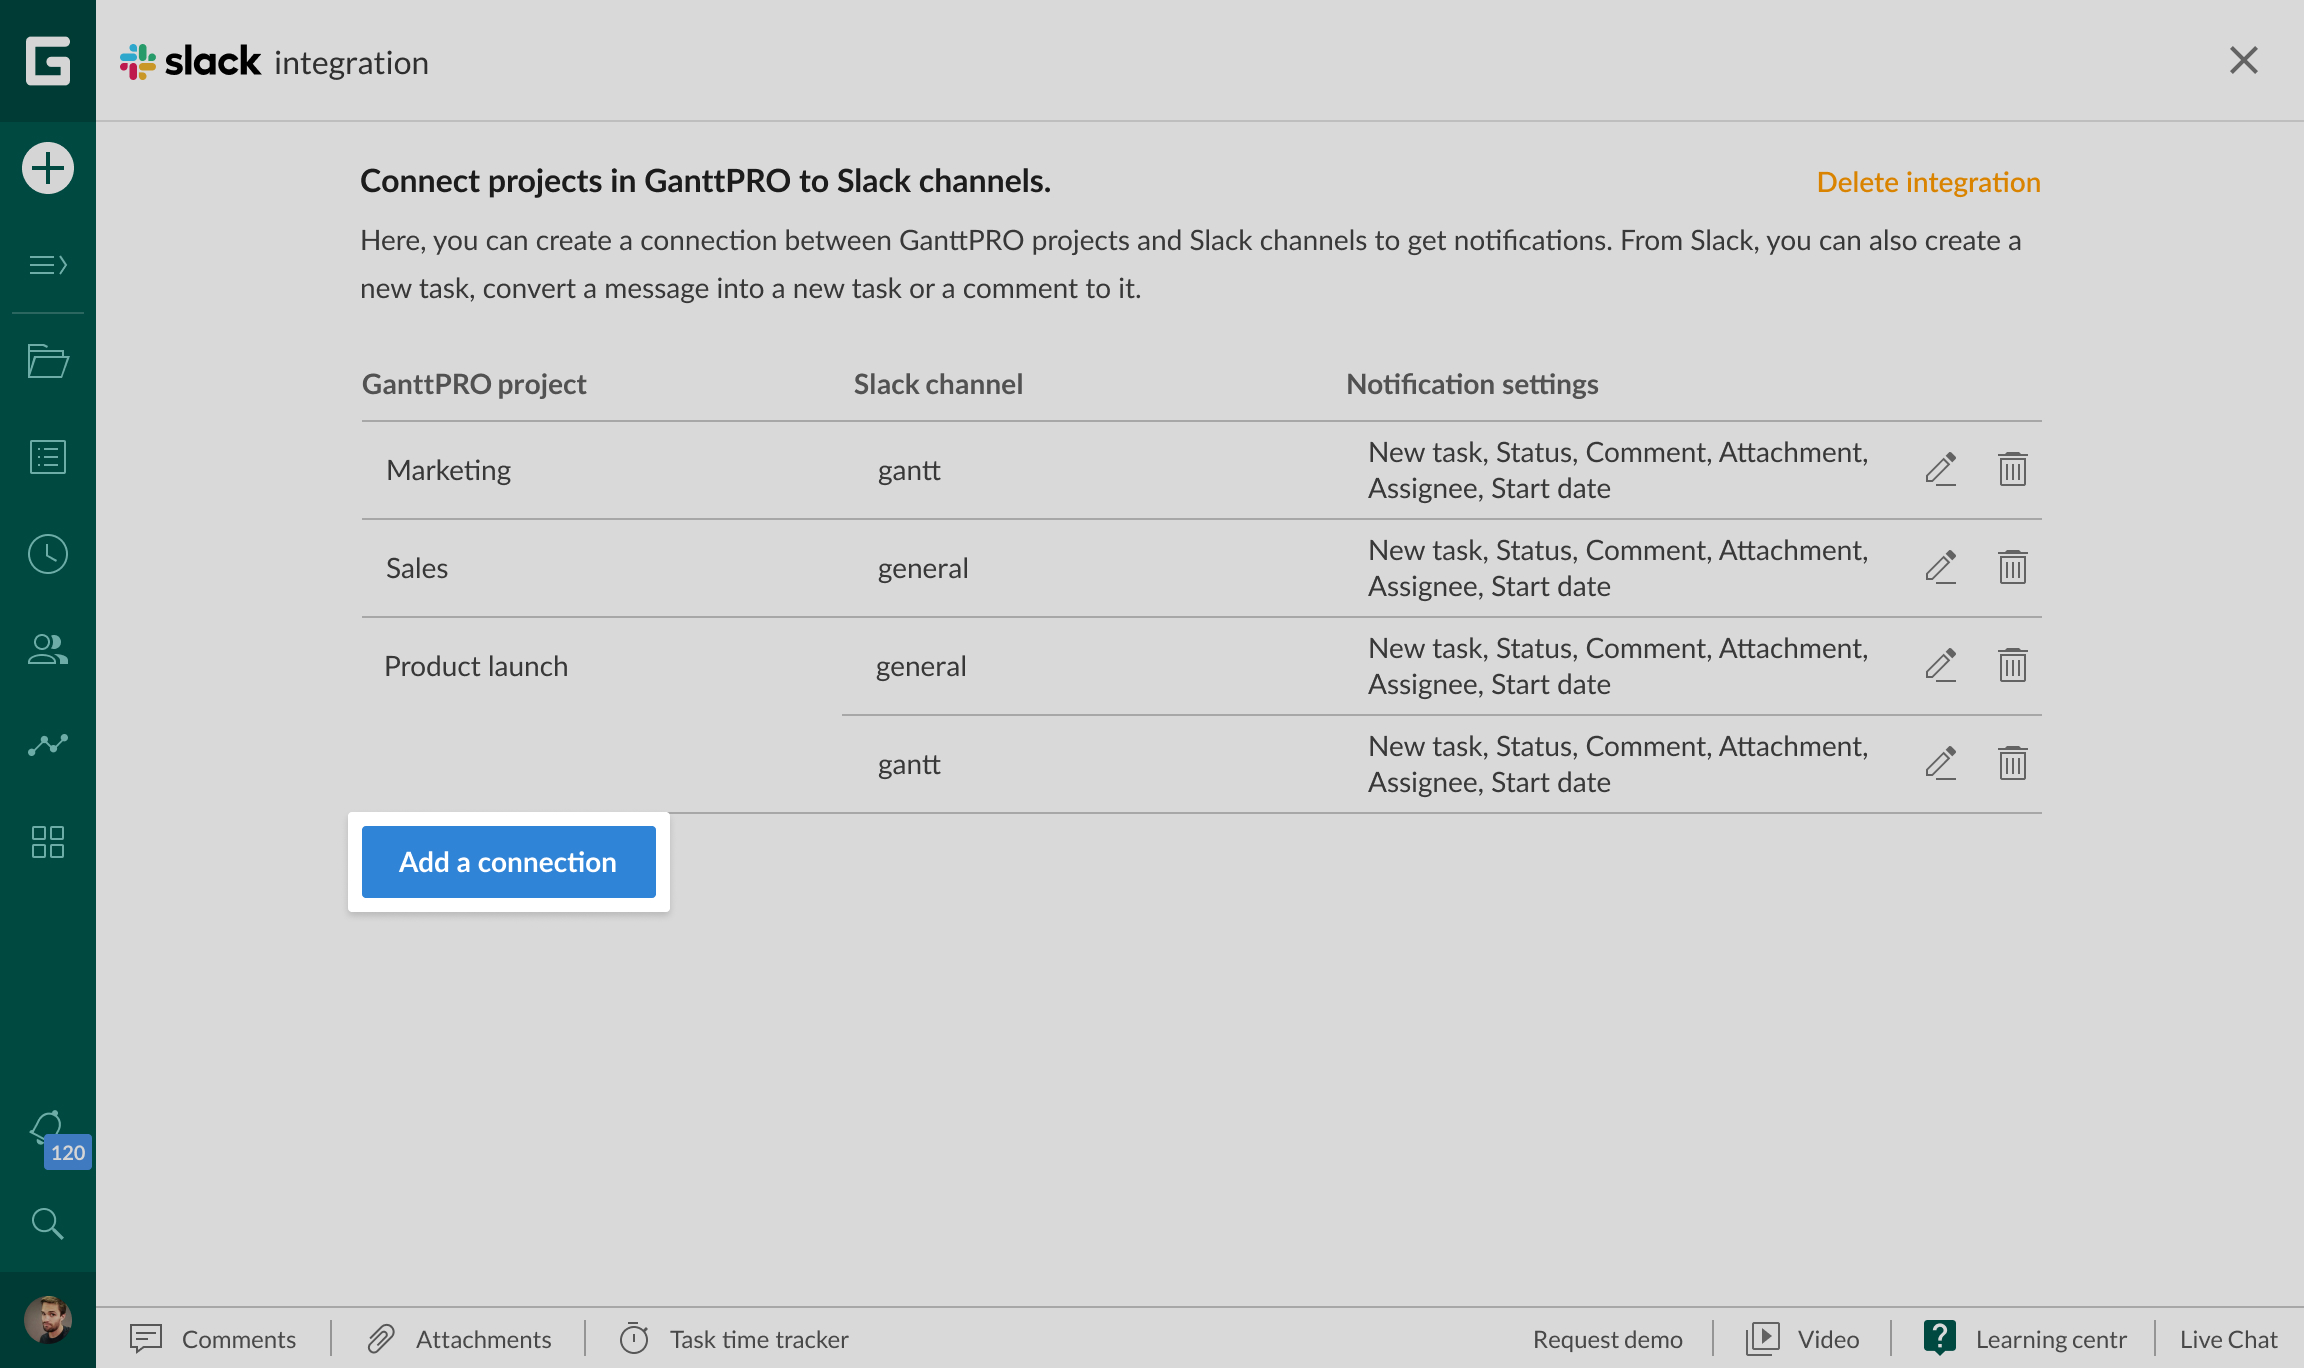
Notifications from GanttPRO to Slack
From GanttPRO to Slack, the following notifications are available:
- Creating a new task
- Changing task status
- Adding a new comment to a task
- Attaching a new file to a task
- Assigning a new resource to a task
- Changing a start date of a task

You can set up or edit notifications in two ways:
- The window where you connect GanttPRO projects to Slack channels
- On the upper right corner of your screen (available after the integration is set up)
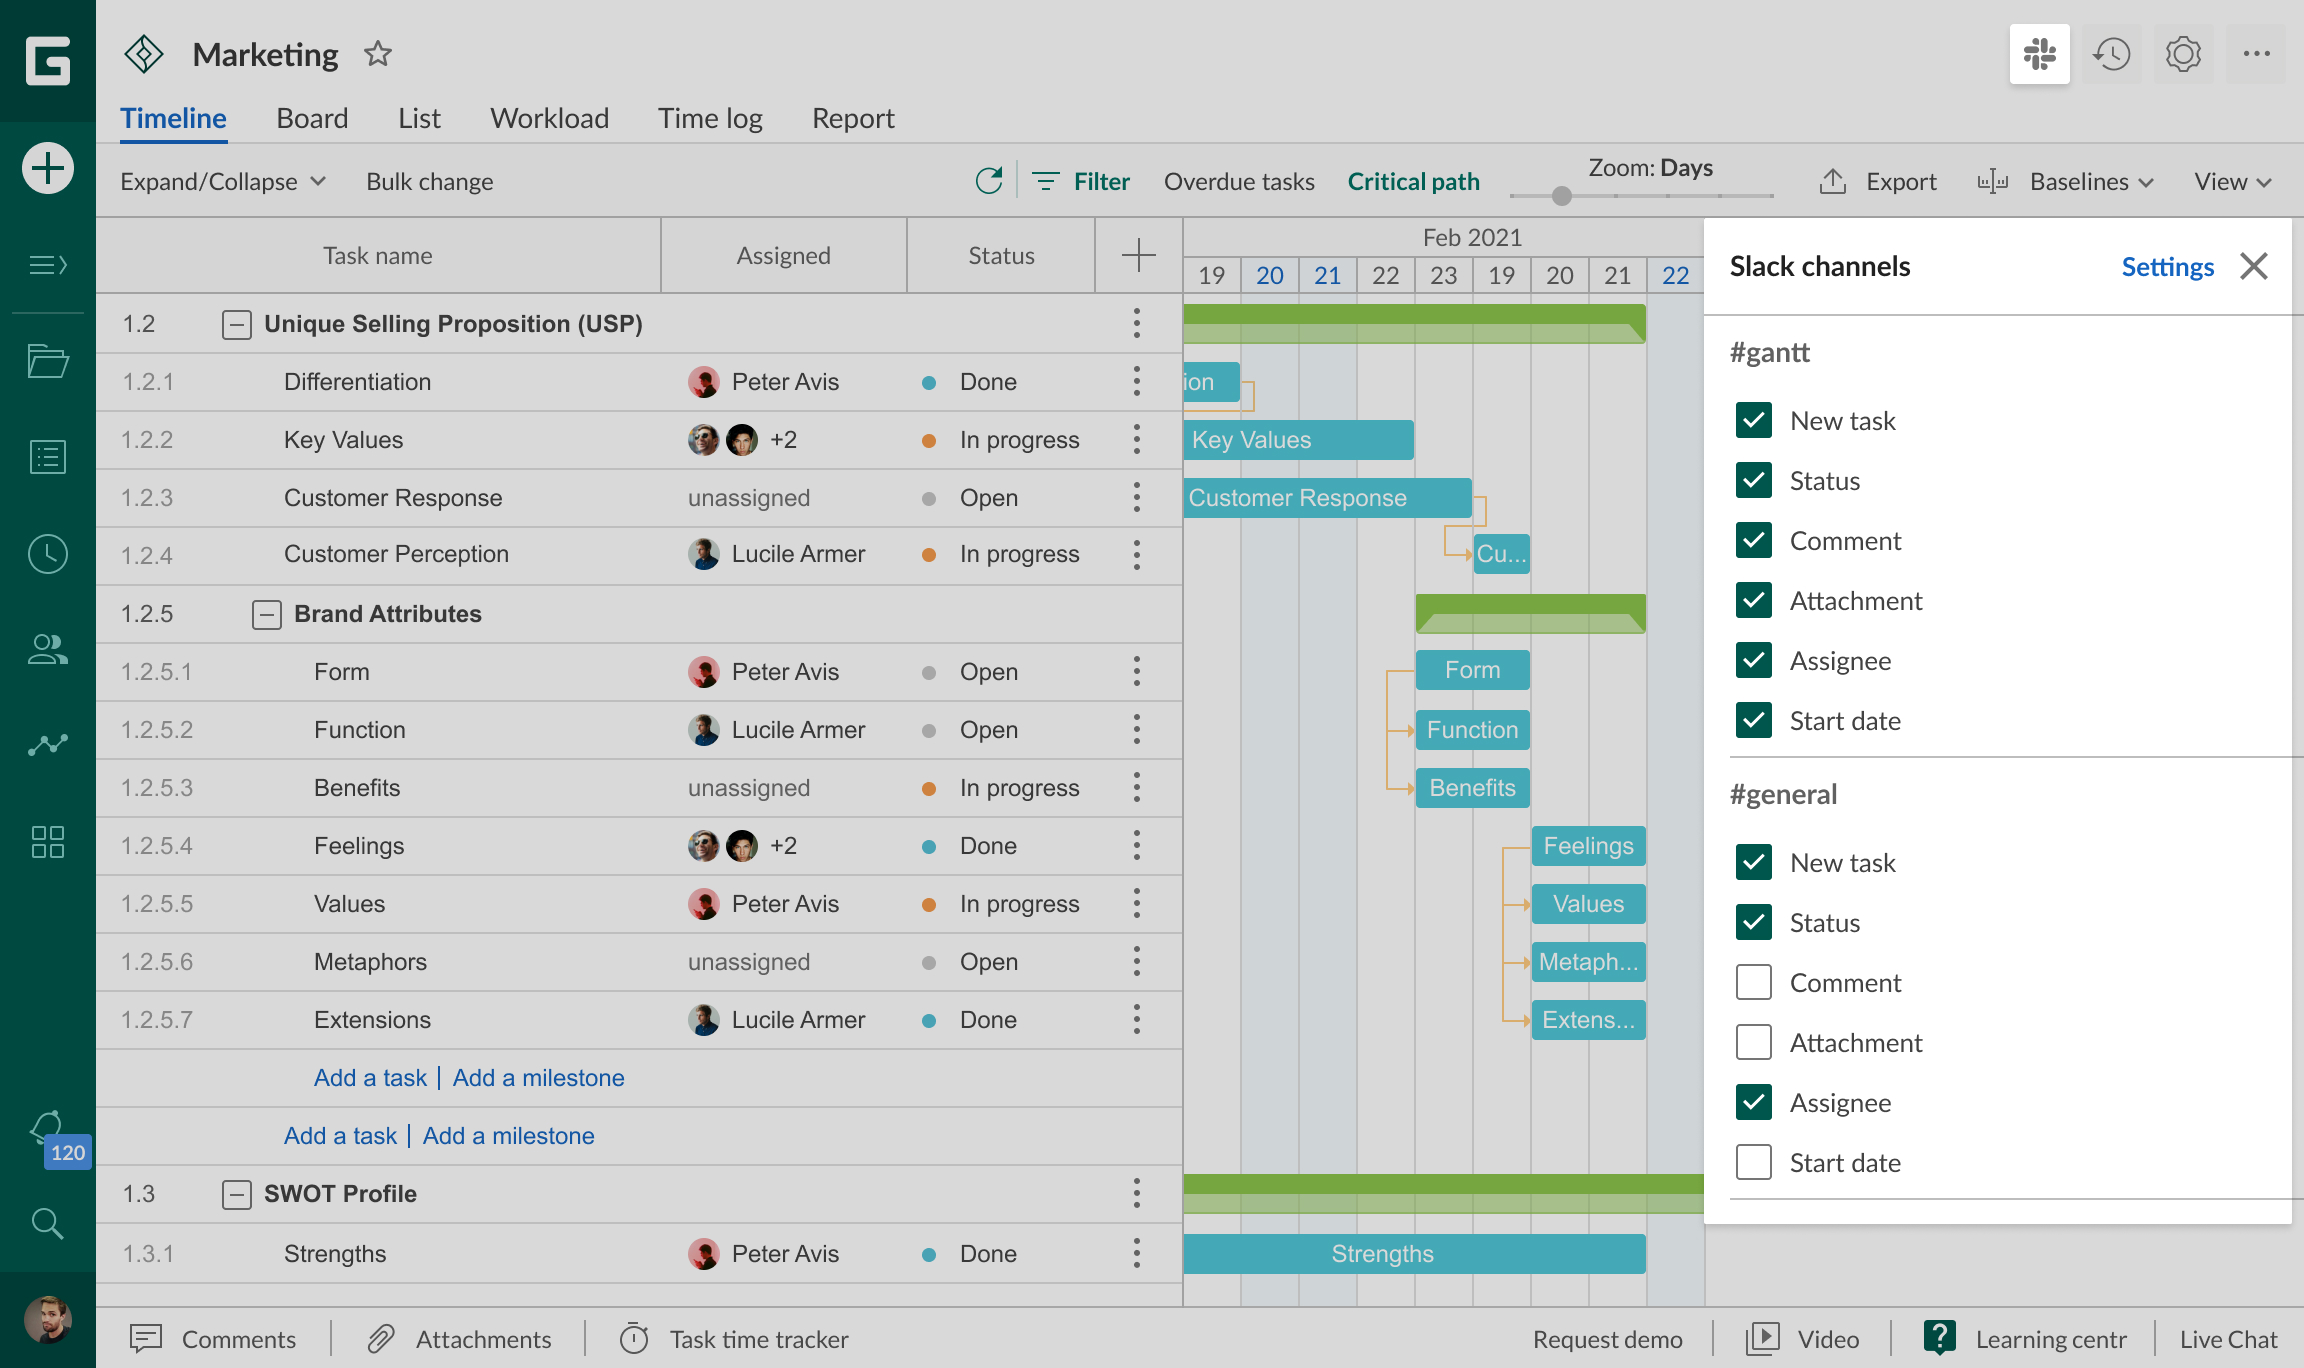
Commands from Slack to GanttPRO
From Slack to GanttPRO, the following commands are available:
- Creating a new task
- Converting a message in Slack into a comment to a task
- Сonverting a message in Slack into a new task
Disabling the integration
To disable the integration, an Owner should go to the window with GanttPRO projects and Slack channels connection and choose “Delete integration”. The integration will be disabled for the account and all users. All connections between GanttPRO projects and Slack channels will be deleted.
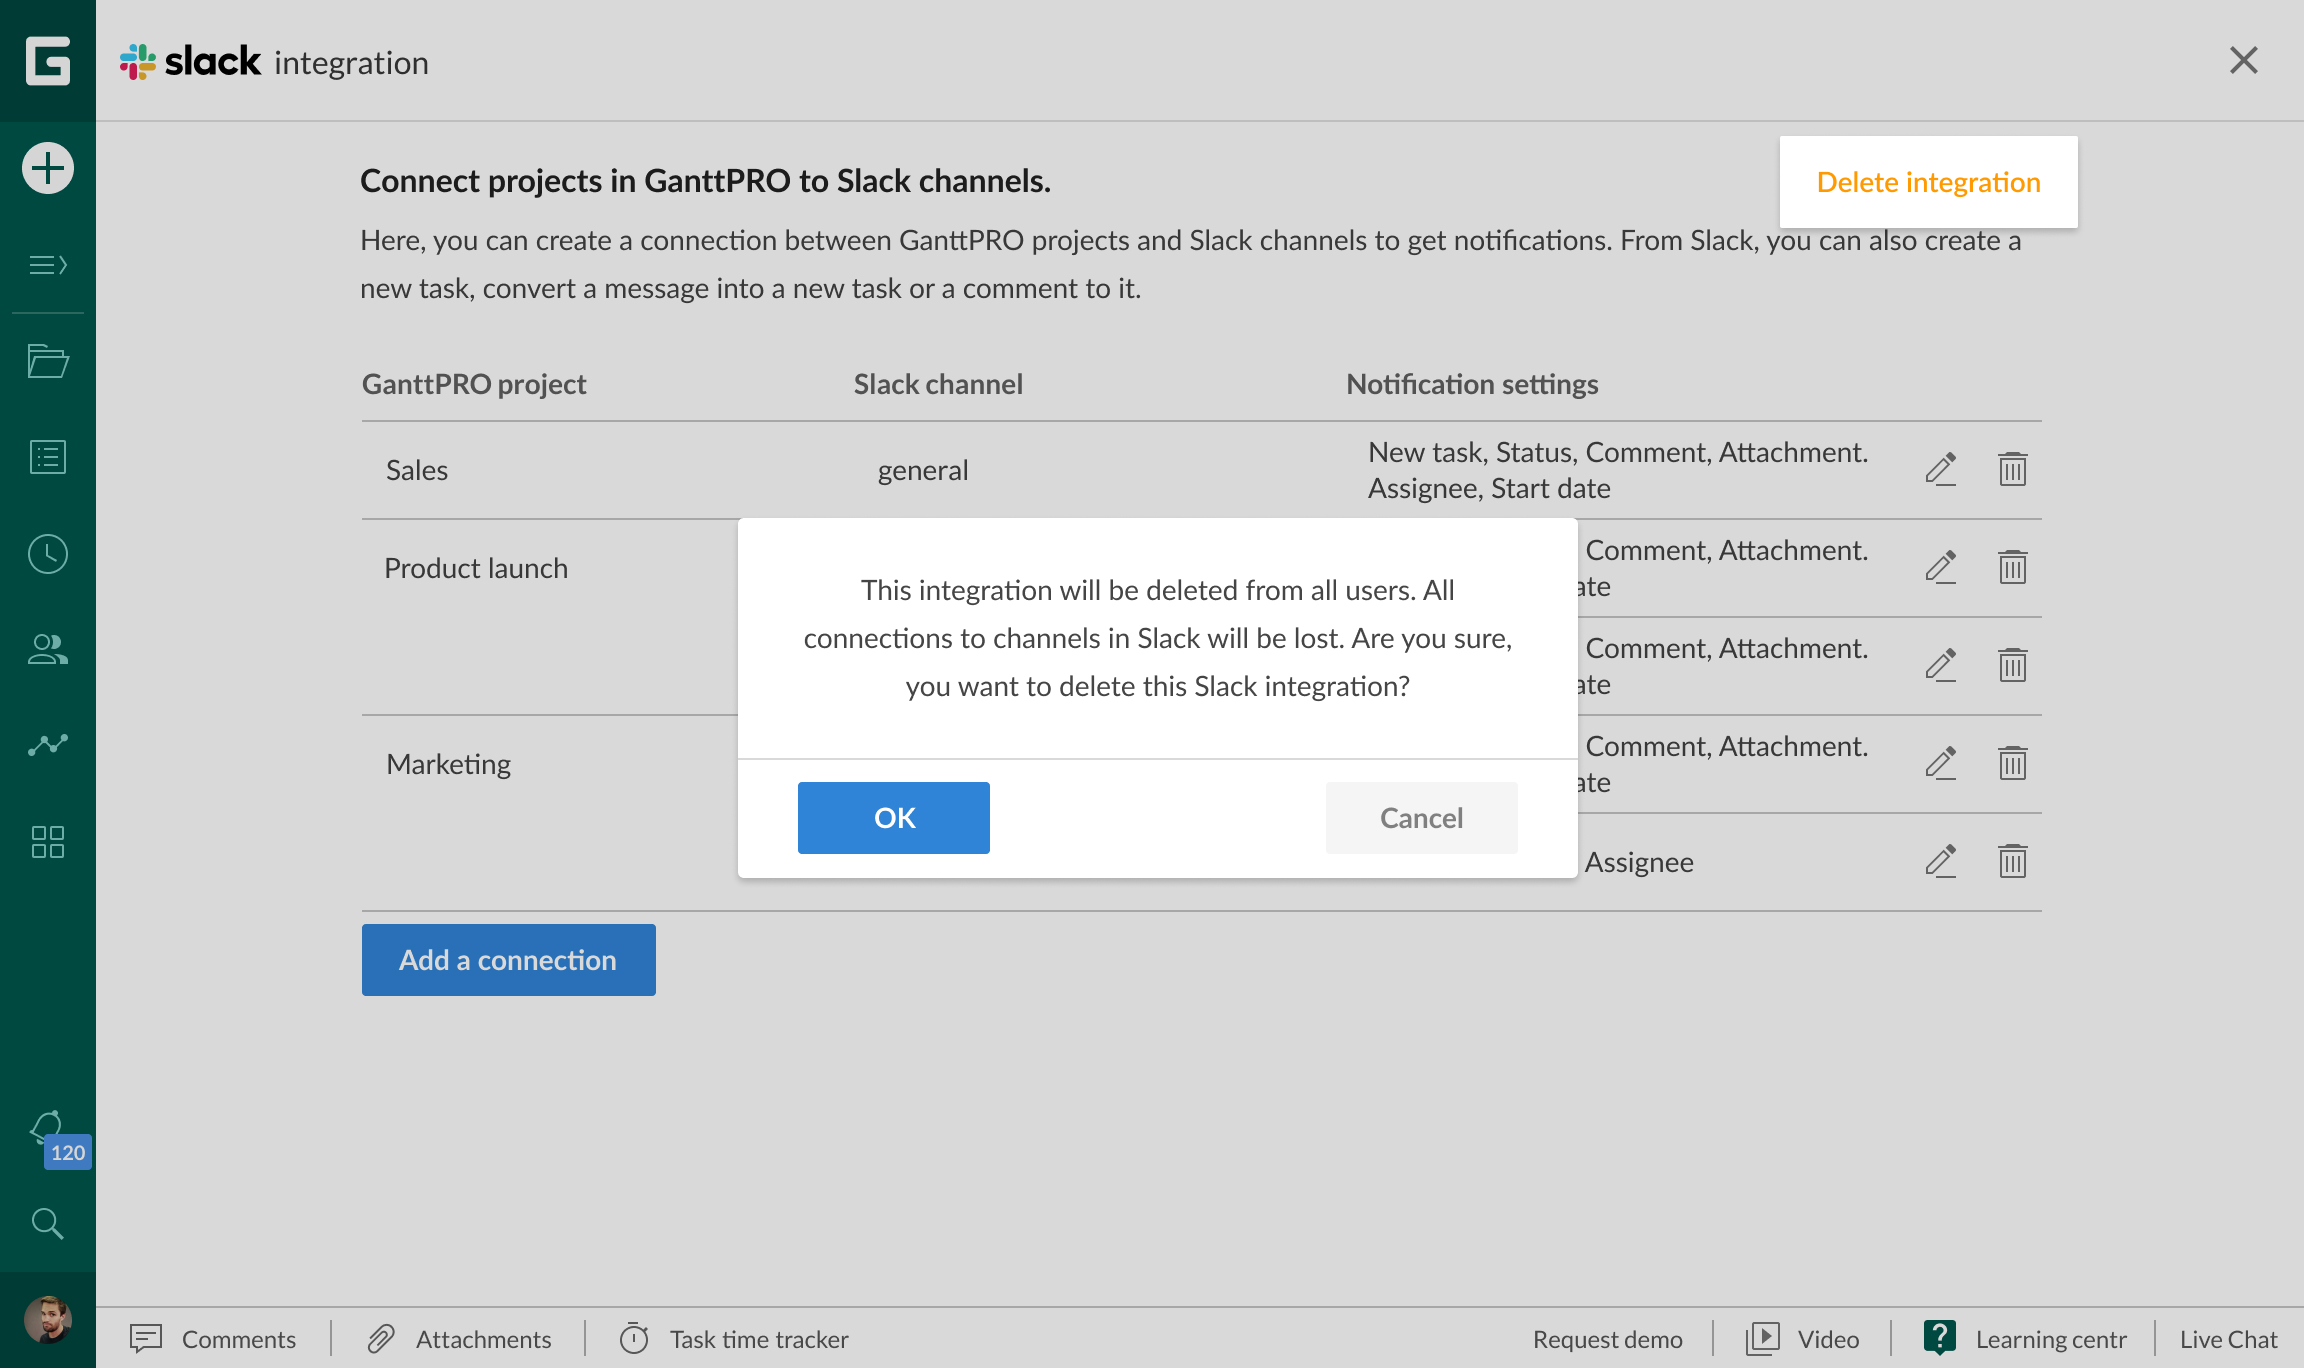
API
API allows developers to safely and securely access information from your GanttPRO account. You can use it to integrate GanttPRO into your existing business processes or extend GanttPRO the way specific for your team.
How to use GanttPRO’s API
Please follow the API documentation to get more details. An API key is required to be able to use an API.
To add a new API key, go to your GanttPRO account’s profile settings, choose Integration and API, and follow the instructions.
Note that you have to be an owner of your GanttPRO team account to generate API keys for your team.
Profile settings → Integration and API.
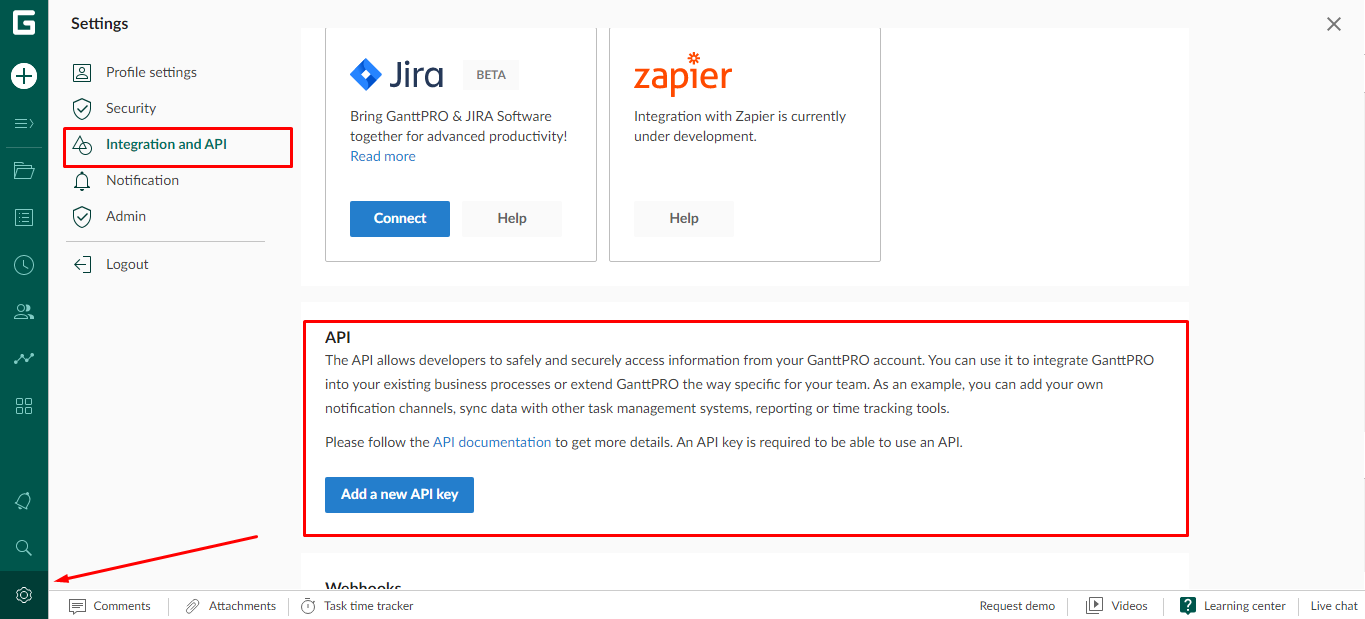
Microsoft Teams
Connecting your GanttPRO account to MS Teams, you will be able to get notifications in MS Teams channels on certain users’ actions in GanttPRO projects, as well as create tasks and comment on them in GanttPRO from Microsoft Teams’ interface.
Connecting GanttPRO to Microsoft Teams
To connect GanttPRO and MS Teams, go to your profile settings, select “Integration and API”, then MS Teams and click “Connect”.
Note that only an account Owner can enable the integration.
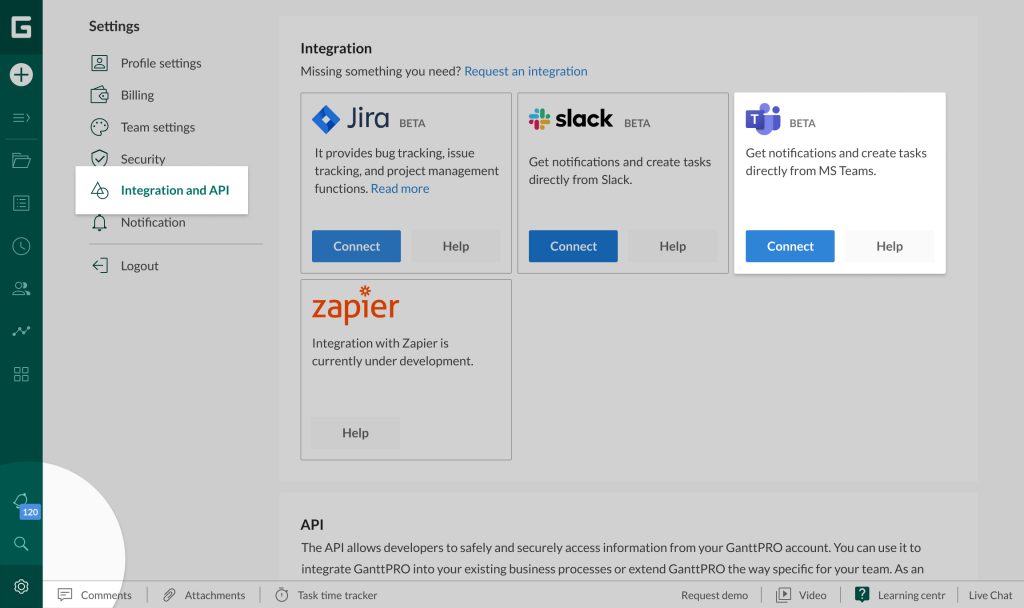
After that, you will see the Microsoft authorization window. There, you can log in, choose an account, and allow GanttPRO to access your MS Teams account.
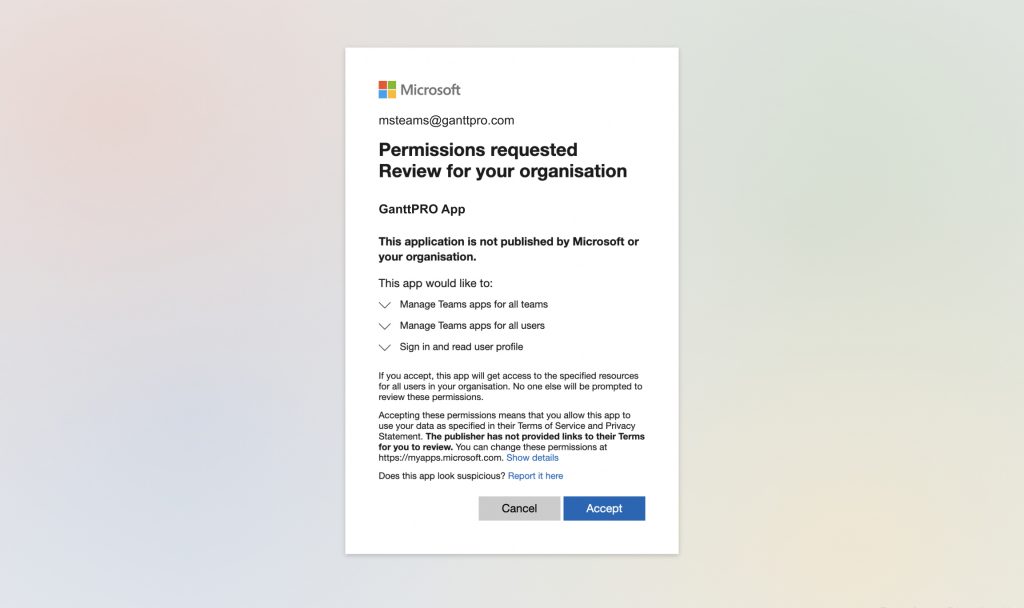
Please note: access to MS Teams account can be granted only by the MS Teams’ users with the “Owner” or “Global Admin” roles or “Application admin” + “Privileged role admin” simultaneously.
Upon successful authorization, the “Connect” button back on the Integration and API page will change to “Settings”.
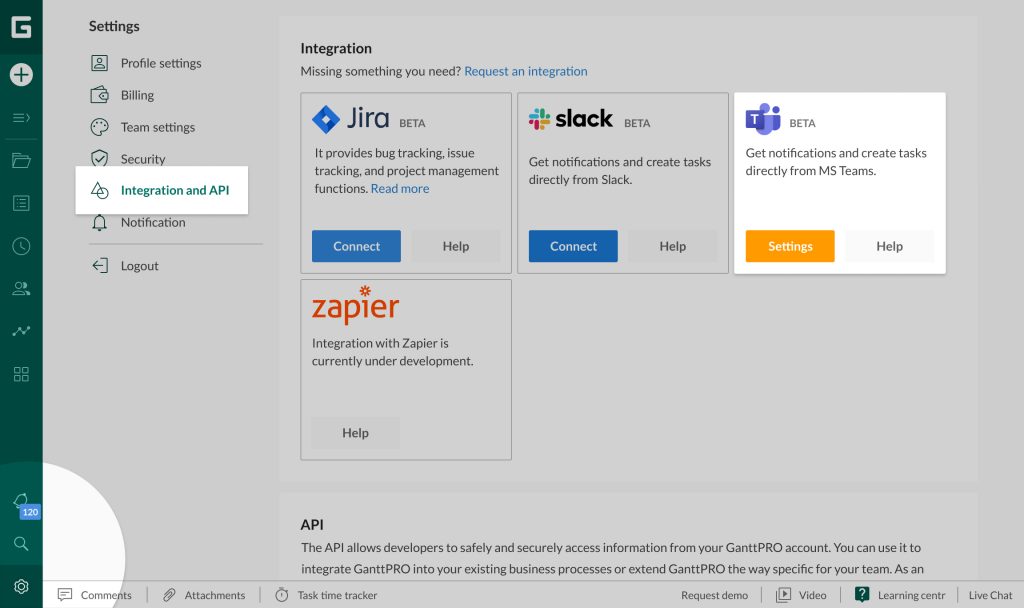
Note that users with the “Admin” and “Member” roles can’t connect the organization’s account in MS Teams that differ from the organization’s account of the Owner.
Connecting GanttPRO projects to Microsoft Teams channels
After setting up the integration, the Owner and Admins will be able to connect projects in GanttPRO to channels in MS Teams to get certain notifications about projects in GanttPRO.
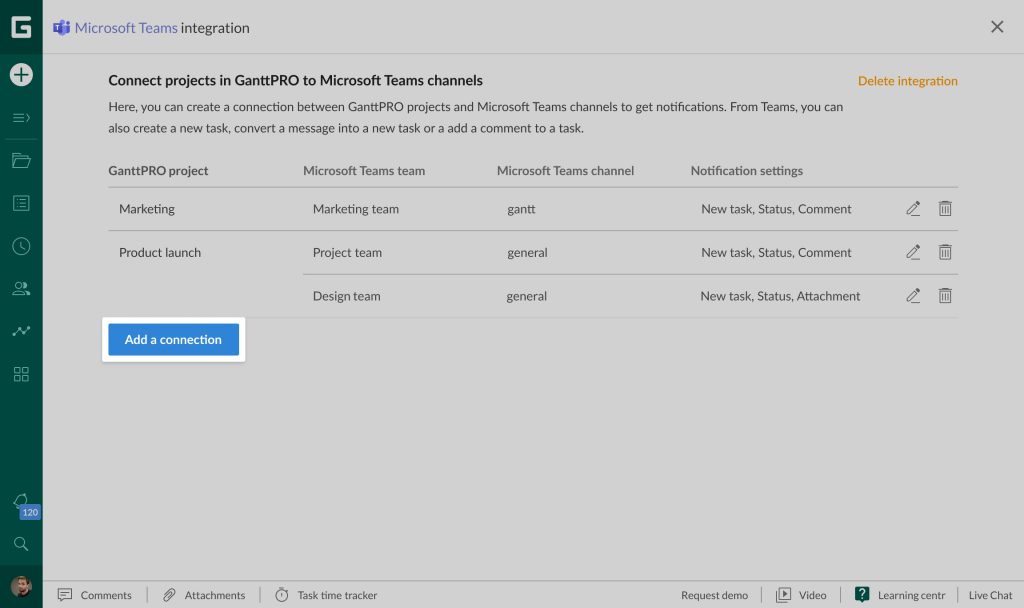
To connect projects in GanttPRO to channels in MS Teams, the Owner or Admin has to click on “Settings” below the MS Teams icon on the Integration and API page in the GanttPRO app and open the Microsoft Teams Integration Tab.
To add a connection, select:
- A project in GanttPRO.
- A team in MS Teams.
- An MS Teams’ channel.
- Types of notifications you want to get in the channel.
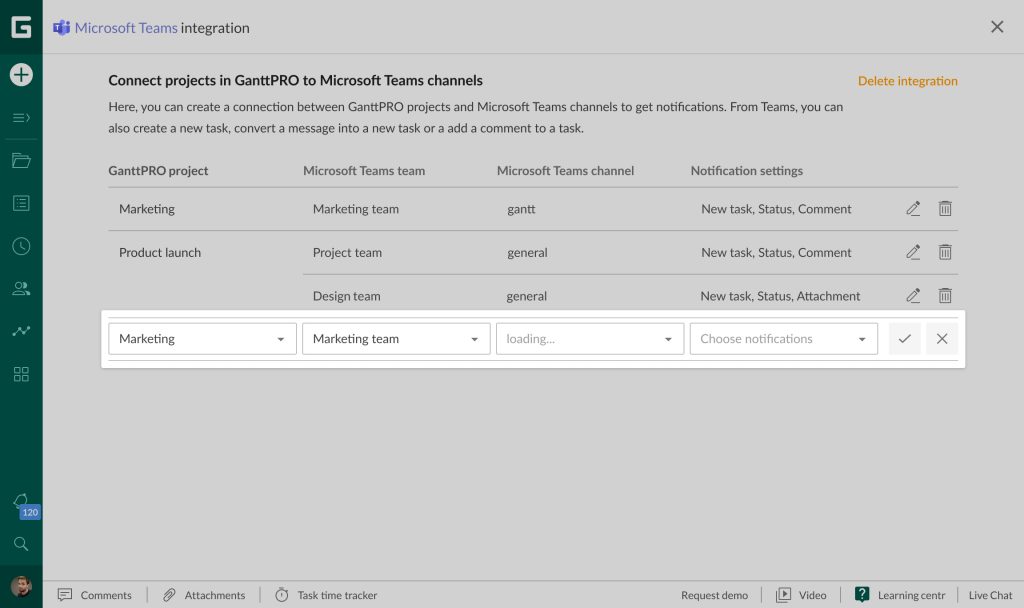
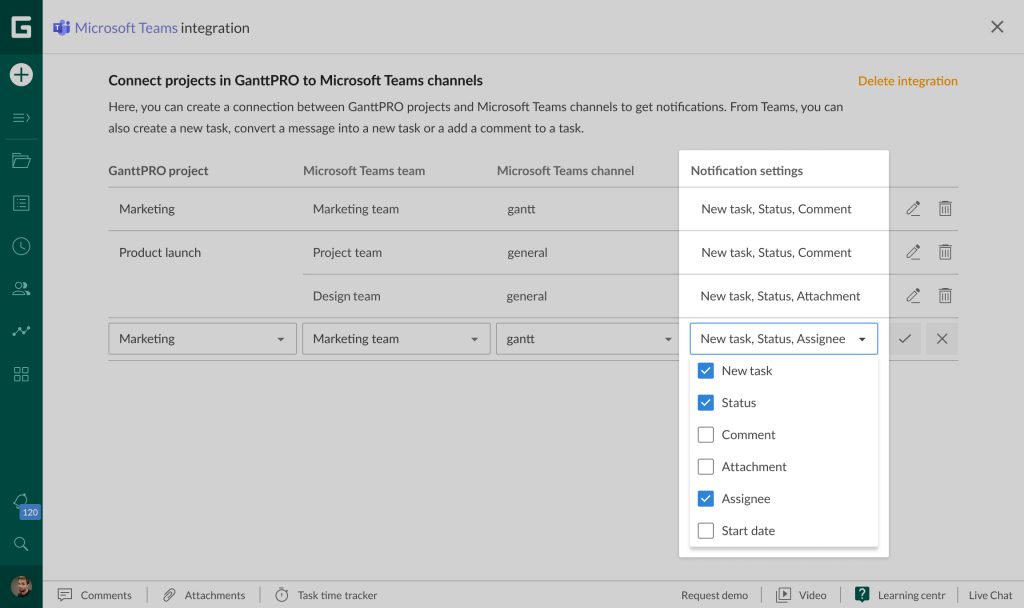
If there were no previous connections in the MS Teams’ team you have chosen, it will take a few seconds to connect.
Notifications from GanttPRO to Microsoft Teams
In MS Teams, you can choose to receive the following notifications from GanttPRO:
- A new task has been created.
- An assignee has been changed.
- A comment to a task has been added.
- An attachment to a task has been made.
- A task status has been updated.
- The start date of a task has been changed.
Commands from Microsoft Teams to GanttPRO
From MS Teams to GanttPRO, you can send the following commands:
- Create a task.
- Adding a comment to a task.
The “Create a task” command allows creating tasks in GanttPRO straight from MS Teams.
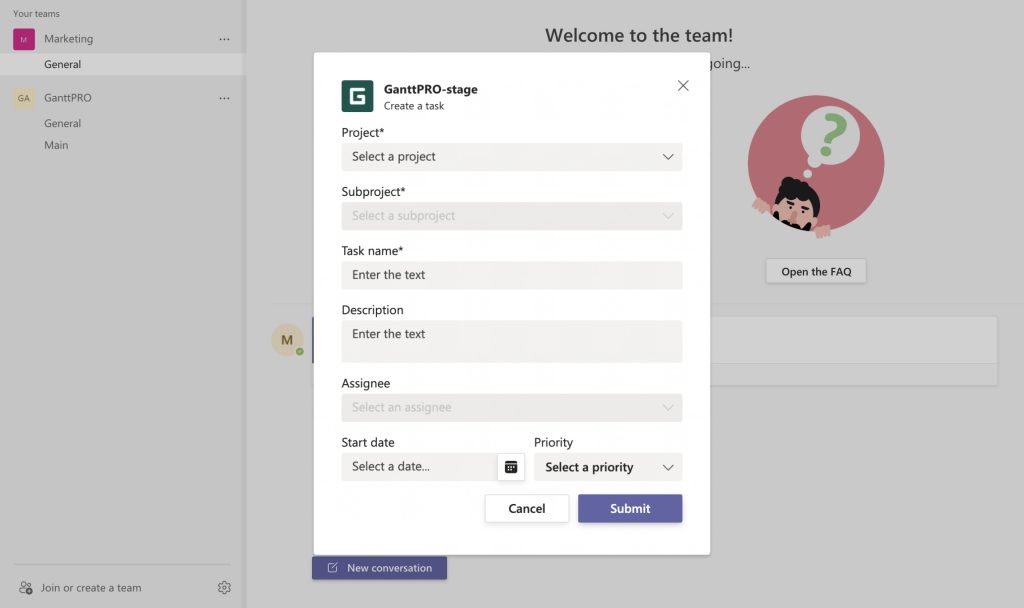
It is possible to work with the “Create a task” command in three ways:
- Clicking on the GanttPRO icon.
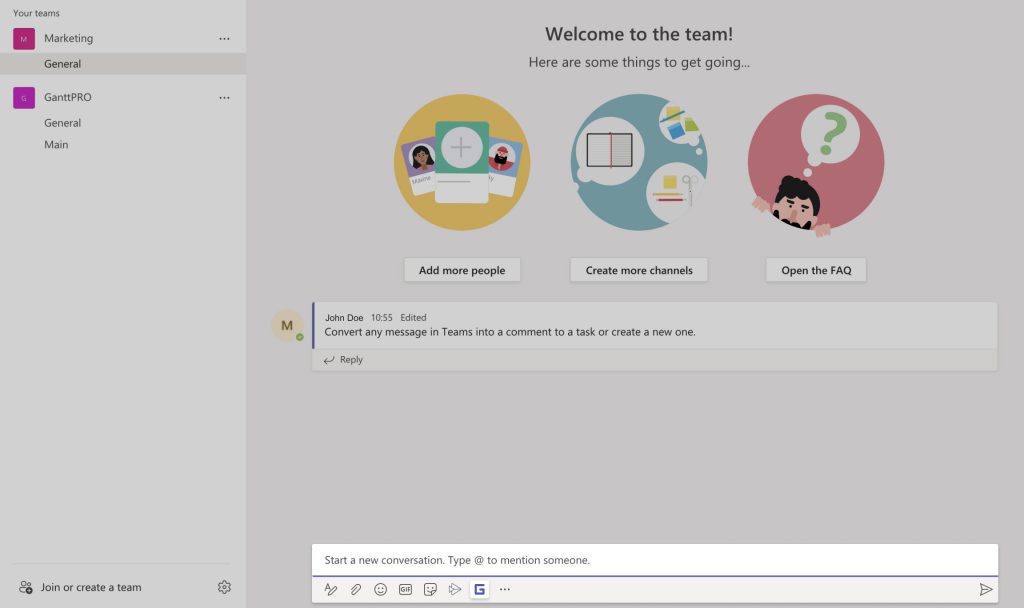
- Using the GanttPRO bot. For this, type @ganttpro in the connected channel.
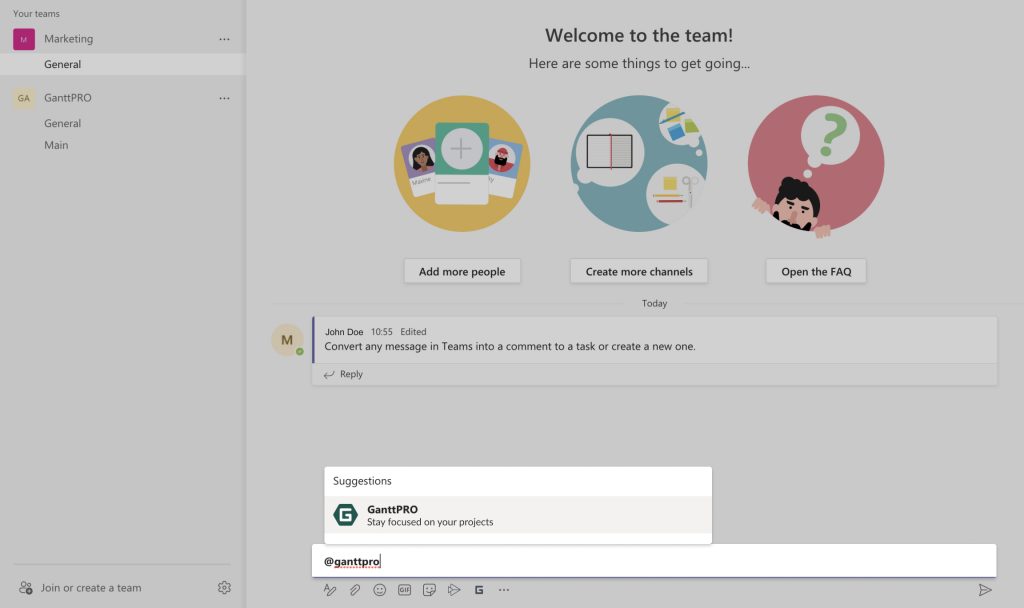
- Using the menu after clicking on the three dots button above the message field.
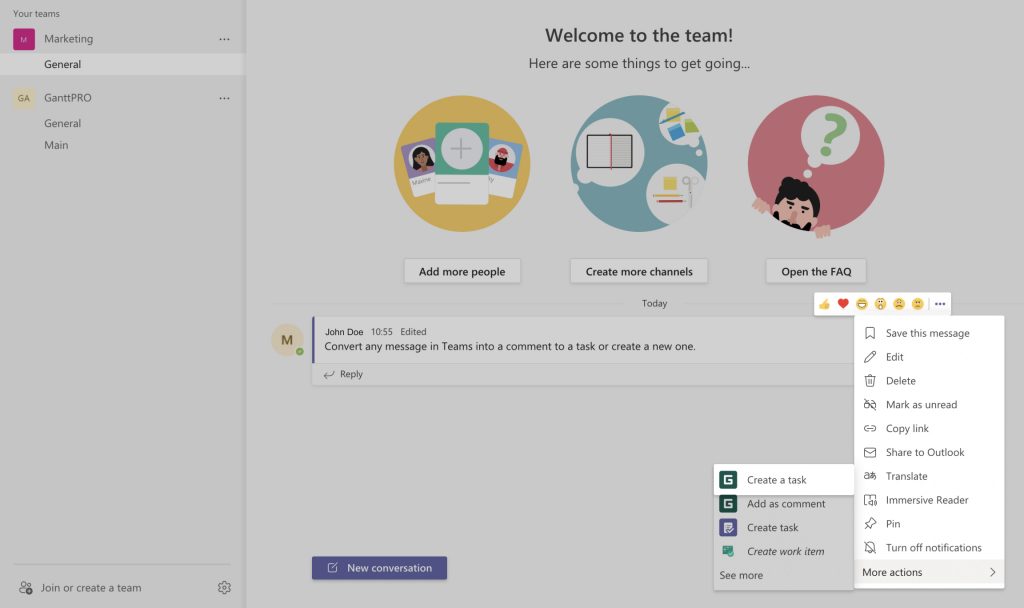
With the “Add as a comment” command, you can add messages from MS Teams as comments to tasks in GanttPRO.
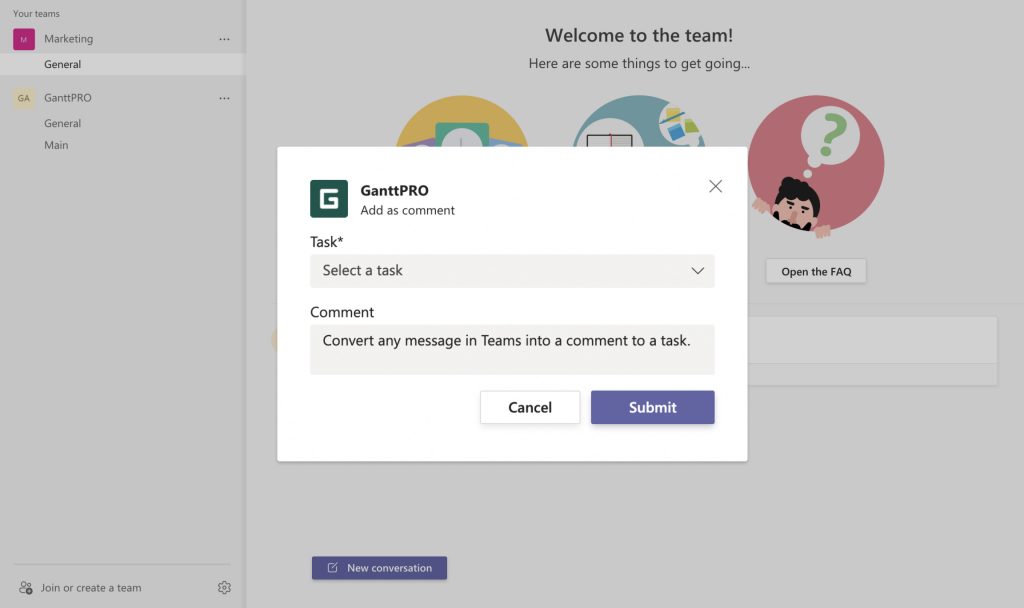
To do this, just click on the three dots button above the message field and type your comment.

Disabling the integration
An Owner can disable the integration for the whole account on the page where it has been created by choosing “Delete integration”. After that, it will be completely disabled and won’t be available for Members and Admins.
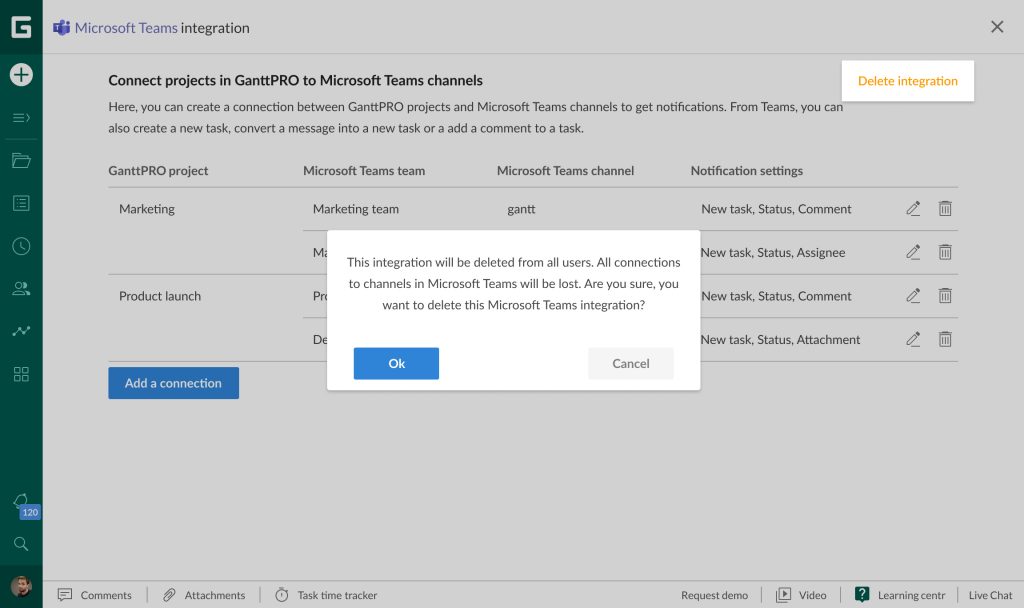
Admins and Members can disable integration locally (within their accounts). In that case, they will no longer be able to establish connections, and use the “Create a task” and “Add a comment” commands in MS Teams.
Security
Two-factor authentication
Two-factor authentication, also known as 2-step verification, 2FA or MFA, adds an extra layer of security to your GanttPRO account. It is one of the best precautions against cyberattacks.
At GanttPRO, we implement a Time-based One Time Password (TOTP) algorithm, an approved standard of the Internet Engineering Task Force (IETF). It requires two factors to authenticate your main password and security code (one-time password).
Why do you need 2FA?
If a user’s password is stolen or compromised, an attacker cannot gain access without the TOTP, which expires quickly.
How to implement 2FA?
You can activate 2FA in your GanttPRO account’s profile settings in the left bottom corner.
Profile settings → Security.
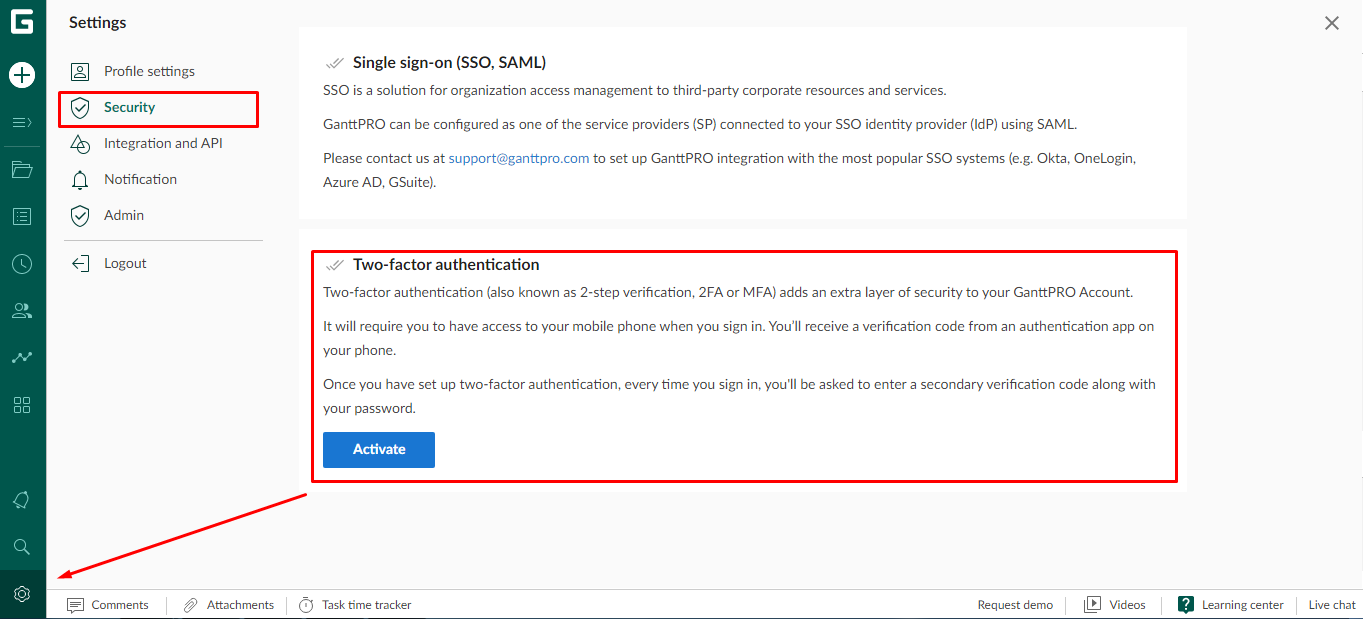
To get a one-time password, you need TOTP supported mobile app to be installed on your phone when you sign in. You’ll receive a verification code from an authentication app on your phone.
Once you have set up two-factor authentication, every time you sign in, you’ll be asked to enter a secondary verification code along with your password.
To make your account safer, only three steps are required:
– Download an authenticator app. It can be Google authenticator (IOS, Android) for your phone or tablet. You can also use Microsoft Authenticator, Authy, Duo, or any other TOTP apps of your choice.
– Scan the QR code. You will be able to scan the image in your profile settings with the help of an authentication app and your phone’s camera.
– Enable two-factor authentication. Enter the 6-digit verification code from the app.
Single sign-on
Single sign-on is a solution for organization access management to third-party corporate resources and services.
SAML and SSO are important to any enterprise cybersecurity strategy. Identity management best practices require user accounts to be both limited to only the resources the user needs to do their job and to be audited and managed centrally. By using an SSO solution, you can disable accounts from one system and remove access to all available resources, including GanttPRO, at once, what protects your data from theft.
How to set up integrations with SSO systems
Please contact us at support@ganttpro.com to set up GanttPRO integration with the most popular SSO systems (e.g. Okta, OneLogin, Azure AD, GSuite).